8 Healthy Snacks for School Ideas
Packing healthy snacks for school doesn’t have to feel like solving a puzzle! As a mom who’s been through countless lunch-packing mornings, I’ve discovered that the secret to happy kids and stress-free mornings is having go-to healthy snacks that are both nutritious and actually get eaten.
These 10 healthy snacks for school ideas have saved me time, money, and those dreaded “Mom, I’m still hungry” texts. They’re simple, wholesome, and designed to keep your little ones energized through their busy school days without the sugar crash.
What Are Healthy Snacks for School?
Ever wonder why some snacks disappear from lunchboxes while others come home untouched? Healthy snacks for school are those magical combinations of nutrients that kids actually enjoy eating! They’re packed with protein, fiber, and natural energy—not artificial colors or mystery ingredients.
Think of them as tiny fuel stations for growing bodies and busy brains. After all, they say the way to a child’s heart (and focus) is through nutritious, delicious snacks. Ready to transform your snack-packing routine?
Why You’ll Love These Healthy Snacks for School
Budget-Friendly Nutrition
Making snacks at home costs a fraction of pre-packaged alternatives. You’ll save hundreds of dollars each school year while knowing exactly what your kids are eating.
Real Energy, No Sugar Crashes
These snacks combine complex carbs, protein, and healthy fats to keep energy levels steady. No more afternoon meltdowns from sugar highs and lows!
Kid-Tested, Parent-Approved
Every snack on this list has been battle-tested with real kids. They’re fun to eat, easy to pack, and actually make it into hungry bellies instead of the trash. Plus, many can be prepared ahead on Sunday for grab-and-go convenience all week.
If you love meal prep strategies, you’ll want to explore batch-cooking tips that make weekday mornings effortless. Let’s dive into these game-changing snack ideas!
How to Make These 10 Healthy Snacks for School
Quick Overview
These snacks are designed for busy families! Most require 10 minutes or less of prep time, with many needing zero cooking. They’re portable, mess-free, and school-policy friendly (nut-free options included). Each snack provides a balance of nutrients to keep kids satisfied and focused.
Prep Time: 5-15 minutes per snack
Storage: Most last 3-5 days refrigerated
Serving Size: 1-2 snacks per child daily
1. Energy-Boosting Trail Mix Cups
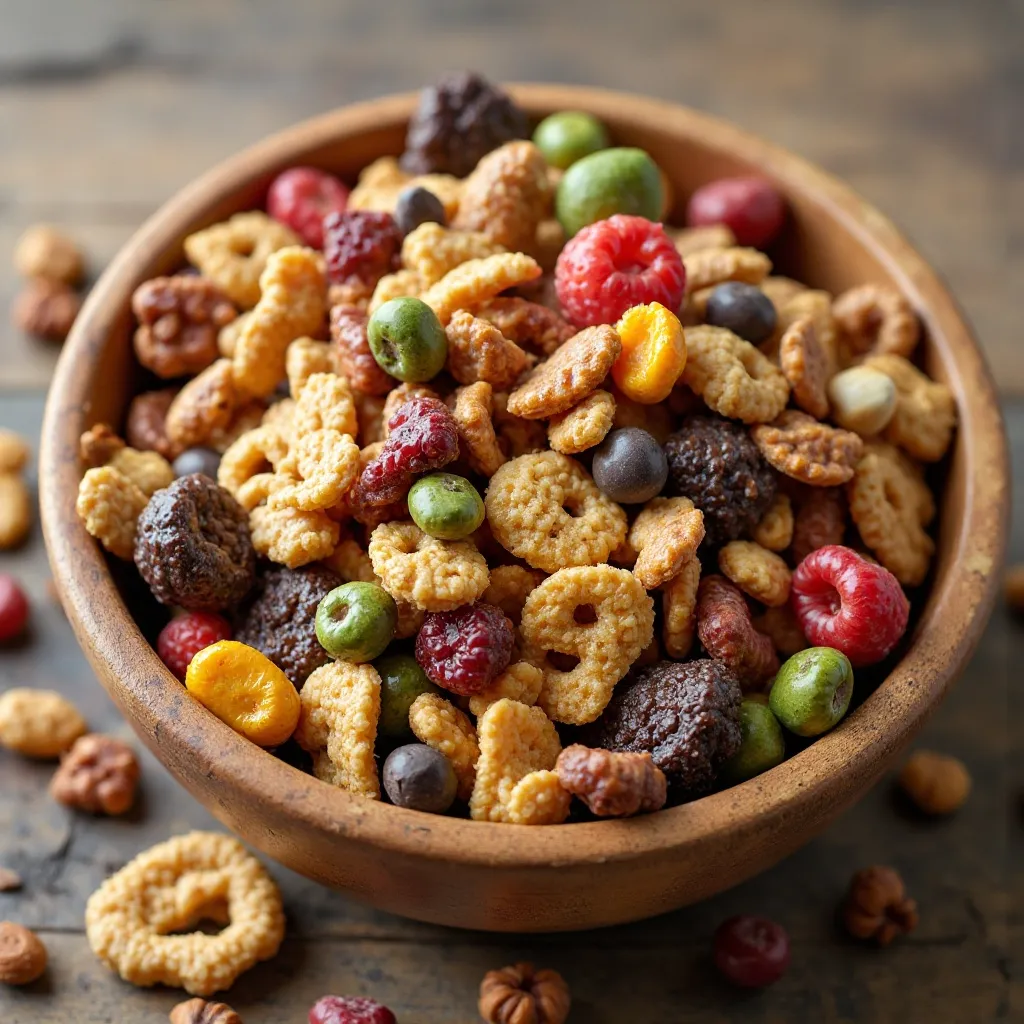
What Makes This Special
Trail mix cups are completely customizable and can be made allergen-free for any school requirements. They provide sustained energy without artificial ingredients.
Key Ingredients for Trail Mix Cups
- 1 cup whole grain cereal (like Cheerios or Chex)
- ½ cup dried cranberries or raisins
- ½ cup sunflower seeds or pumpkin seeds (nut-free option)
- ¼ cup mini chocolate chips (optional)
- ¼ cup coconut flakes
- Small reusable containers or snack bags
Step-by-Step Instructions
Step 1: In a large mixing bowl, combine all your dry ingredients. Let your kids help measure—it makes them more excited to eat it later!
Step 2: Mix everything together thoroughly, ensuring even distribution of each ingredient.
Step 3: Portion into individual containers, about ½ cup per serving. This makes grab-and-go mornings so much easier.
Step 4: Seal containers tightly and store in a cool, dry place. These stay fresh for up to 2 weeks.
Step 5: Pack with an ice pack if including chocolate chips on warm days.
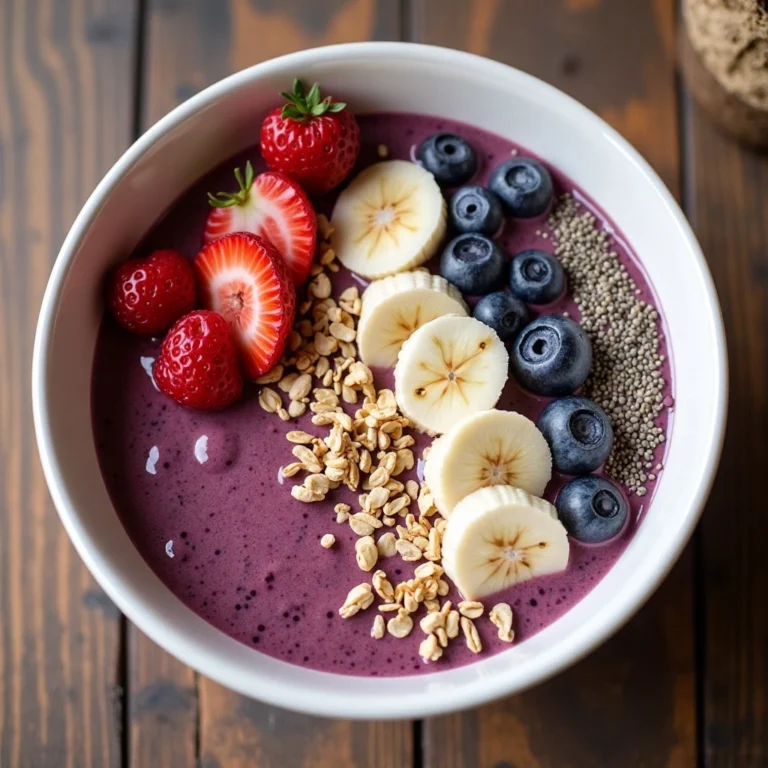
2. Homemade Fruit & Yogurt Parfaits
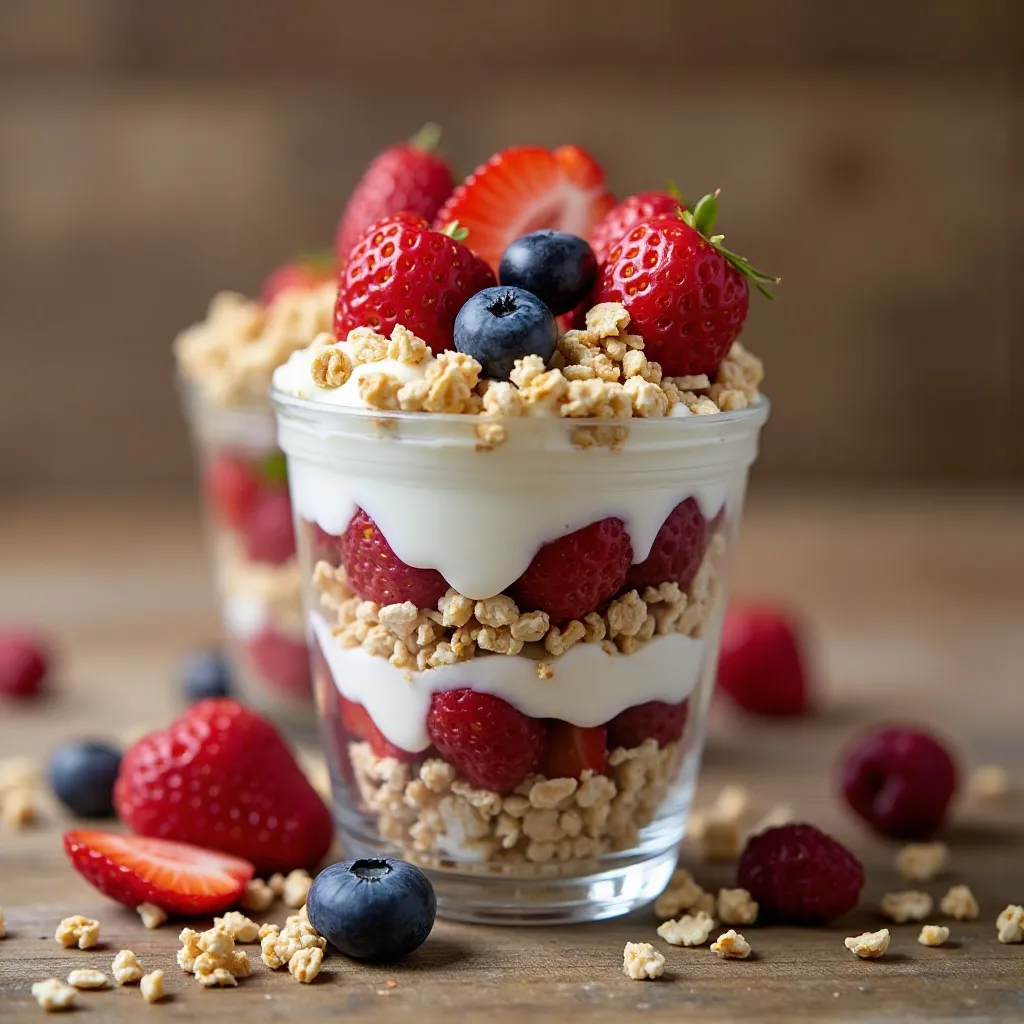
What Makes This Special
Parfaits feel like dessert but deliver serious nutrition! Layers of creamy yogurt, fresh fruit, and crunchy granola create a satisfying texture combination kids love.
Key Ingredients for Fruit & Yogurt Parfaits
- 2 cups plain Greek yogurt (or vanilla for sweeter taste)
- 1 cup fresh berries (strawberries, blueberries, or raspberries)
- ½ cup granola (look for low-sugar options)
- 2 tablespoons honey or maple syrup (optional)
- Small mason jars or parfait containers with lids
Step-by-Step Instructions
Step 1: If using plain yogurt, stir in honey or maple syrup to taste. Greek yogurt provides extra protein to keep kids full longer.
Step 2: Wash and prepare fruit. Slice strawberries, leave blueberries whole, and gently rinse raspberries.
Step 3: Layer ingredients in containers: Start with 2-3 tablespoons yogurt on the bottom.
Step 4: Add a layer of fresh fruit, then a sprinkle of granola.
Step 5: Repeat layers until the container is full, ending with granola on top for maximum crunch.
Step 6: Seal tightly and refrigerate. These stay fresh for 2-3 days when stored properly.
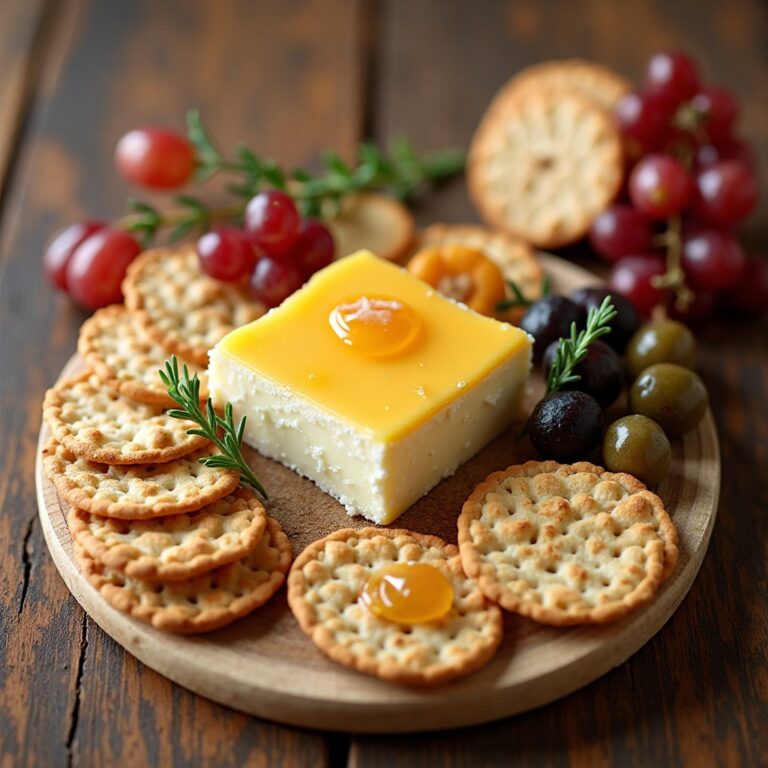
3. Cheese and Whole Grain Crackers
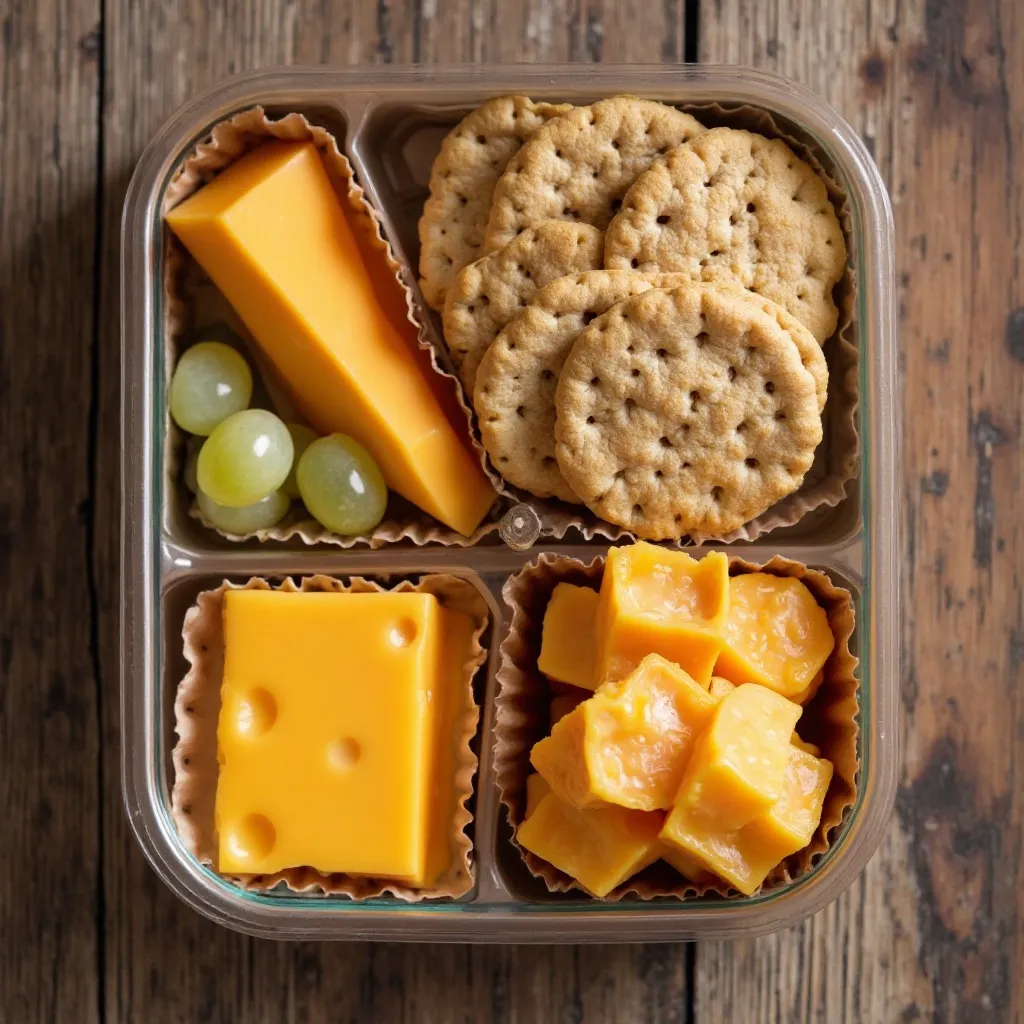
What Makes This Special
This timeless combination provides calcium, protein, and complex carbohydrates. It’s simple but incredibly satisfying and travels well.
Key Ingredients for Cheese and Crackers
- 8 oz block of cheese (cheddar, mozzarella, or Colby Jack)
- 1 box whole grain crackers (look for options with 3g+ fiber)
- Optional: grapes or apple slices for added freshness
Step-by-Step Instructions
Step 1: Cut cheese into bite-sized cubes or use a fun cookie cutter to make shapes. Kids are more likely to eat food that looks fun!
Step 2: Portion crackers into small bags or containers, about 8-10 crackers per serving.
Step 3: Pack cheese separately in a small container to prevent the crackers from getting soggy.
Step 4: Include an ice pack to keep cheese at safe temperatures, especially in warmer months.
Step 5: Add a few grapes or apple slices for color, natural sweetness, and extra vitamins.
4. Apple Slices with Sunflower Seed Butter
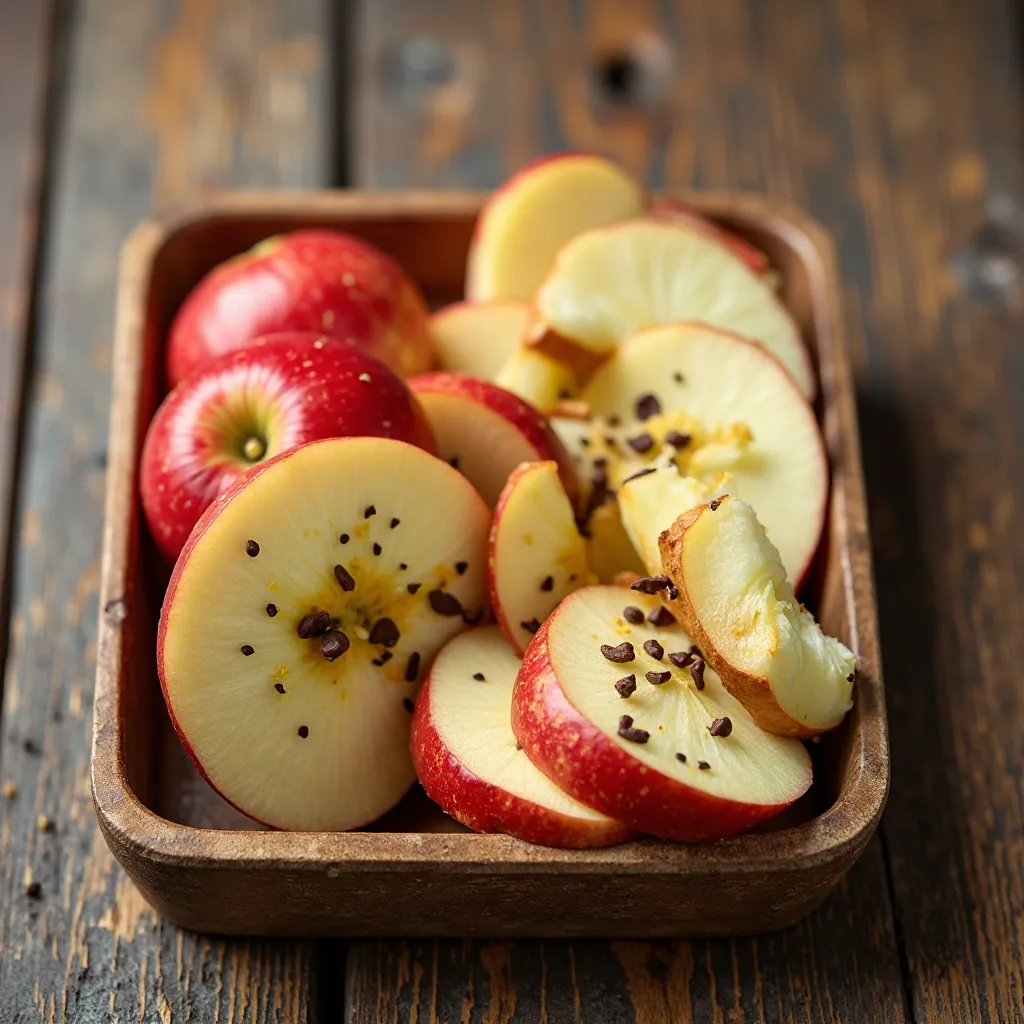
What Makes This Special
This nut-free alternative to the classic apple and peanut butter combination is school-safe and equally delicious. The healthy fats in sunflower seed butter help absorb the vitamins in apples.
Key Ingredients for Apple Slices with Seed Butter
- 2-3 medium apples (Honeycrisp, Gala, or Fuji work best)
- ½ cup sunflower seed butter
- 1 tablespoon lemon juice
- Optional: mini chocolate chips or raisins for topping
Step-by-Step Instructions
Step 1: Fill a bowl with cold water and add lemon juice. This prevents apple slices from turning brown.
Step 2: Wash apples thoroughly. Core and slice them into wedges, about 8 slices per apple.
Step 3: Immediately place apple slices in the lemon water for 3-5 minutes.
Step 4: Drain apple slices and pat dry with paper towels. Pack them in an airtight container.
Step 5: Portion sunflower seed butter into small containers (2 tablespoons per serving).
Step 6: For extra fun, sprinkle mini chocolate chips or raisins on the seed butter for a special treat.
5. Banana Oat Energy Bites

What Makes This Special
These no-bake bites taste like cookies but are packed with wholesome ingredients. They’re naturally sweet, portable, and give kids the energy boost they need.
Key Ingredients for Banana Oat Energy Bites
- 2 ripe bananas, mashed
- 2 cups old-fashioned oats
- ¼ cup honey or maple syrup
- ½ cup mini chocolate chips
- 1 teaspoon vanilla extract
- ½ teaspoon cinnamon
- Pinch of salt
Step-by-Step Instructions
Step 1: Preheat your oven to 350°F (175°C). Line a baking sheet with parchment paper.
Step 2: In a large bowl, mash bananas until smooth using a fork.
Step 3: Add oats, honey, vanilla extract, cinnamon, and salt. Mix until everything is well combined and sticky.
Step 4: Fold in chocolate chips gently, distributing them evenly throughout the mixture.
Step 5: Using a cookie scoop or spoon, form mixture into 1-inch balls. Place them on the prepared baking sheet.
Step 6: Bake for 15-18 minutes until edges are lightly golden. They’ll firm up as they cool.
Step 7: Let cool completely before storing in an airtight container. These last 5-7 days at room temperature.
6. Mini Bell Pepper Nachos
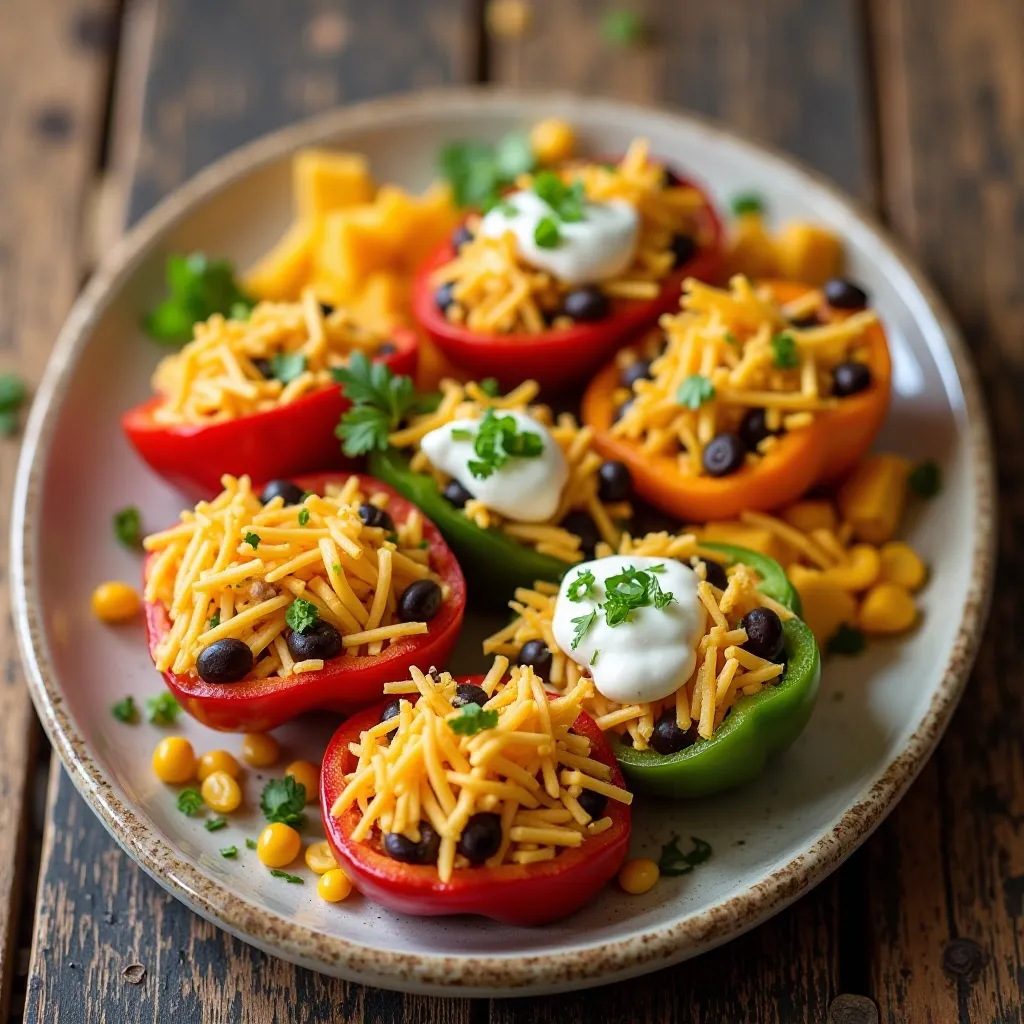
What Makes This Special
These colorful “boats” turn vegetables into a fun, interactive snack. Kids love the crunch and the fact that they can eat them with their hands!
Key Ingredients for Bell Pepper Nachos
- 4 mini bell peppers (or 2 large peppers, cut in half)
- ½ cup shredded cheddar cheese
- ¼ cup black beans, drained and rinsed
- ¼ cup corn kernels
- 2 tablespoons Greek yogurt or sour cream
- Optional: diced tomatoes, mild salsa
Step-by-Step Instructions
Step 1: Wash bell peppers and cut them in half lengthwise. Remove seeds and membranes.
Step 2: Arrange pepper halves on a microwave-safe plate, cut side up.
Step 3: Fill each pepper half with a spoonful of black beans and corn.
Step 4: Sprinkle shredded cheese generously over the filling.
Step 5: Microwave for 30-45 seconds until cheese melts. Alternatively, bake at 375°F for 8-10 minutes.
Step 6: Let cool slightly, then add a small dollop of Greek yogurt on top.
Step 7: Pack in containers once cooled. These can be eaten cold or at room temperature.
7. Homemade Popcorn Mix
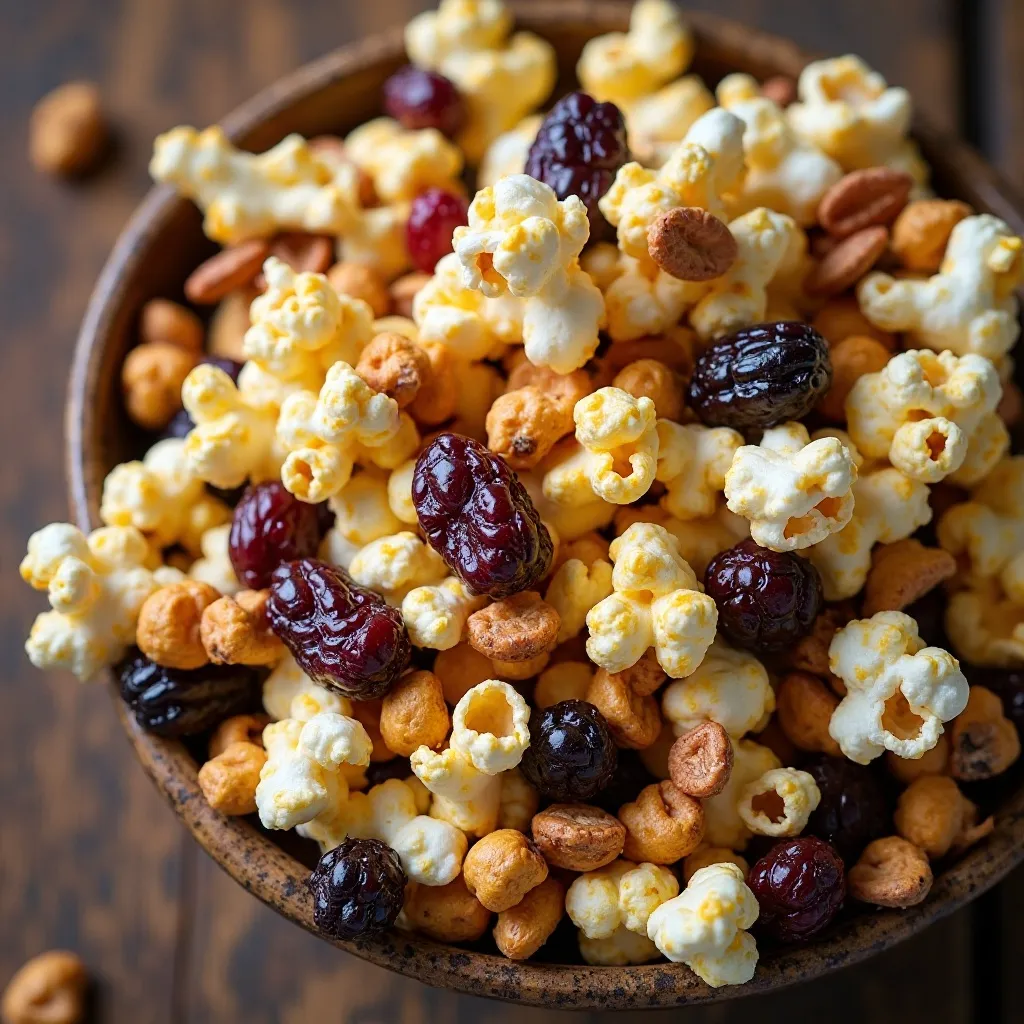
What Makes This Special
Air-popped popcorn is a whole grain that’s naturally low in calories but high in fiber. Mixed with seeds and dried fruit, it becomes a satisfying, crunchy snack.
Key Ingredients for Popcorn Mix
- 6 cups air-popped popcorn
- ½ cup roasted chickpeas
- ⅓ cup pumpkin seeds
- ⅓ cup dried cranberries or cherries
- 1 tablespoon olive oil or melted coconut oil
- ½ teaspoon sea salt
- Optional: ¼ teaspoon garlic powder or nutritional yeast
Step-by-Step Instructions
Step 1: Pop popcorn using an air popper or stovetop method. Avoid microwave popcorn with artificial flavors.
Step 2: Spread popcorn on a large baking sheet. Remove any unpopped kernels—these are choking hazards!
Step 3: In a small bowl, mix olive oil with sea salt and any optional seasonings.
Step 4: Drizzle the seasoned oil over popcorn and toss gently to coat.
Step 5: Add roasted chickpeas, pumpkin seeds, and dried fruit. Mix everything together thoroughly.
Step 6: Portion into individual bags or containers. This mix stays fresh for up to 1 week when stored in an airtight container.
8. Frozen Yogurt Bark with Berries
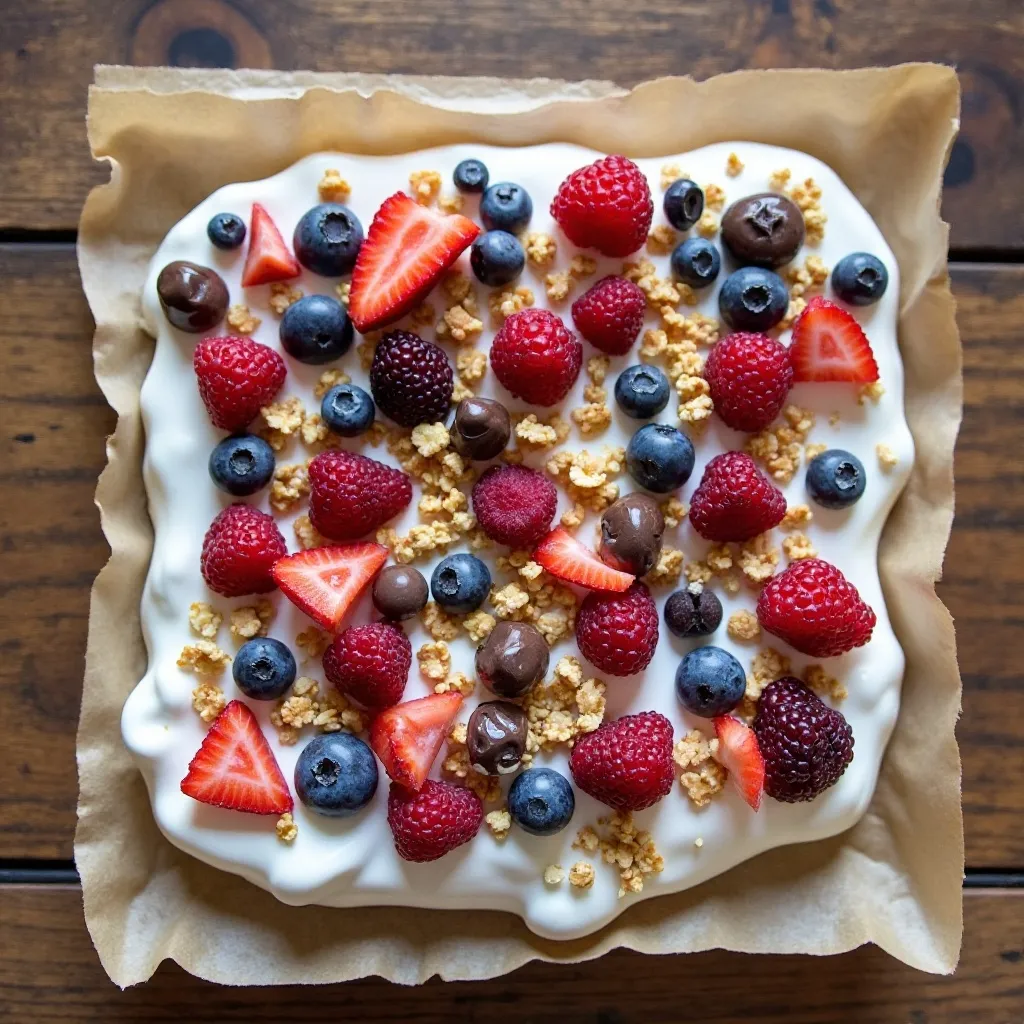
What Makes This Special
This snack feels like a special treat but it’s incredibly healthy! The frozen texture is refreshing, and it’s perfect for satisfying sweet cravings.
Key Ingredients for Yogurt Bark
- 2 cups Greek yogurt (plain or vanilla)
- 2 tablespoons honey
- 1 cup mixed berries (blueberries, raspberries, sliced strawberries)
- 2 tablespoons granola
- Optional: mini chocolate chips, coconut flakes
Step-by-Step Instructions
Step 1: Line a baking sheet or shallow dish with parchment paper.
Step 2: In a bowl, mix Greek yogurt with honey until smooth and well combined.
Step 3: Spread yogurt mixture evenly on the prepared baking sheet, about ¼-inch thick.
Step 4: Scatter berries, granola, and any optional toppings evenly across the yogurt surface. Press them gently so they stick.
Step 5: Freeze for at least 3 hours or until completely solid.
Step 6: Once frozen, break the bark into irregular pieces using your hands or a knife.
Step 7: Store pieces in a freezer-safe container or bag. Pack in insulated lunch boxes with extra ice packs to keep frozen until snack time.
What to Serve These Healthy Snacks With
Pair these snacks with:
- Fresh water or flavored water (add cucumber or lemon slices)
- Milk or unsweetened almond milk for extra calcium
- A piece of fruit like an orange or banana for additional vitamins
- Raw veggies on the side for extra crunch and nutrition
- Whole grain crackers to complement protein-rich snacks
The key is balancing different food groups throughout the day. If breakfast was carb-heavy, choose a protein-rich snack. If lunch includes lots of protein, go for fruit and veggie snacks.
Top Tips for Perfecting Healthy School Snacks
Plan Ahead for Success
Dedicate Sunday afternoon to snack prep. Wash and cut vegetables, portion trail mix, and bake energy bites all at once. This investment of 30-60 minutes saves you hours during the busy school week.
Invest in Quality Containers
Buy child-friendly, leak-proof containers in various sizes. Bento-style boxes keep foods separated and fresh. Clear containers let kids see what’s inside, making them more excited to eat.
Rotate Snacks Regularly
Don’t pack the same snack every day! Kids get bored easily. Create a weekly rotation so they look forward to different snacks throughout the week.
Temperature Safety Matters
Always include an ice pack with perishable items like yogurt, cheese, or hummus. Foods that sit at room temperature for more than 2 hours can harbor harmful bacteria.
Get Kids Involved
Let children help choose and prepare their snacks. They’re much more likely to eat something they helped make. Even young kids can wash fruit, stir ingredients, or fill containers.
Check School Policies
Always verify your school’s allergy and food policies. Many schools are nut-free zones, which is why I’ve included plenty of nut-free alternatives in this list.
Keep It Simple
Don’t stress about making Pinterest-perfect snacks. Simple, nutritious food is always better than elaborate creations that take too much time and energy.
Storing and Reheating Tips
Refrigerated Storage:
Most of these snacks stay fresh for 3-5 days when stored in airtight containers in the refrigerator. Yogurt parfaits and veggie sticks with hummus are best consumed within 3 days for optimal freshness.
Freezer Storage:
Energy bites and yogurt bark freeze beautifully for up to 3 months. Store in freezer-safe bags with air removed. Thaw energy bites at room temperature for 10 minutes before eating.
Room Temperature Storage:
Trail mix, popcorn mix, and energy bites can be stored at room temperature for up to 1 week in airtight containers. Keep them in a cool, dry place away from direct sunlight.
Reheating Instructions:
Most snacks are meant to be eaten cold or at room temperature. If you want to warm mini bell pepper nachos, microwave for 15-20 seconds. Avoid reheating yogurt-based snacks as they’ll separate and become watery.
Lunchbox Packing:
Pack cold snacks with at least one ice pack. Insulated lunch bags work best for temperature control. If your child has access to a refrigerator at school, that’s even better!
Nutrition Table (Per Serving – Average)
| Nutrient | Amount |
|---|---|
| Calories | 150-250 |
| Protein | 5-12g |
| Carbohydrates | 15-30g |
| Fiber | 3-6g |
| Fat | 5-10g |
| Sugar | 8-15g (naturally occurring) |
| Sodium | 100-300mg |
Note: Nutritional values vary by specific snack and portion sizes.
Frequently Asked Questions
What are the healthiest snacks to pack for school?
The healthiest school snacks combine protein, fiber, and healthy fats. Think fruit with nut or seed butter, cheese with whole grain crackers, veggie sticks with hummus, or homemade energy bites. These combinations provide sustained energy without sugar crashes and keep kids full until the next meal.
How do I keep school snacks fresh without refrigeration?
Use an insulated lunch bag with at least one quality ice pack. Freeze water bottles overnight and pack them alongside snacks—they’ll thaw by lunch and keep everything cold. For non-perishable options, choose trail mix, popcorn mix, or energy bites that don’t require refrigeration.
Are store-bought snacks okay for school?
Yes, but read labels carefully! Look for snacks with fewer than 5 ingredients, minimal added sugar (less than 8g per serving), and at least 3g of fiber or protein. Avoid artificial colors, high fructose corn syrup, and partially hydrogenated oils. Homemade is usually healthier and more cost-effective though.
What snacks are safe for nut-free schools?
Excellent nut-free options include sunflower seed butter with fruit, cheese and crackers, hummus with veggies, hard-boiled eggs, popcorn mix with pumpkin seeds, yogurt parfaits, and energy bites made with seeds instead of nuts. Always check ingredient labels for “may contain” warnings.
How much snack should I pack for my child?
Elementary-age children typically need 1-2 snacks providing 150-200 calories each. Older kids and teens may need larger portions or additional snacks. Watch what comes home uneaten to gauge portion sizes, and adjust accordingly. Every child’s appetite is different.
Can I prepare school snacks for the whole week?
Absolutely! Many snacks like energy bites, trail mix, hard-boiled eggs, and cut vegetables last 5-7 days when properly stored. Yogurt parfaits are best made 2-3 days ahead. Create an assembly line on Sundays, and mornings become stress-free grab-and-go situations.
What if my child won’t eat healthy snacks?
Start small. If they love crackers, upgrade to whole grain versions. If they like fruit snacks, transition to dried fruit. Let them help choose and prepare snacks—ownership creates enthusiasm. Pair new foods with familiar favorites, and be patient. Taste preferences can take 10-15 exposures to develop.
How do I prevent apple slices from turning brown?
Soak apple slices in lemon water (1 tablespoon lemon juice per cup of water) for 3-5 minutes before packing. The citric acid prevents oxidation. Alternatively, use pineapple juice or store slices in a container with minimal air exposure. Honeycrisp and Gala apples brown slower than other varieties.
Tips for Avoiding Common Snack-Packing Mistakes
Mistake #1: Packing Too Much
Start with smaller portions. It’s better for snacks to be fully eaten than to come home wasted. You can always increase amounts if your child is consistently hungry.
Mistake #2: Ignoring Temperature Safety
Perishable foods left at room temperature for more than 2 hours (1 hour if above 90°F) can grow harmful bacteria. When in doubt, pack an ice pack. Food safety is non-negotiable.
Mistake #3: Making Every Snack Identical
Kids crave variety just like adults. Create a simple rotation schedule so they’re not eating the same thing every day. Monday: fruit and yogurt, Tuesday: veggies and hummus, Wednesday: cheese and crackers, and so on.
Mistake #4: Over-Complicating Things
You don’t need fancy arrangements or elaborate preparations. Simple, fresh, whole foods in proper portions are perfect. Save your energy for when you actually have time to be creative.
Mistake #5: Forgetting to Ask for Feedback
Check in with your kids regularly about which snacks they enjoy most. Their tastes change, and they might suddenly love something they previously refused. Communication prevents wasted food and unhappy kids.
Mistake #6: Not Reading School Policies
Every school has different rules about allergens, packaging, and types of foods allowed. Review these policies at the start of each school year to avoid snacks being confiscated or causing issues.
Mistake #7: Skipping the Ice Pack
Even on cool days, lunch boxes can get warm, especially if they sit in lockers or classrooms. An ice pack costs pennies and prevents foodborne illness. It’s always worth including.
Final Thoughts
Packing healthy snacks for school is one of those parenting tasks that seems small but makes a huge difference in your child’s day. These 10 healthy snacks for school ideas have been tested in real lunch boxes by real kids, and they’ve passed the ultimate test—they actually get eaten!
Remember, the goal isn’t perfection. Some days you’ll have beautifully prepared parfaits, and other days you’ll toss an apple and cheese stick in a bag. Both are okay. What matters is making the effort to provide nourishing options that fuel your child’s body and brain.
Start with one or two recipes from this list, see which ones your kids love, and build from there. Before you know it, you’ll have a rotation of go-to snacks that make lunch packing feel effortless instead of overwhelming.
Here’s to happy, healthy kids and stress-free mornings! Which snack will you try first?