10 Healthy Snacks Low Calorie Ideas
You know that 3 PM slump when your stomach starts growling and the vending machine starts calling your name? I’ve been there more times than I’d like to admit! But here’s what I’ve learned: reaching for those processed snacks leaves you hungrier an hour later and guilty almost immediately.
That’s why I’ve spent months testing and perfecting these 10 healthy snacks low calorie options that actually taste incredible and keep you full. These aren’t bland rice cakes or sad celery sticks – these are real, satisfying snacks that you’ll genuinely look forward to eating.
Most take under 10 minutes to prepare, and they’re so budget-friendly that you won’t need to choose between your snack habit and your savings account. If you loved my energy ball recipes from last month, you’re going to be absolutely obsessed with these!
What Are Healthy Low Calorie Snacks?
Ever wonder why we call them “snacks” and not “mini meals”? Well, here’s the thing – a true healthy low calorie snack is that perfect bite-sized boost that bridges the gap between meals without derailing your wellness goals. I like to think of them as little love notes to your body, giving it just enough fuel to keep going strong.
The key is finding that sweet spot between under 200 calories and packed with nutrients that actually nourish you. You know what they say – the way to anyone’s heart is through their stomach, and these snacks prove you don’t need to sacrifice flavor for health. Ready to discover your new favorite afternoon pick-me-up? Let’s dive in!
Why You’ll Love These Healthy Snacks Low Calorie Ideas
They’re Satisfaction Without the Guilt
There’s something magical about biting into a snack that tastes indulgent but won’t leave you feeling heavy or regretful. Each of these options delivers that perfect combination of protein, fiber, and healthy fats that keeps hunger at bay for hours. The creamy textures, satisfying crunch, and burst of flavors make every bite feel like a treat, not a compromise.
Your Wallet Will Thank You
Here’s a secret the snack food industry doesn’t want you to know: making your own healthy snacks costs about 70% less than buying pre-packaged options. A single serving of store-bought protein balls can run you $3-4, while making them at home costs pennies per serving. Plus, you control exactly what goes in, which means no hidden sugars or mystery ingredients.
Endless Flavor Possibilities
From sweet to savory, creamy to crunchy, these snacks cover every craving imaginable. The toppings and mix-ins are where the real magic happens – think dark chocolate chips, crushed nuts, fresh herbs, and vibrant spices that transform simple ingredients into something extraordinary. If you enjoyed my Mediterranean-inspired lunch bowls, you’ll love how these snacks incorporate similar bright, bold flavors. I encourage you to get creative and make these recipes your own!
How to Make These 10 Healthy Snacks Low Calorie Ideas
Quick Overview
What makes these snacks so special is their simplicity and versatility. Most require just 5-10 minutes of active prep time, with some ready to eat immediately and others perfect for meal prep on Sunday afternoons.
Each snack delivers between 80-200 calories per serving while packing in protein, fiber, and nutrients that support your energy levels throughout the day. You’ll find options that require no cooking at all, alongside a few that benefit from quick baking or chilling. The best part? They all taste so good that your family won’t even realize they’re eating healthy.
Preparation Time:
- Active prep: 5-10 minutes per recipe
- Passive time: 0-30 minutes (depending on snack)
- Make-ahead friendly: Most can be prepared 3-5 days in advance
- Beginner-friendly: No special skills required
1. Protein-Packed Greek Yogurt Parfait Cups

Key Ingredients for Greek Yogurt Parfait Cups
- 1 cup plain Greek yogurt (non-fat or 2%)
- 1/2 cup fresh berries (strawberries, blueberries, or raspberries)
- 2 tablespoons low-sugar granola
- 1 teaspoon honey or pure maple syrup
- 1 tablespoon sliced almonds
- Fresh mint leaves for garnish (optional)
Step-by-Step Instructions
Start by selecting a clear glass or small mason jar so you can see the beautiful layers you’re creating. Spoon 1/3 cup of Greek yogurt into the bottom of your container, spreading it evenly. The tangy creaminess of Greek yogurt provides the perfect protein-rich base.
Wash and slice your fresh berries into bite-sized pieces. I love using a mix of strawberries and blueberries for color contrast. Layer half of your berries on top of the yogurt, pressing them gently against the sides of the glass for a pretty presentation.
Add another layer of yogurt, using about 1/4 cup this time. Drizzle half a teaspoon of honey over this layer, letting it cascade down the sides naturally. This creates those gorgeous golden streaks that make the parfait look Instagram-worthy.
Sprinkle one tablespoon of granola over the yogurt layer. Make sure to add the granola just before eating to keep it crunchy, or pack it separately if making this ahead for work or school.
Top with the remaining berries and finish with sliced almonds and a tiny drizzle of honey. Garnish with fresh mint if you’re feeling fancy.
Calories per serving: 180 calories
2. Crispy Baked Chickpea Snacks

Key Ingredients for Baked Chickpeas
- 1 can (15 oz) chickpeas, drained and rinsed
- 1 tablespoon olive oil
- 1/2 teaspoon smoked paprika
- 1/4 teaspoon garlic powder
- 1/4 teaspoon cumin
- 1/4 teaspoon sea salt
- Pinch of black pepper
Step-by-Step Instructions
Preheat your oven to 400°F (200°C). This high temperature is crucial for achieving that perfect crispy texture that makes these chickpeas so addictive.
Drain and rinse your chickpeas thoroughly in a colander. Here’s the important part that many people skip: pat them completely dry using paper towels or a clean kitchen cloth. The drier they are, the crispier they’ll become. I usually let them air dry for about 10 minutes after patting them.
Remove any loose skins that come off during the drying process. Don’t obsess over getting every single skin off, but removing the obvious ones helps achieve better crispiness.
In a mixing bowl, toss the dried chickpeas with olive oil until each one is lightly coated. Add your spices – I’m using smoked paprika for that gorgeous color and subtle smoky flavor, but feel free to experiment with different spice combinations.
Spread the chickpeas in a single layer on a baking sheet lined with parchment paper. Make sure they’re not crowded or touching too much, as this creates steam and prevents crisping.
Bake for 25-30 minutes, shaking the pan every 10 minutes to ensure even roasting. They’re done when they’re golden brown and crunchy. Let them cool completely on the baking sheet – they’ll continue to crisp up as they cool.
Calories per serving (1/4 cup): 120 calories
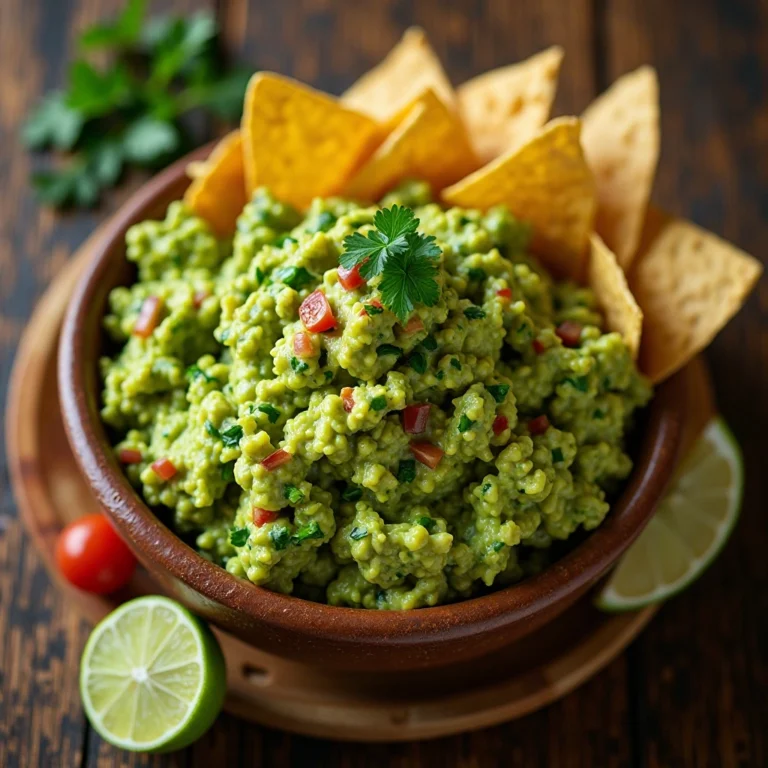
3. Apple Slices with Almond Butter
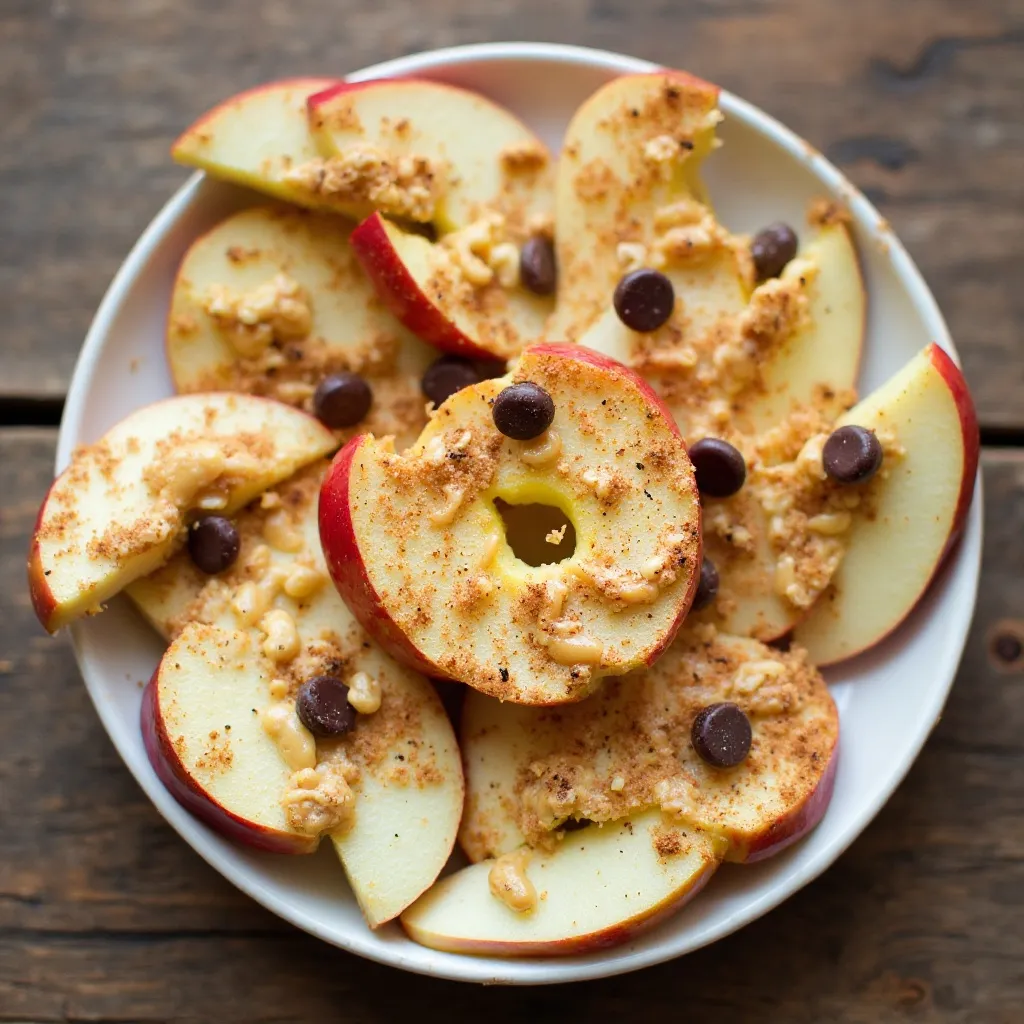
Key Ingredients for Apple Almond Snack
- 1 medium apple (Honeycrisp or Granny Smith work beautifully)
- 2 tablespoons natural almond butter
- 1 teaspoon chia seeds
- Dash of cinnamon
- 3-4 dark chocolate chips (optional)
Step-by-Step Instructions
Choose a crisp, fresh apple and wash it thoroughly under cold water. I prefer Honeycrisp for their sweet crunch or Granny Smith when I want something more tart to balance the richness of almond butter.
Core the apple and slice it into 8-10 wedges, about 1/4 inch thick. You can leave the skin on for extra fiber and nutrients. Immediately squeeze a tiny bit of lemon juice over the slices if you’re not eating them right away to prevent browning.
Arrange your apple slices on a plate in a fan pattern or simply pile them up. This is your canvas for deliciousness!
Measure out your almond butter into a small bowl. If it’s too thick to drizzle, warm it in the microwave for about 10 seconds, stirring halfway through. You want it pourable but not hot.
Drizzle the almond butter over the apple slices in a decorative zigzag pattern, or serve it on the side for dipping. I personally love the dipping method because you can control exactly how much you get with each bite.
Sprinkle chia seeds over the top for an omega-3 boost and a fun textural element. Dust with a light shake of cinnamon for warmth and natural sweetness. If you’re feeling a tiny bit indulgent, press 3-4 dark chocolate chips into the almond butter on a few slices.
Calories per serving: 195 calories
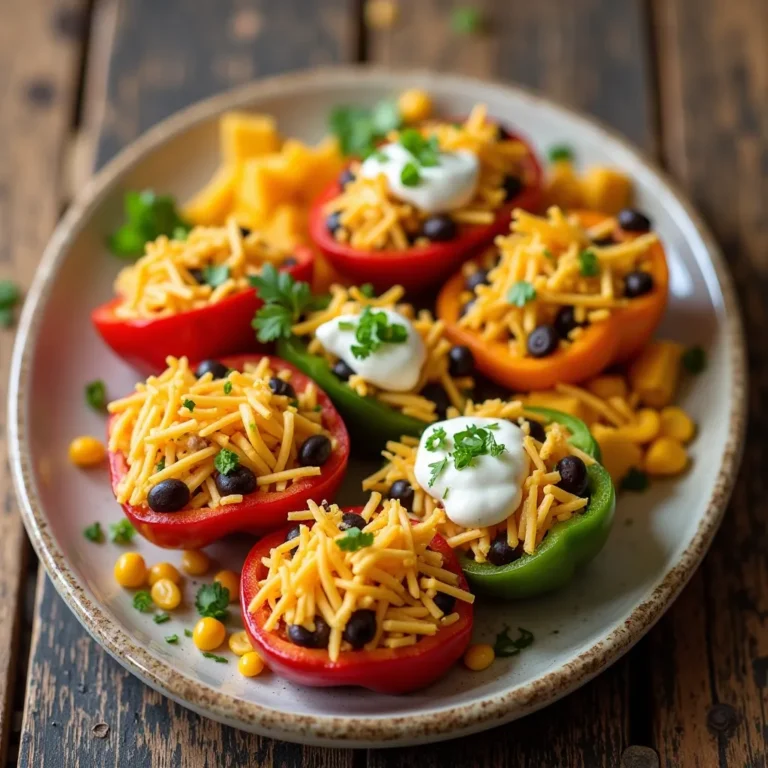
4. Cucumber Hummus Bites
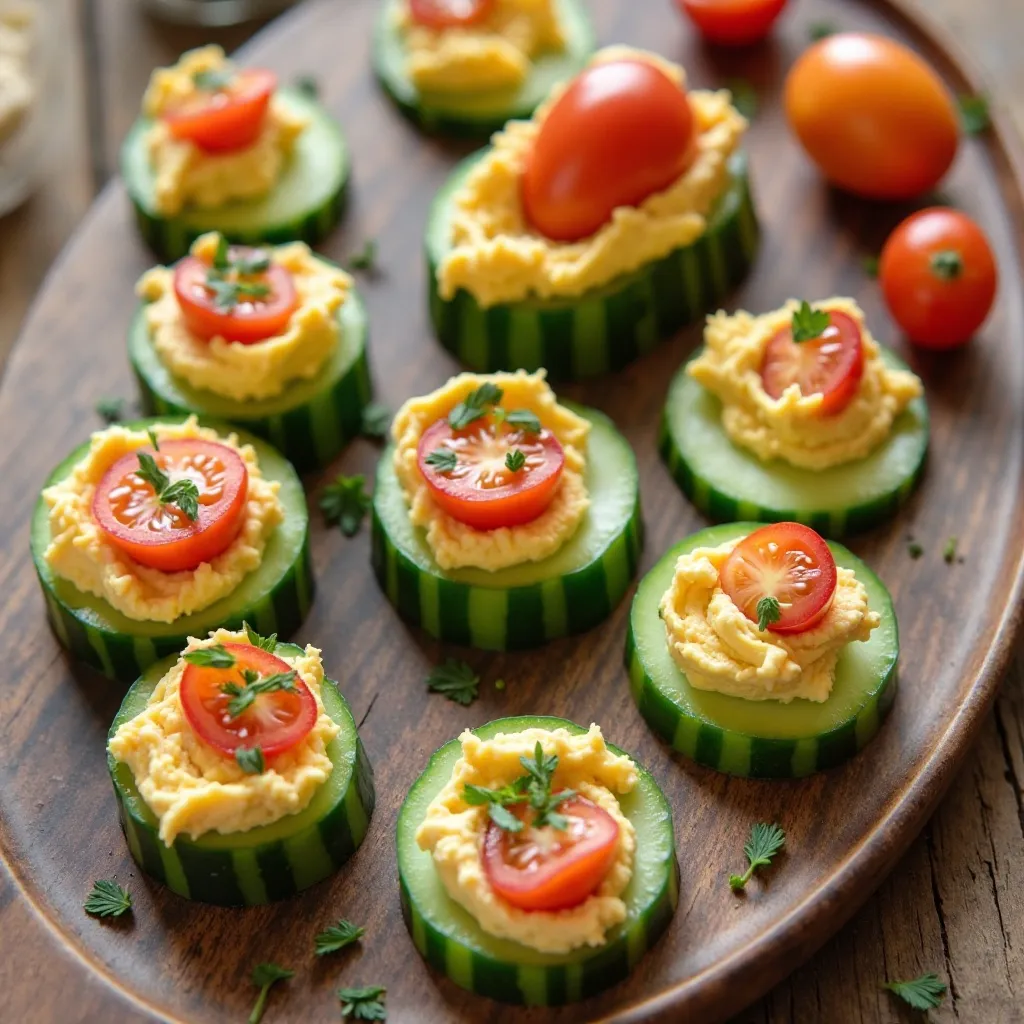
Key Ingredients for Cucumber Bites
- 1 large English cucumber
- 1/2 cup hummus (any flavor you love)
- Cherry tomatoes, halved
- Fresh dill or parsley
- Everything bagel seasoning
- Olive oil for drizzling
Step-by-Step Instructions
Wash your cucumber and slice it into rounds about 1/2 inch thick. English cucumbers work best because they have fewer seeds and a milder flavor, but regular cucumbers work too if you scoop out some of the seeds.
Lay your cucumber rounds on a serving platter or large plate. These become your edible “crackers,” and trust me, they’re so much more refreshing than actual crackers.
Using a small spoon or a piping bag if you’re feeling professional, place about a teaspoon of hummus on each cucumber round. I love using roasted red pepper hummus for extra flavor and that beautiful orange color, but classic, garlic, or roasted pine nut hummus all work wonderfully.
Top each bite with half a cherry tomato, placing it gently into the hummus so it stays put. The juicy burst of tomato against the creamy hummus and cool cucumber is absolutely perfect.
Garnish each bite with a small sprig of fresh dill or a few chopped parsley leaves. The herbs add a pop of color and fresh flavor that elevates these simple bites.
Finish with a light sprinkle of everything bagel seasoning and the tiniest drizzle of good quality olive oil. The seasoning adds that savory, slightly oniony crunch that makes these completely irresistible.
Calories per serving (5 bites): 85 calories
5. Frozen Banana Chocolate Bites
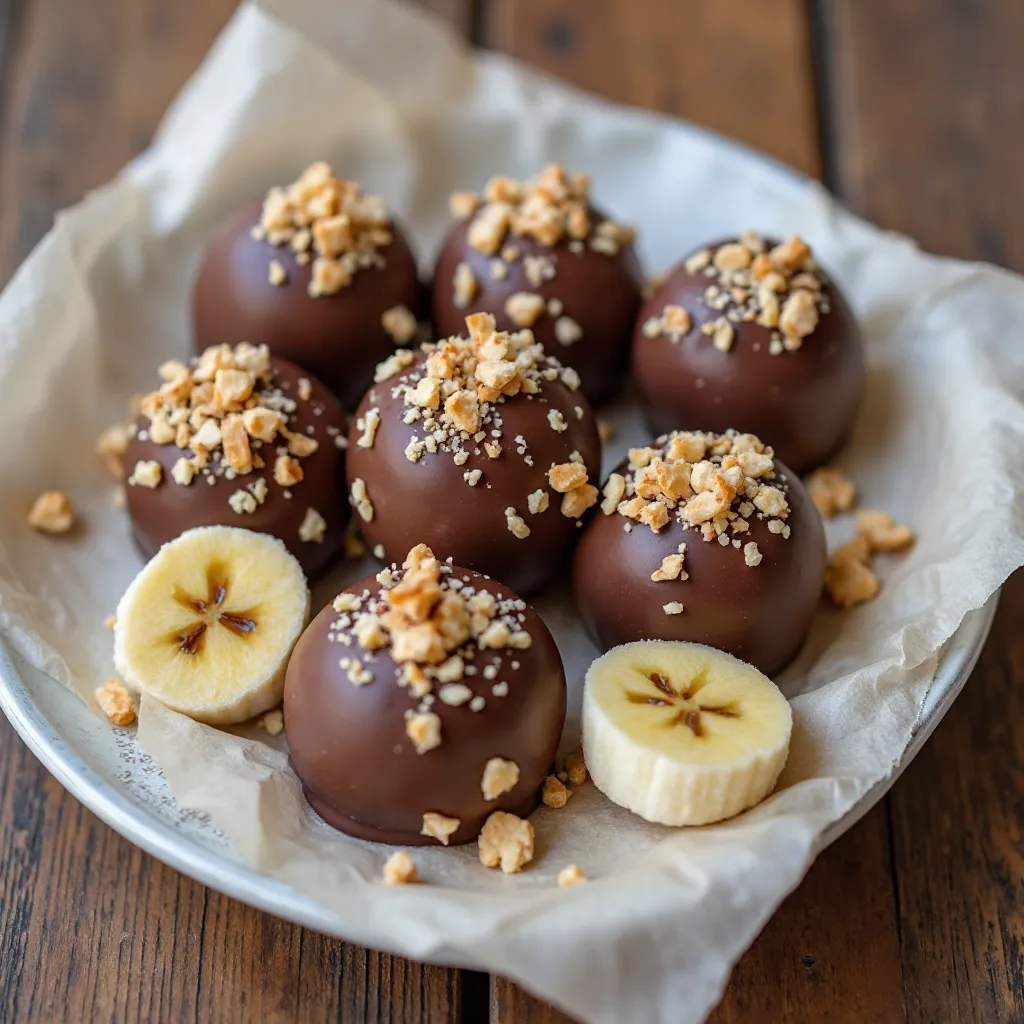
Key Ingredients for Banana Bites
- 2 medium ripe bananas
- 1/3 cup dark chocolate chips (70% cocoa or higher)
- 1 teaspoon coconut oil
- 2 tablespoons crushed almonds or peanuts
- Sea salt flakes (optional but amazing)
Step-by-Step Instructions
Line a small baking sheet or plate with parchment paper. This prevents sticking and makes cleanup incredibly easy.
Peel your bananas and slice them into rounds about 1/2 inch thick. You should get about 8-10 slices per banana. Arrange them on your prepared baking sheet, making sure they’re not touching.
Place the baking sheet in the freezer for at least 30 minutes. This initial freeze is important because it makes the bananas firm enough to dip without falling apart.
While the bananas are freezing, prepare your chocolate coating. Combine dark chocolate chips and coconut oil in a microwave-safe bowl. Microwave in 20-second intervals, stirring between each one, until completely smooth and melted. The coconut oil helps create a thinner coating that sets up beautifully.
Remove the frozen banana slices from the freezer. Working quickly, dip each slice halfway into the melted chocolate, letting the excess drip back into the bowl. Place the dipped banana back on the parchment paper.
Immediately sprinkle crushed nuts over the chocolate portion while it’s still wet. If you’re using sea salt flakes, add just a tiny pinch to each bite now. The salt enhances the chocolate flavor in the most magical way.
Return the baking sheet to the freezer for at least 15 minutes to let the chocolate set completely. Once frozen, transfer the bites to an airtight container and keep them frozen until you’re ready to eat.
Calories per serving (4 bites): 145 calories
6. Rice Cake Pizza Bites
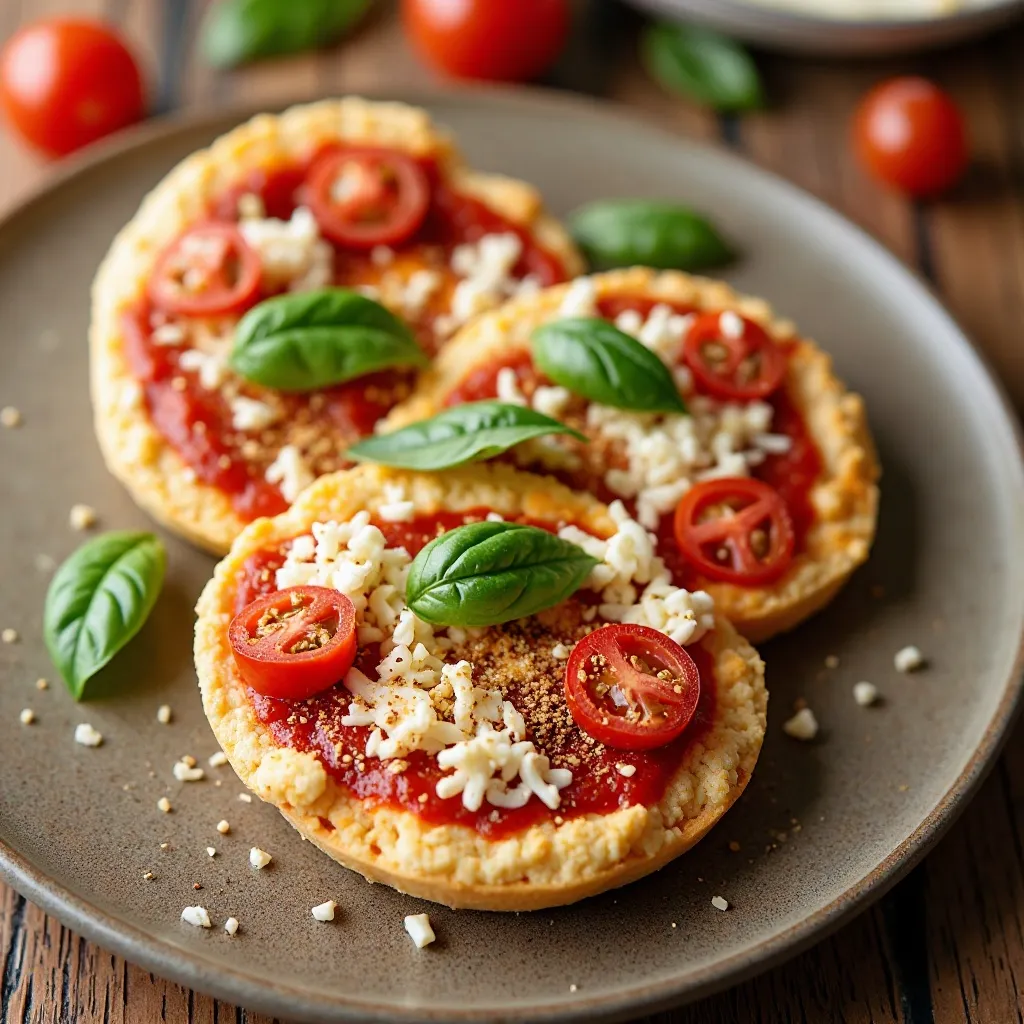
Key Ingredients for Rice Cake Pizzas
- 2 plain rice cakes (brown rice or multi-grain)
- 2 tablespoons tomato sauce (low-sugar marinara)
- 1/4 cup shredded part-skim mozzarella cheese
- 4-5 cherry tomatoes, sliced
- Fresh basil leaves
- Italian seasoning
- Red pepper flakes (optional)
Step-by-Step Instructions
Start by placing your rice cakes on a microwave-safe plate or small baking sheet if you prefer to use the oven. Both methods work beautifully for these quick snacks.
Spread one tablespoon of tomato sauce evenly across each rice cake, leaving a tiny border around the edges just like a real pizza. Use the back of your spoon to spread it in circular motions for even coverage.
Sprinkle the shredded mozzarella cheese over the sauce, distributing it evenly. Don’t go overboard with the cheese – a light layer is all you need to get that melty, gooey texture without adding too many calories.
Arrange your sliced cherry tomatoes on top of the cheese in a pretty pattern. The tomatoes add freshness and a pop of color that makes these look as good as they taste.
Dust with a pinch of Italian seasoning over each rice cake pizza. This brings in those classic pizza herbs like oregano, basil, and thyme.
For the microwave method, heat on high for 30-45 seconds until the cheese is melted and bubbly. For the oven method, place under the broiler for 2-3 minutes, watching carefully to prevent burning.
Remove from heat and immediately top with fresh basil leaves torn into small pieces. Add a sprinkle of red pepper flakes if you like a little kick. Let them cool for about 30 seconds before eating – that cheese gets hot!
Calories per serving (2 rice cakes): 150 calories
7. Veggie Sticks with Cottage Cheese Dip
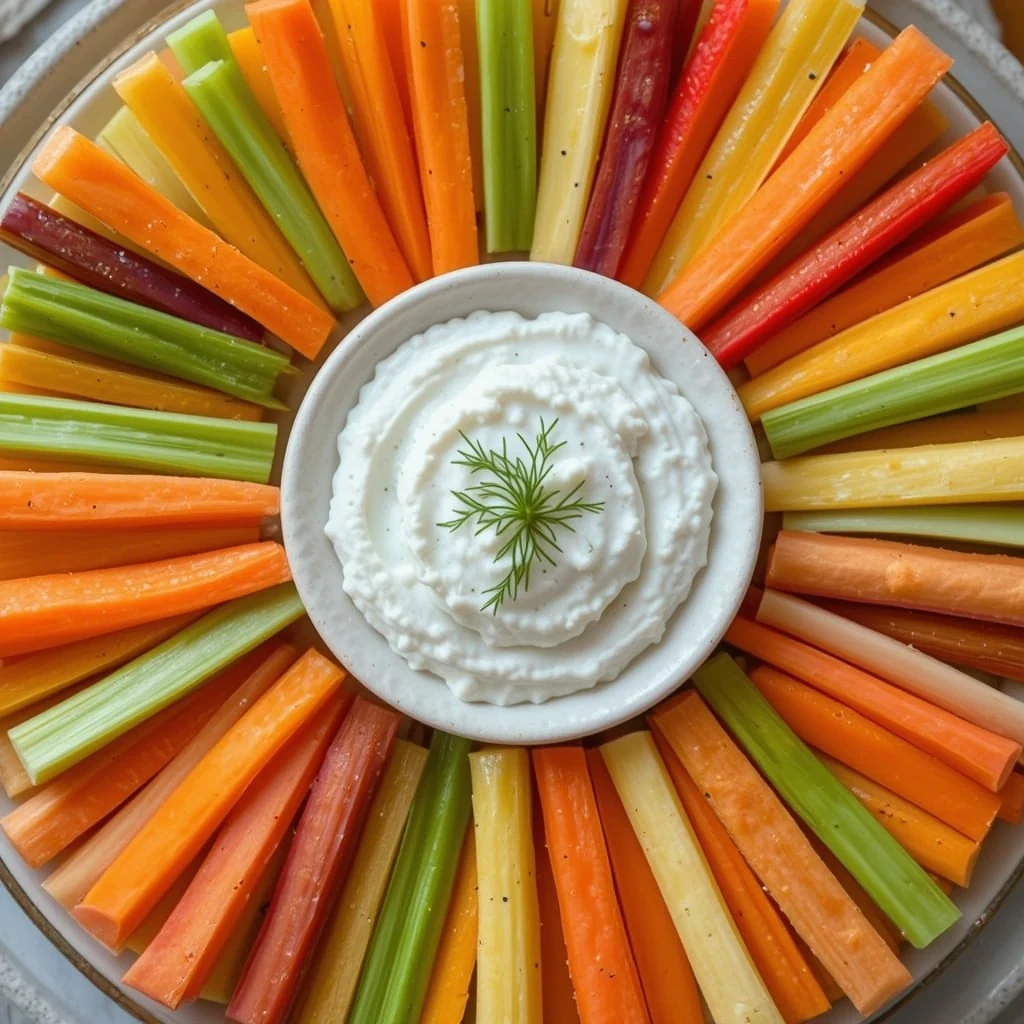
Key Ingredients for Veggie Dip Snack
- 1/2 cup low-fat cottage cheese
- 1 tablespoon fresh lemon juice
- 1 teaspoon dried dill
- 1/4 teaspoon garlic powder
- 1 cup carrot sticks
- 1 cup celery sticks
- 1/2 cup bell pepper strips
- Black pepper to taste
Step-by-Step Instructions
In a small food processor or blender, combine the cottage cheese, fresh lemon juice, dried dill, and garlic powder. Blend until smooth and creamy, scraping down the sides as needed. This transforms regular cottage cheese into an incredibly creamy dip that rivals any high-calorie ranch dressing.
If you don’t have a blender, you can simply mash the cottage cheese with a fork and stir in the seasonings. It won’t be quite as smooth, but it’ll still be delicious. Season with freshly ground black pepper to taste.
Wash all your vegetables thoroughly. For the carrots, peel them and cut them into sticks about 3 inches long and 1/4 inch thick. Try to make them uniform so they look appealing and are easy to dip.
Trim your celery stalks and cut them into similar-sized sticks. I like to cut any particularly wide stalks in half lengthwise first so they’re easier to handle.
Core and seed your bell pepper, then slice it into strips. I love using a mix of red, yellow, and orange peppers for a rainbow of colors and slightly different flavors.
Arrange all your veggie sticks in sections on a plate, creating a colorful presentation. Place your cottage cheese dip in the center in a small bowl.
Calories per serving: 110 calories
8. Trail Mix Energy Bites
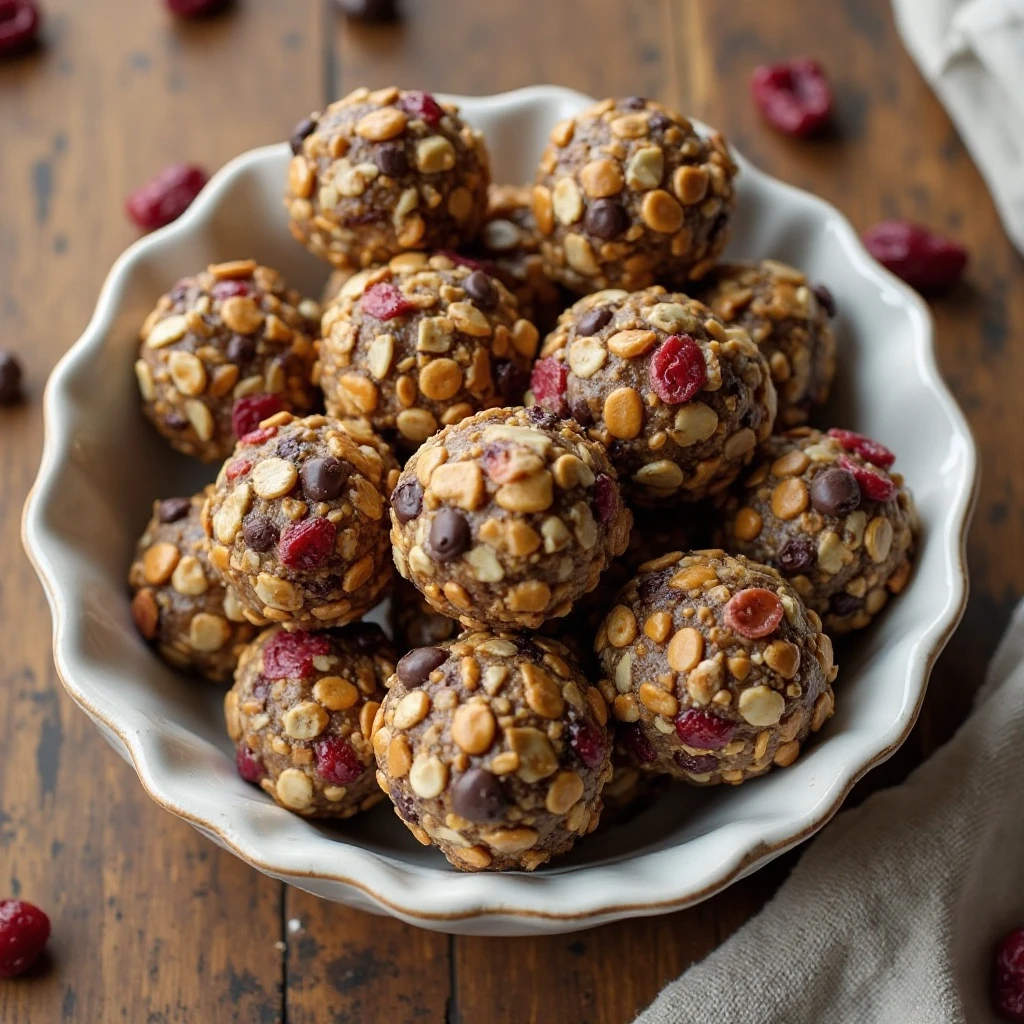
Key Ingredients for Energy Bites
- 1/2 cup rolled oats
- 1/4 cup natural peanut butter
- 2 tablespoons honey
- 2 tablespoons ground flaxseed
- 2 tablespoons mini dark chocolate chips
- 2 tablespoons dried cranberries (unsweetened if possible)
- 1 tablespoon pumpkin seeds
- Pinch of sea salt
Step-by-Step Instructions
In a medium mixing bowl, combine the peanut butter and honey. Microwave them together for about 15 seconds to make them easier to mix. Stir until they’re completely combined and smooth.
Add the rolled oats to the peanut butter mixture. Use a sturdy wooden spoon or spatula to fold them in. The mixture will seem dry at first, but keep stirring – it comes together beautifully.
Mix in the ground flaxseed, which adds omega-3 fatty acids and helps bind everything together. This ingredient is a nutritional powerhouse that you won’t even taste.
Fold in your chocolate chips, dried cranberries, and pumpkin seeds. These add-ins provide different textures and flavors in every bite. The cranberries bring tartness, the chocolate gives you that treat feeling, and the pumpkin seeds add a satisfying crunch.
Add a small pinch of sea salt and mix everything one final time. The salt enhances all the other flavors and prevents the bites from tasting bland.
Using your hands, roll the mixture into balls about 1 inch in diameter. You should get approximately 12 bites from this recipe. If the mixture is too sticky, wet your hands slightly with cold water between rolling each ball.
Place the energy bites on a plate or in a container and refrigerate for at least 30 minutes before eating. This firming time helps them hold their shape perfectly.
Calories per serving (2 bites): 165 calories
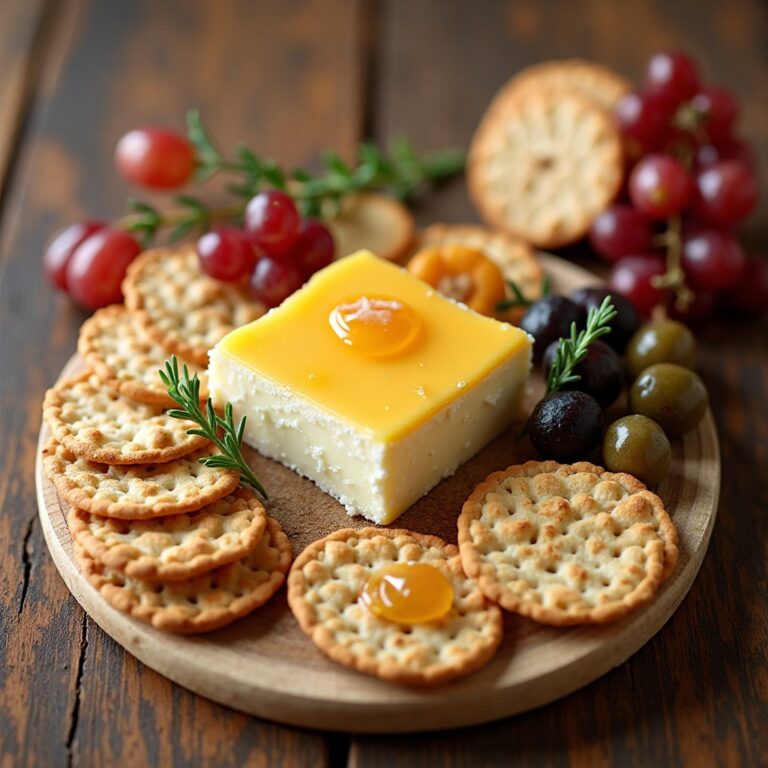
9. Watermelon Feta Skewers
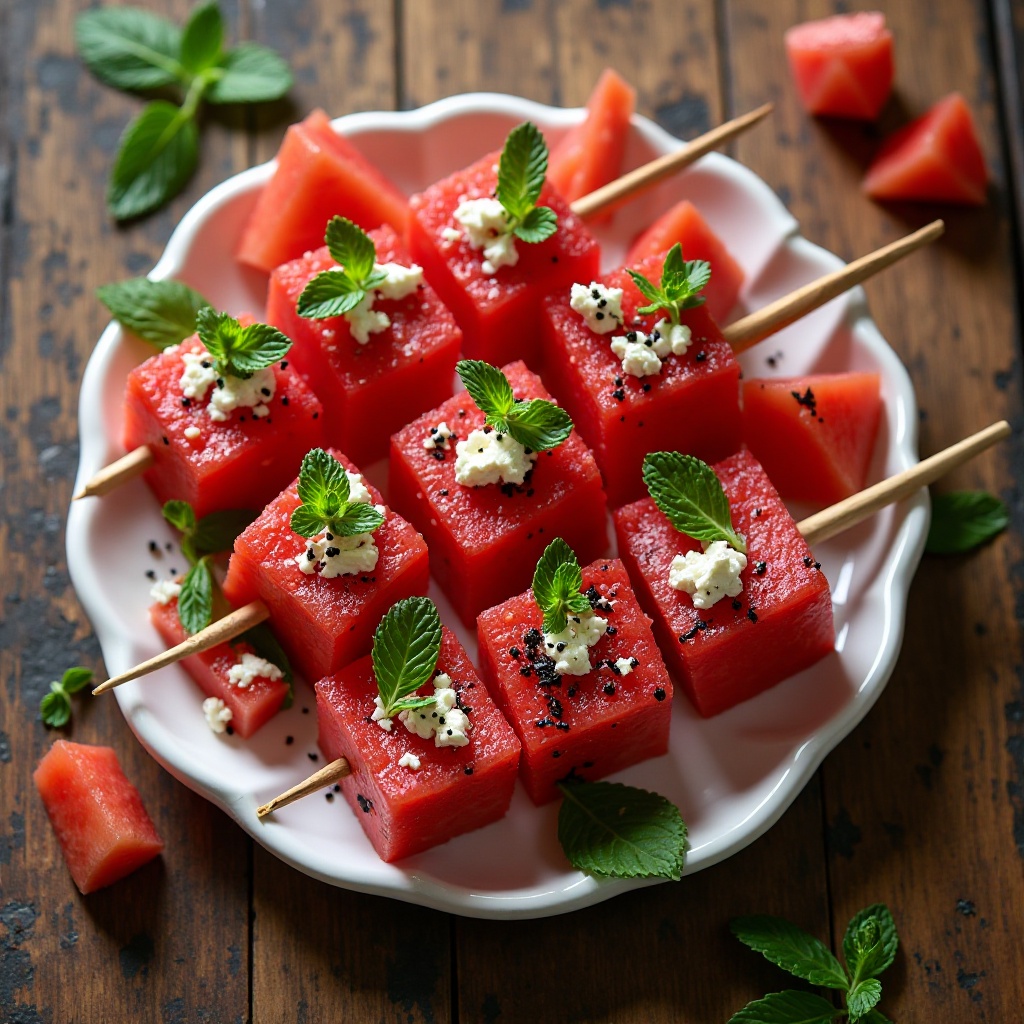
Key Ingredients for Watermelon Skewers
- 2 cups cubed watermelon (1-inch cubes)
- 1/4 cup crumbled feta cheese (reduced-fat)
- 8-10 fresh mint leaves
- 1 teaspoon balsamic glaze
- Wooden skewers or toothpicks
- Cracked black pepper
Step-by-Step Instructions
Cut your watermelon into uniform 1-inch cubes, removing any seeds you encounter. The key is making them all roughly the same size so they look professional and are easy to eat.
If using wooden skewers, soak them in water for about 10 minutes first. This prevents them from splintering and makes them easier to work with.
Thread one watermelon cube onto each skewer, pushing it about halfway down. The watermelon should sit securely on the skewer without sliding around.
Add a small piece of feta cheese on top of the watermelon. Use about a teaspoon of crumbled feta per skewer. The salty, tangy cheese against the sweet watermelon creates the most incredible flavor combination.
Take one mint leaf and fold it in half, then thread it onto the skewer above the feta. The mint adds a refreshing herbal note that ties everything together beautifully.
Arrange all your finished skewers on a serving platter. Just before serving, drizzle the balsamic glaze lightly over all the skewers using a spoon or by carefully squeezing the bottle in a back-and-forth motion.
Finish with a light grinding of black pepper over the entire platter. The pepper adds a subtle spicy note that enhances the sweetness of the watermelon.
Keep these refrigerated until serving time, as they’re best enjoyed cold. They’re incredibly refreshing on hot summer days!
Calories per serving (3 skewers): 75 calories
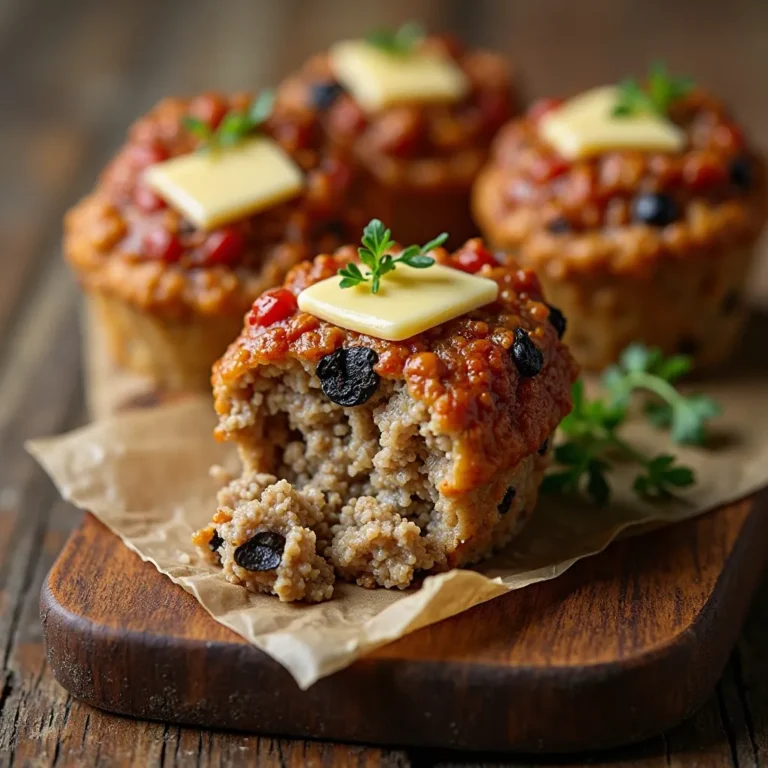
10. Egg White Veggie Muffins

Key Ingredients for Veggie Muffins
- 6 egg whites (or 3/4 cup liquid egg whites)
- 1/2 cup chopped spinach
- 1/4 cup diced bell peppers (any color)
- 2 tablespoons diced onion
- 2 tablespoons shredded part-skim mozzarella
- 1/4 teaspoon garlic powder
- Salt and pepper to taste
- Cooking spray
Step-by-Step Instructions
Preheat your oven to 350°F (175°C). Spray a 6-cup muffin tin generously with cooking spray, making sure to coat the sides and bottom of each cup thoroughly. This ensures easy removal after baking.
In a mixing bowl, whisk the egg whites until they’re slightly frothy. This incorporates a bit of air and makes the muffins lighter.
Prepare all your vegetables by chopping them into small, uniform pieces. For the spinach, if using fresh, chop it finely. If using frozen, make sure it’s completely thawed and squeeze out all excess water using paper towels.
Add the chopped spinach, bell peppers, and onion to the egg whites. Stir to combine everything evenly throughout the mixture.
Season with garlic powder, salt, and black pepper. Remember that you’re dividing this among 6 muffins, so don’t be shy with the seasonings.
Divide the mixture evenly among the 6 prepared muffin cups, filling each about 2/3 full. Sprinkle a small amount of shredded mozzarella on top of each muffin.
Bake for 18-22 minutes, until the muffins are set in the center and the tops are lightly golden. You can test doneness by inserting a toothpick into the center – it should come out clean.
Let the muffins cool in the pan for about 5 minutes before running a knife around the edges and removing them. This cooling time helps them set up and makes removal easier.
Calories per serving (2 muffins): 95 calories
What to Serve These Healthy Snacks With
These snacks are incredibly versatile and work beautifully in various situations. Pair the Greek yogurt parfait or apple almond snack with your morning coffee or afternoon herbal tea for a balanced mid-morning boost. The savory options like cucumber hummus bites and rice cake pizzas complement a fresh green salad perfectly for a light lunch.
For post-workout fuel, reach for the protein-packed egg white muffins or trail mix energy bites alongside a tall glass of cold water with lemon. The frozen banana bites and watermelon feta skewers are absolutely perfect as a light dessert after dinner, especially on warm evenings when you want something sweet but refreshing.
Consider building a snack board with several of these options for movie night or entertaining guests. Mix the crispy chickpeas with the veggie sticks and cottage cheese dip, adding the watermelon skewers for color and variety. Pair everything with sparkling water infused with cucumber and mint for a spa-like experience at home.
Top Tips for Perfecting These Healthy Snacks Low Calorie Ideas
Meal Prep Like a Pro
Dedicate one hour on Sunday to preparing several of these snacks for the week ahead. Store the baked chickpeas in an airtight container at room temperature, keep the energy bites refrigerated in a sealed container, and pre-portion the cottage cheese dip into small containers alongside cut veggies. This advance preparation means you’ll always have healthy options ready when hunger strikes.
Ingredient Substitutions That Work
Don’t have almond butter? Peanut butter, cashew butter, or sunflower seed butter all work wonderfully. If Greek yogurt isn’t your thing, try skyr or regular yogurt strained through cheesecloth for thickness. Swap feta for goat cheese in the watermelon skewers, or use nutritional yeast instead of cheese for a plant-based option in the egg muffins.
Avoid These Common Mistakes
The biggest mistake people make with baked chickpeas is not drying them thoroughly enough before roasting – this results in chewy instead of crispy snacks. For the banana bites, make sure your bananas aren’t overly ripe or they’ll be too soft to dip properly. When making energy bites, resist adding extra liquid ingredients as this makes them too soft to hold their shape.
Portion Control Secrets
Even healthy snacks can add up calorie-wise if you’re not mindful. I love using small bowls and plates to naturally limit portion sizes without feeling deprived. For snacks like trail mix bites or chickpeas, pre-portion them into small containers or bags so you’re not tempted to eat the entire batch.
Enhance the Flavors
Don’t be afraid to experiment with different spice combinations on the chickpeas – try curry powder, za’atar, or cinnamon sugar for variety. Toast your nuts before adding them to any recipe to intensify their flavor. A squeeze of fresh lemon or lime juice brightens up almost any savory snack and adds zero calories.
Storing and Reheating Tips
Refrigeration Guidelines
The Greek yogurt parfaits stay fresh for up to 2 days when stored in airtight containers, but add the granola just before eating to maintain crunch. Cucumber hummus bites are best assembled fresh, but you can prep the components separately and store them for up to 3 days. The cottage cheese dip keeps beautifully for 5 days in a sealed container. Egg white muffins stay fresh for 4-5 days in the refrigerator.
Freezing for Longer Storage
Frozen banana bites obviously store in the freezer and last for up to 3 months in a freezer-safe container with parchment paper between layers. Trail mix energy bites freeze exceptionally well for up to 2 months – just let them thaw for 10 minutes before eating. You can also freeze the egg white muffins for up to 2 months and reheat them straight from frozen.
Reheating Instructions
For the egg white muffins, microwave on high for 30-45 seconds or until warmed through. The rice cake pizzas are best made fresh, but you can reheat them in a toaster oven at 350°F for about 3 minutes. Chickpeas that lose their crunch can be re-crisped in a 400°F oven for 5-7 minutes.
Room Temperature Storage
Baked chickpeas stay crispy at room temperature for up to 5 days when stored in an airtight container with a small piece of paper towel to absorb any moisture. Trail mix energy bites can sit at room temperature for 2-3 days if your house isn’t too warm, though I prefer keeping them chilled for the best texture.
Nutrition Information Table
| Snack Name | Calories | Protein | Carbs | Fat | Fiber |
|---|---|---|---|---|---|
| Greek Yogurt Parfait | 180 | 15g | 22g | 4g | 3g |
| Baked Chickpeas | 120 | 5g | 18g | 3g | 5g |
| Apple with Almond Butter | 195 | 4g | 25g | 9g | 5g |
| Cucumber Hummus Bites | 85 | 3g | 8g | 4g | 2g |
| Frozen Banana Bites | 145 | 2g | 20g | 7g | 3g |
| Rice Cake Pizzas | 150 | 8g | 18g | 5g | 2g |
| Veggie Sticks with Dip | 110 | 12g | 10g | 2g | 3g |
| Trail Mix Energy Bites | 165 | 5g | 18g | 8g | 3g |
| Watermelon Feta Skewers | 75 | 3g | 10g | 3g | 1g |
| Egg White Veggie Muffins | 95 | 14g | 4g | 3g | 1g |
Frequently Asked Questions
Can I make these snacks ahead for the entire week?
Absolutely! Most of these snacks are actually better when meal prepped. The baked chickpeas, energy bites, and egg muffins all store beautifully for 4-5 days. I recommend preparing 2-3 different snacks each Sunday so you have variety throughout the week. Just remember to add fresh elements like herbs or crunchy toppings right before eating to maintain optimal texture and flavor.
Are these snacks suitable for weight loss?
Yes, these snacks are specifically designed to support weight loss goals while keeping you satisfied. Each option provides a balance of protein, fiber, and healthy fats that help control hunger and prevent overeating at meals. The key is sticking to the recommended portion sizes and using these snacks strategically between meals rather than as additions to already complete meals.
Can I swap ingredients if I have food allergies?
Definitely! These recipes are incredibly flexible. For nut allergies, use sunflower seed butter instead of almond or peanut butter, and replace almonds with pumpkin seeds. For dairy allergies, substitute coconut yogurt for Greek yogurt and nutritional yeast for cheese. Most vegetables can be swapped based on preference or availability without significantly changing the nutritional profile.
How do I keep baked chickpeas crispy?
The secret to crispy chickpeas is threefold: dry them thoroughly before roasting, don’t overcrowd the pan, and store them properly. After baking, let them cool completely before storing in an airtight container with a small piece of paper towel to absorb any moisture. Avoid refrigerating them as the humidity causes sogginess. If they do lose crunch, simply pop them back in a 400°F oven for 5 minutes.
What’s the best time to eat these snacks?
Timing depends on your personal schedule and hunger patterns. Most people benefit from having a snack mid-morning (around 10 AM) and mid-afternoon (around 3 PM) to maintain stable blood sugar and energy levels. The protein-rich options like egg muffins or Greek yogurt parfaits work wonderfully as post-workout snacks within 30 minutes of exercising. The lighter options like watermelon skewers are perfect in the evening when you want something sweet without feeling too full before bed.
Can kids enjoy these healthy snacks too?
These snacks are absolutely family-friendly! Kids especially love the frozen banana bites, rice cake pizzas, and apple slices with almond butter. The egg white muffins are perfect for picky eaters who might resist vegetables in other forms. Let your children help prepare these snacks – they’re more likely to eat something they helped create. Just be mindful of any choking hazards for younger children and adjust sizes accordingly.
How much money will I save making these at home?
The savings are significant! Pre-packaged healthy snacks typically cost $2-5 per serving, while these homemade versions average about $0.50-1.50 per serving. For example, a container of store-bought energy bites costs around $8-10 for 6 servings, but making them at home costs approximately $4 for 12 servings. Over a month, you could easily save $60-100 by preparing your own snacks.
Do these snacks provide enough energy for athletes?
While these snacks are nutritious, active athletes or those with intense workout routines may need to increase portion sizes or combine multiple snacks to meet their higher energy needs. Consider doubling the energy bites recipe or pairing the Greek yogurt parfait with a handful of nuts for additional calories and protein. The egg white muffins are excellent pre-workout fuel, while the banana bites work well for post-workout recovery.
Tips for Avoiding Common Mistakes
Don’t Skip the Prep Work
One of the biggest mistakes is jumping into making snacks without properly preparing your ingredients first. Take time to thoroughly wash and dry all produce, measure ingredients accurately, and have everything ready before you start. This “mise en place” approach prevents errors and makes the process much more enjoyable.
Temperature Matters
Many people rush the cooling process, but this is crucial for success. Chickpeas need to cool completely to reach maximum crispiness. Energy bites must chill adequately or they’ll fall apart. Frozen treats need proper freezing time to achieve the right texture. Be patient and trust the process.
Watch Your Portions
It’s easy to mindlessly snack even on healthy foods. Use measuring cups and spoons initially until you can eyeball proper portions. Pre-portion snacks into individual containers immediately after making them so you’re not tempted to eat more than intended.
Quality Ingredients Make a Difference
Using natural, minimally processed ingredients dramatically improves both flavor and nutrition. Choose natural nut butters without added sugars, select fresh vegetables at peak ripeness, and invest in good quality olive oil and spices. The difference in taste is remarkable and worth the slightly higher cost.
Don’t Be Afraid to Experiment
While these recipes are tested and delicious, everyone’s taste preferences differ. If you don’t love dill, try basil. Not a fan of almonds? Use walnuts. Keep notes on your favorite variations so you can recreate them. Cooking should be fun and personalized to your tastes.
Storage Errors to Avoid
Never store crispy items with moist items in the same container. Don’t refrigerate snacks meant for room temperature storage like the chickpeas. Always use airtight containers to maintain freshness. Label containers with dates so you know when items were prepared.
Final Thoughts
Creating these healthy snacks low calorie ideas has genuinely transformed my relationship with snacking. I no longer feel guilty reaching for food between meals because I know I’m nourishing my body with real, wholesome ingredients. The best part? My family actually requests these snacks now instead of processed options from the store.
I encourage you to start with just two or three of these recipes that appeal to you most. Master those, then gradually add more to your rotation. Before you know it, you’ll have a whole arsenal of delicious, healthy snacks at your fingertips. Your body, wallet, and taste buds will thank you!
What’s your favorite healthy snack from this list? Drop a comment below and let me know which one you’re excited to try first. And if you make any of these, I’d absolutely love to see your creations – tag me on social media so I can cheer you on in your healthy snacking journey!