15 NYE Appetizers Mexican – Perfect Bites for Your Celebration
Ring in the new year with bold, vibrant flavors that’ll have your guests coming back for more! These 15 NYE appetizers Mexican-inspired will transform your celebration into an unforgettable fiesta. I still remember my first New Year’s Eve hosting—I served store-bought snacks and everyone left early.
The next year, I brought out homemade Mexican appetizers, and suddenly my party became the place to be! These recipes are quick, budget-friendly, and absolutely delicious, perfect for both experienced cooks and kitchen newcomers alike.
What Are NYE Appetizers Mexican?
Ever wonder why Mexican appetizers steal the show at every party? It’s simple—they’re packed with flavor, easy to eat while mingling, and look absolutely stunning on your table. These aren’t just regular appetizers; they’re conversation starters, crowd-pleasers, and the secret weapon to hosting success.
As they say, “the way to a man’s heart is through his stomach,” and trust me, these appetizers work magic on everyone! Ready to become the host everyone’s talking about? Let’s dive into these incredible recipes.
Why You’ll Love These 15 NYE Appetizers Mexican
Bold Flavors That Pop
Mexican appetizers bring an explosion of taste with every bite. The combination of zesty lime, smoky chipotle, creamy cheese, and fresh cilantro creates layers of flavor that dance on your palate. Unlike bland party snacks, these bites pack personality and pizzazz.
Budget-Friendly Party Food
Making these appetizers at home saves you serious cash compared to catering or buying pre-made party platters. Most ingredients are affordable pantry staples or fresh produce that won’t break the bank. You’ll spend less and impress more—that’s a winning combination!
Customizable and Crowd-Pleasing
Whether your guests love spicy heat or prefer mild flavors, these recipes adapt beautifully. You can easily adjust seasonings, swap proteins, or create vegetarian versions. Everyone leaves happy, and you look like a culinary genius. Time to roll up your sleeves and create some magic in your kitchen. Your guests are going to be so impressed!
How to Make 15 NYE Appetizers Mexican
Quick Overview
These Mexican-inspired appetizers are designed for stress-free entertaining. Most recipes take 30 minutes or less from start to finish.
You’ll love how simple ingredients transform into restaurant-quality bites. The best part? Many can be prepared ahead, leaving you free to enjoy your own party.
We’re talking creamy, crispy, cheesy, and fresh options that cater to every taste preference.
- Total Prep Time: 20-30 minutes per recipe
- Total Cook Time: 10-20 minutes per recipe
- Make-Ahead Friendly: Yes for most recipes
- Skill Level: Beginner to Intermediate
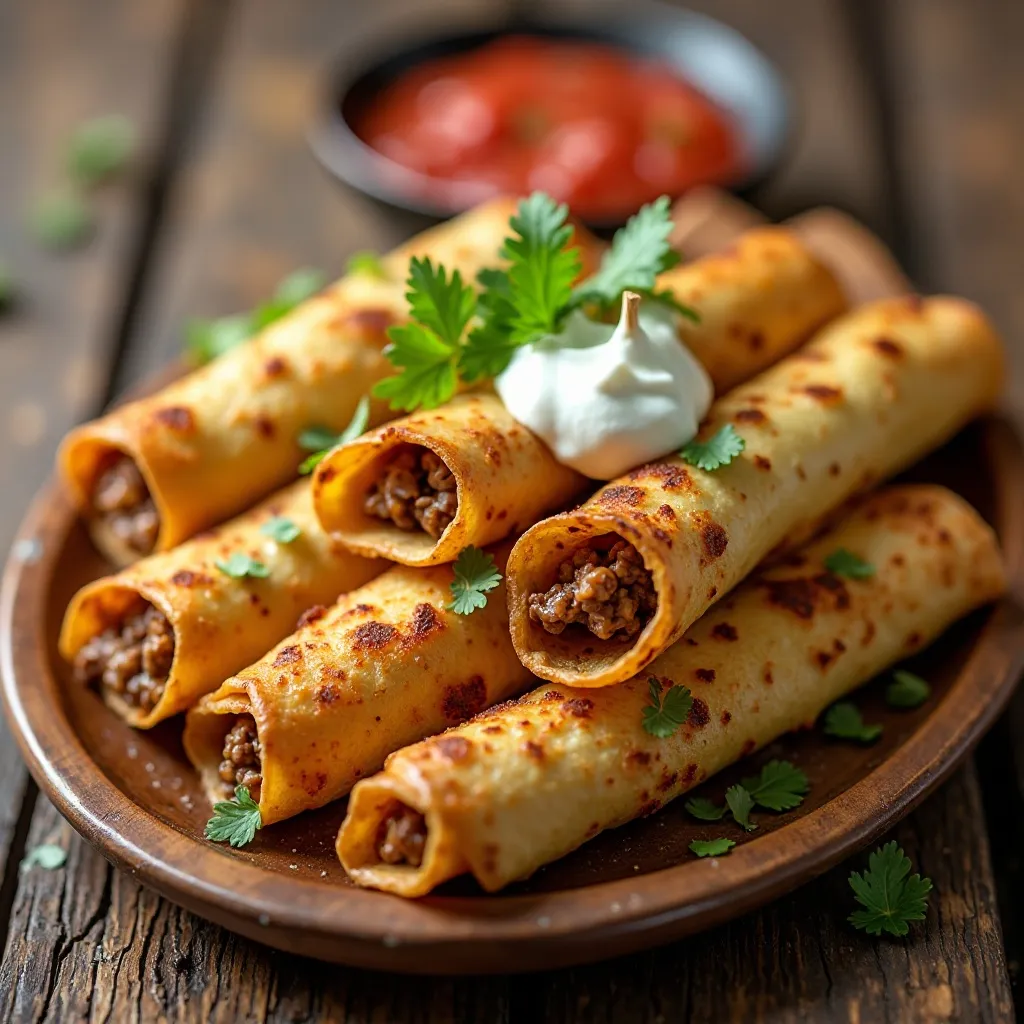
1. Mini Chicken Taquitos
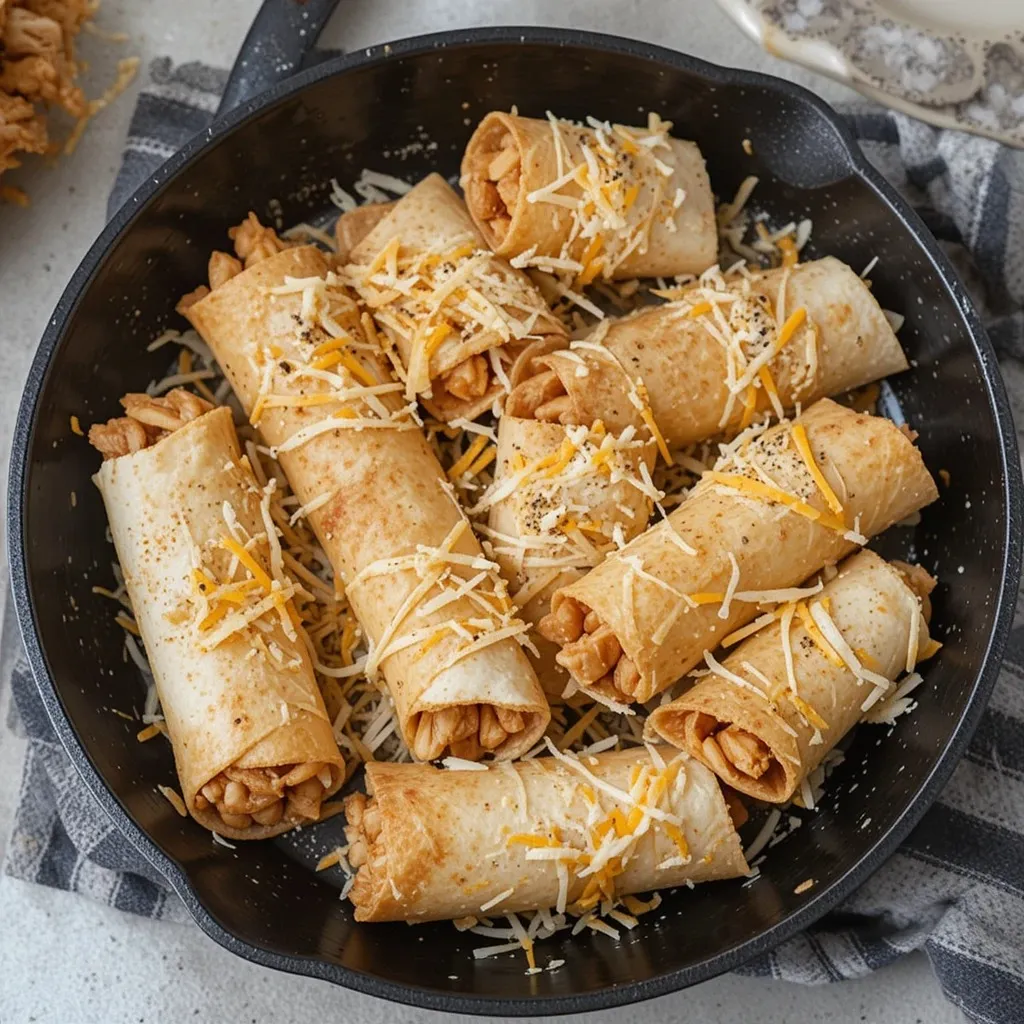
What Makes This Special
These crispy rolled delights are packed with seasoned chicken and melted cheese. They’re like little flavor bombs that disappear within minutes of hitting the table! I’ve never had leftovers when I make these.
Key Ingredients
- 2 cups shredded rotisserie chicken
- 1 cup cream cheese, softened
- 1 cup shredded Mexican cheese blend
- 1/2 cup salsa
- 1 tsp cumin
- 1 tsp chili powder
- 1/2 tsp garlic powder
- 12 small flour tortillas
- 2 tbsp vegetable oil for frying
- Salt and pepper to taste
Step-by-Step Instructions
Prepare the Filling
Start by shredding your rotisserie chicken into a large mixing bowl. This is such a time-saver! Add the softened cream cheese, shredded Mexican cheese, salsa, cumin, chili powder, and garlic powder.
Mix everything together using a fork or your hands until well combined and creamy. The mixture should hold together nicely. Taste and adjust seasonings with salt and pepper.
Warm the Tortillas
Place your flour tortillas between damp paper towels and microwave for 15-20 seconds. This makes them pliable and prevents cracking when rolling. Work quickly while they’re still warm.
Roll the Taquitos
Place two tablespoons of the chicken mixture along one edge of each tortilla. Roll tightly away from you, keeping the filling tucked in as you go. The tighter the roll, the crispier they’ll get!
Secure with a toothpick if needed, though once they start cooking, they usually stay closed.
Cook to Perfection
Heat two tablespoons of oil in a large skillet over medium-high heat. Test the heat by dropping a small piece of tortilla—it should sizzle immediately.
Place taquitos seam-side down in the pan. Don’t overcrowd! Cook 2-3 minutes until golden brown and crispy. Use tongs to flip and cook another 2-3 minutes on the other side.
Remove to a paper towel-lined plate to drain. Serve immediately while hot and crispy.
Tips for Perfect Taquitos
Don’t overfill your tortillas or they’ll burst open during cooking. Two tablespoons is the sweet spot.
If baking instead of frying, brush with oil and bake at 425°F for 15-20 minutes, flipping halfway through.
Make these ahead by rolling and refrigerating up to 4 hours before cooking.
What to Serve With
Serve with sour cream, guacamole, salsa verde, and pico de gallo for dipping. Fresh lime wedges add a bright finishing touch.
2. Loaded Nachos Supreme
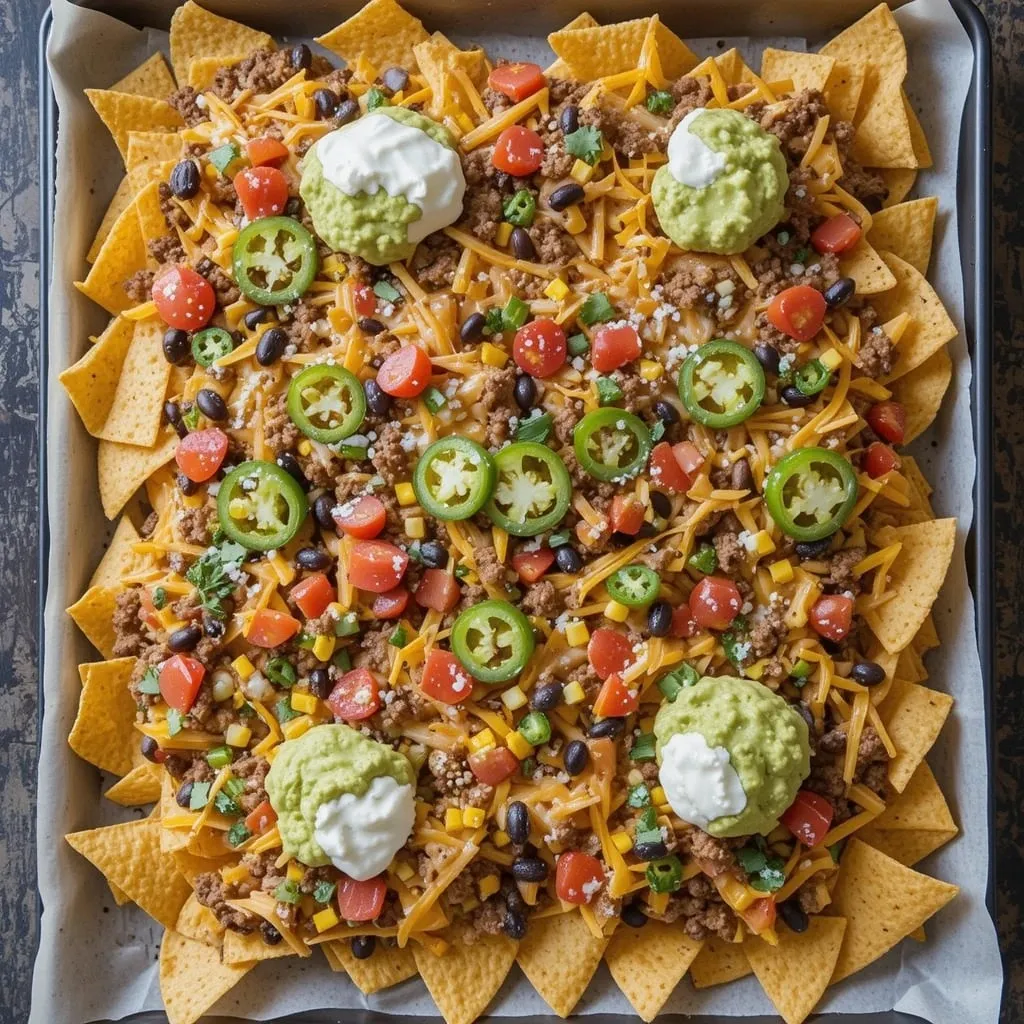
What Makes This Special
These aren’t your basic nachos! We’re building layers of flavor with perfectly seasoned beef, gooey cheese, and all the fresh toppings that make nachos legendary.
Key Ingredients
- 1 large bag tortilla chips
- 1 lb ground beef
- 1 tbsp chili powder
- 1 tsp cumin
- 1/2 tsp garlic powder
- 2 cups shredded Mexican cheese blend
- 1 can black beans, drained and rinsed
- 1 cup diced tomatoes
- 1/2 cup sliced jalapeños
- 1 cup corn kernels (optional)
- Sour cream for topping
- Guacamole for topping
- Fresh cilantro, chopped
- 2 limes, cut into wedges
- Salt to taste
Step-by-Step Instructions
Prepare Your Base
Preheat your oven to 375°F. Line a large baking sheet with parchment paper—this makes cleanup so much easier!
Spread tortilla chips in an even layer across the pan. Try to create a solid base without too many gaps. You want every chip to get some toppings!
Cook the Beef
In a large skillet over medium-high heat, brown the ground beef, breaking it up with a wooden spoon as it cooks. This should take about 6-8 minutes.
Once the meat is no longer pink, drain any excess fat. Add chili powder, cumin, garlic powder, and salt to taste. Stir well and cook for another 2 minutes to let the spices bloom.
Build Your Layers
This is where the magic happens! Sprinkle half the cheese over the chips. Layer the seasoned beef evenly across the chips. Add black beans, corn, and diced tomatoes.
Top with the remaining cheese. The double cheese layer ensures everything stays together and creates that irresistible cheese pull!
Scatter jalapeño slices on top—use more or less depending on your heat preference.
Bake to Perfection
Place the baking sheet in the preheated oven and bake for 10-12 minutes. You’re looking for melted, bubbly, slightly golden cheese.
Watch closely in the last few minutes to prevent burning the edges of the chips.
Add Fresh Toppings
Remove from the oven and work quickly! Add dollops of sour cream and guacamole while the nachos are still hot.
Sprinkle generously with fresh cilantro and squeeze lime juice over everything. Serve immediately on the baking sheet for that casual, dig-in vibe.
Tips for Perfect Nachos
Use thick, restaurant-style chips that won’t get soggy under all those toppings.
Don’t overload any single area—distribute toppings evenly so every bite is perfect.
For crispier nachos, bake the chips alone for 5 minutes before adding toppings.
What to Serve With
These are pretty complete on their own, but extra salsa and hot sauce on the side never hurt!
3. Creamy Queso Fundido Dip
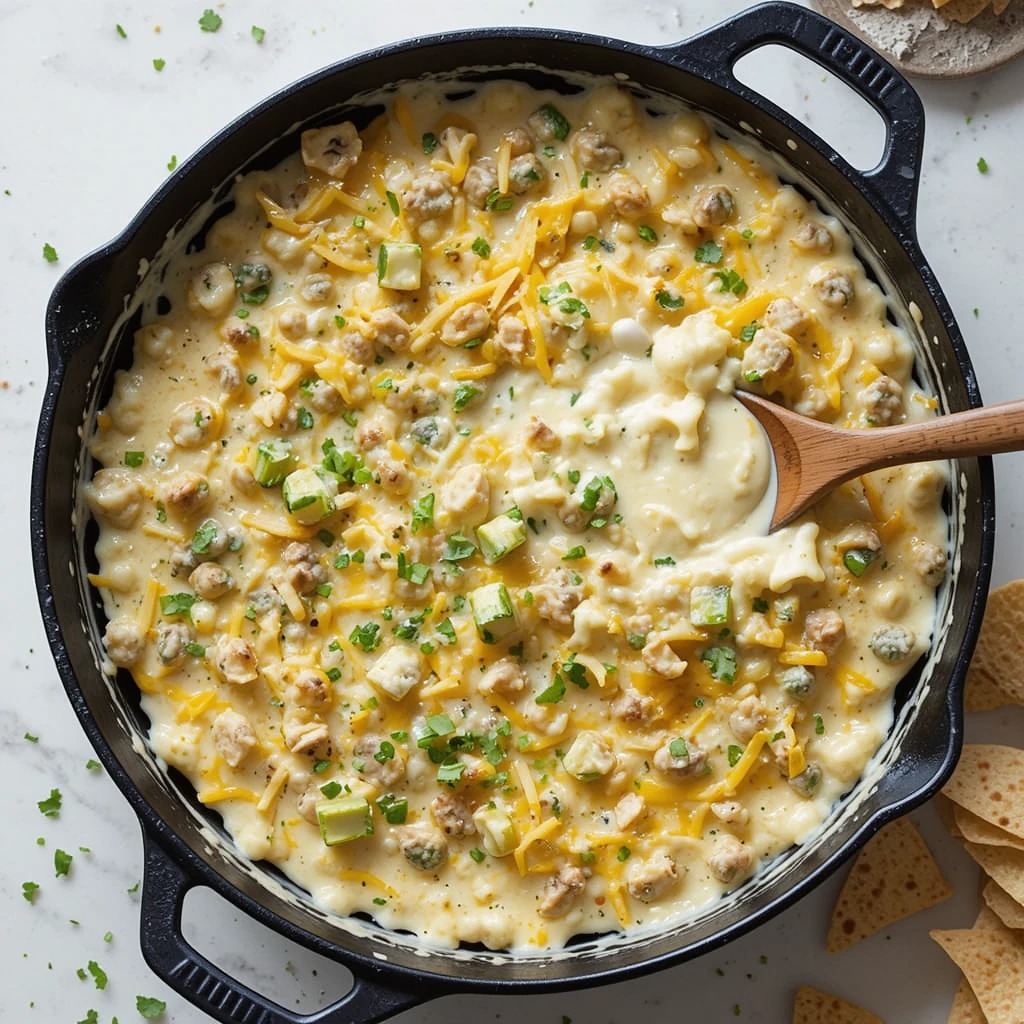
What Makes This Special
This bubbling hot cheese dip is pure comfort in a skillet. The combination of melted cheese with savory additions creates an irresistible appetizer that guests literally gather around.
Key Ingredients
- 2 cups shredded Oaxaca cheese (or mozzarella)
- 1 cup shredded Monterey Jack cheese
- 1 poblano pepper, roasted and diced
- 1 jalapeño, seeded and diced
- 1/2 cup diced onion
- 2 cloves garlic, minced
- 1 tbsp butter
- 1/4 cup heavy cream
- 1/4 cup fresh cilantro, chopped
- 1 tsp cumin
- Tortilla chips for serving
- Warm flour tortillas for serving
Step-by-Step Instructions
Roast the Poblano
Place the poblano pepper directly over a gas flame or under the broiler. Turn occasionally until the skin is blackened all over, about 5-7 minutes.
Place in a bowl and cover with plastic wrap for 5 minutes. This steams the skin and makes it easy to remove.
Peel off the charred skin, remove seeds, and dice the flesh. The smoky flavor this adds is incredible!
Sauté the Aromatics
In a cast-iron skillet or oven-safe pan, melt butter over medium heat. Add diced onion and cook for 3-4 minutes until softened and translucent.
Add minced garlic and jalapeño, cooking for another minute until fragrant. Be careful not to burn the garlic!
Melt the Cheese
Reduce heat to low. Add the shredded cheeses to the skillet, distributing them evenly. Pour the heavy cream over the cheese.
Let it melt slowly, stirring occasionally with a wooden spoon. This takes patience but results in the smoothest, creamiest texture.
As the cheese melts, stir in the cumin and roasted poblano pieces. Keep stirring gently until everything is combined and gooey.
Finish and Serve
Once completely melted and smooth, sprinkle with fresh cilantro. You can serve directly from the skillet—just place it on a trivet to protect your table.
Keep the dip warm by placing the skillet on a warming tray or returning it to a 200°F oven between servings.
Tips for Perfect Queso Fundido
Use freshly shredded cheese, not pre-shredded. The anti-caking agents in bagged cheese prevent smooth melting.
Low and slow is key—high heat will cause the cheese to separate and become grainy.
If the dip gets too thick, stir in a little warm milk or cream to loosen it up.
What to Serve With
Serve with warm tortilla chips, soft flour tortillas, sliced vegetables, or even grilled bread.
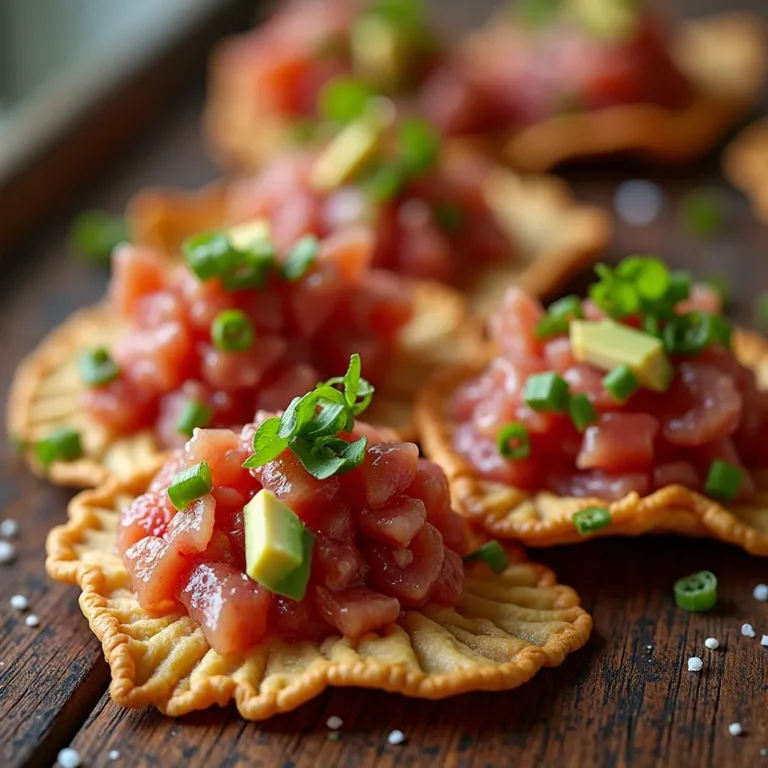
4. Shrimp Ceviche Cups
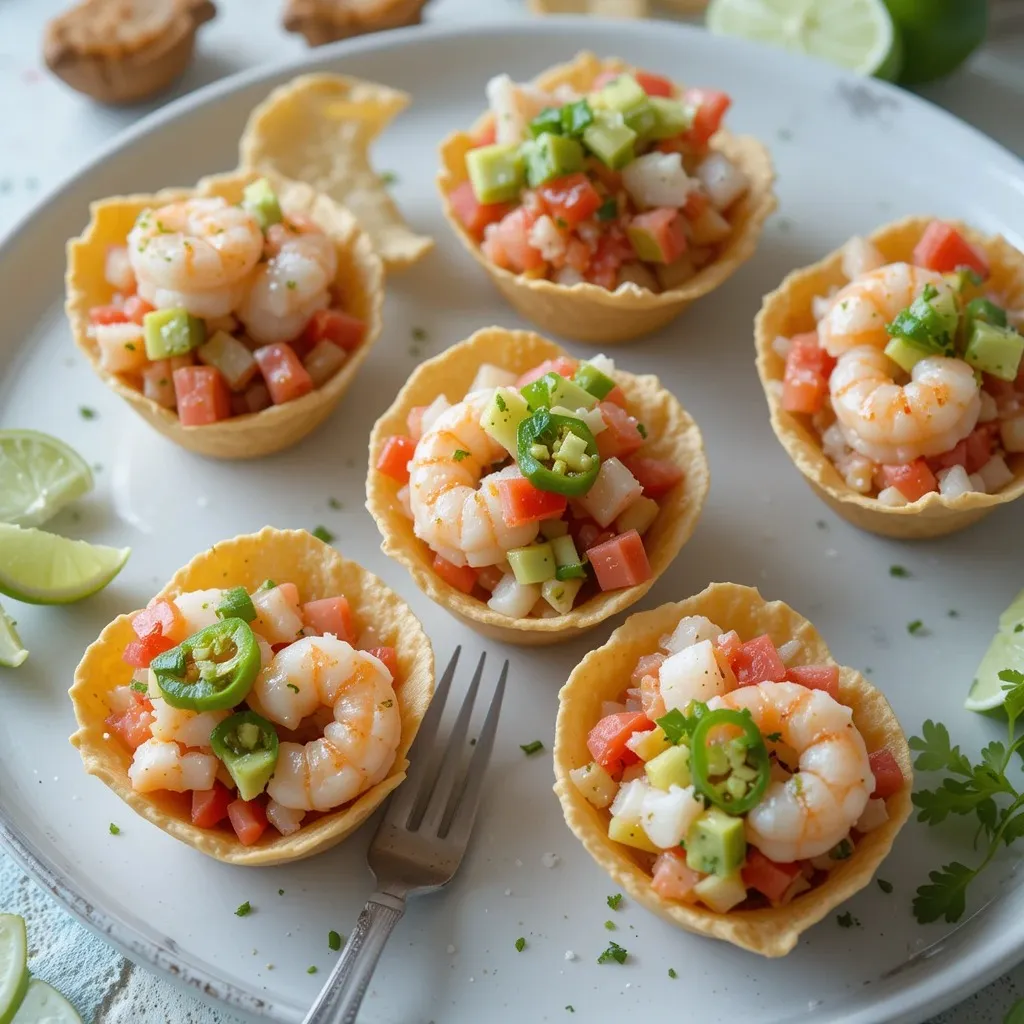
What Makes This Special
Fresh, bright, and light—these ceviche cups are perfect for guests who want something refreshing between richer appetizers. The lime juice “cooks” the shrimp while infusing incredible flavor.
Key Ingredients
- 1 lb medium shrimp, peeled and deveined
- 1 cup fresh lime juice (about 8-10 limes)
- 1 cup diced tomatoes
- 1/2 cup finely diced red onion
- 1 jalapeño, seeded and minced
- 1/2 cup chopped fresh cilantro
- 1 avocado, diced
- 1/4 cup diced cucumber
- 2 tbsp olive oil
- Salt and pepper to taste
- Tortilla chip scoops or crispy tostadas for serving
- Hot sauce (optional)
Step-by-Step Instructions
Cook the Shrimp
Bring a pot of salted water to a rolling boil. Add the shrimp and cook for exactly 2-3 minutes until they turn pink and opaque.
Immediately drain and plunge into a bowl of ice water. This stops the cooking process and keeps the shrimp tender.
Once completely cool, drain well and chop into bite-sized pieces, about half-inch chunks.
Marinate in Lime
Place chopped shrimp in a glass bowl and pour the fresh lime juice over them. Make sure all the shrimp pieces are submerged in the juice.
Cover and refrigerate for at least 30 minutes, or up to 2 hours. The shrimp will turn more opaque and “cook” further in the acidic lime juice.
Don’t marinate longer than 4 hours or the shrimp will become too firm and lose their tender texture.
Mix the Vegetables
In a separate bowl, combine diced tomatoes, red onion, jalapeño, cucumber, and cilantro. Toss with olive oil and season with salt and pepper.
Let this mixture sit for 10-15 minutes to allow flavors to blend.
Combine Everything
Drain most of the lime juice from the shrimp, leaving just a few tablespoons for moisture. Add the vegetable mixture to the shrimp.
Gently fold in diced avocado just before serving—you don’t want it to brown or get mushy.
Taste and adjust seasoning. It should be bright, tangy, and well-seasoned.
Serve in Style
Spoon the ceviche into individual tortilla chip scoops, small cups, or onto crispy tostadas. Garnish each with a cilantro leaf.
Keep the ceviche chilled until serving time. It’s best enjoyed cold!
Tips for Perfect Ceviche
Use the freshest shrimp you can find—quality matters here!
Cut all vegetables to similar small sizes for the best texture in every bite.
If making ahead, combine everything except avocado up to 4 hours early. Add avocado right before serving.
What to Serve With
Serve with extra lime wedges, hot sauce, and saltine crackers as alternative dippers.
5. Mexican Street Corn Salad Bites

What Makes This Special
All the amazing flavors of Mexican street corn, but in an easy-to-eat, mess-free format! Creamy, tangy, slightly spicy, and absolutely addictive.
Key Ingredients
- 4 cups corn kernels (fresh or frozen, thawed)
- 1/2 cup mayonnaise
- 1/2 cup sour cream
- 1 cup crumbled cotija cheese (or feta)
- 2 cloves garlic, minced
- 1 tsp chili powder
- 1/2 tsp smoked paprika
- 1/4 cup fresh cilantro, chopped
- 2 limes, juiced
- 1/4 tsp cayenne pepper (optional)
- Salt and pepper to taste
- Mini phyllo cups or endive leaves for serving
Step-by-Step Instructions
Char the Corn
If using fresh corn, cut kernels off the cob. Heat a large skillet over high heat with no oil.
Add corn kernels in a single layer. Let them sit without stirring for 2-3 minutes to get nice char marks. Toss and repeat.
You want some kernels to be golden and slightly blackened—this adds amazing smoky flavor. Let cool completely.
Make the Creamy Mixture
In a large bowl, whisk together mayonnaise, sour cream, minced garlic, chili powder, smoked paprika, and cayenne pepper if using.
The mixture should be smooth and creamy. This is your flavor base!
Combine Everything
Add the cooled charred corn to the creamy mixture. Fold in the crumbled cotija cheese and chopped cilantro.
Squeeze fresh lime juice over everything and mix well. The lime brightens all the flavors beautifully.
Season with salt and pepper to taste. Remember that cotija is salty, so taste before adding too much salt.
Assemble the Bites
Spoon the corn salad into mini phyllo cups or onto crisp endive leaves. Each bite should be generously filled.
Garnish with extra cotija cheese, a tiny cilantro leaf, and a light dusting of chili powder for presentation.
Chill for at least 30 minutes before serving to let flavors meld.
Tips for Perfect Street Corn Bites
Don’t skip charring the corn—it’s what makes this special!
Make the salad up to 24 hours ahead, but fill the cups within 2 hours of serving to keep them crispy.
For a smokier flavor, add a pinch of chipotle powder to the creamy mixture.
6. Black Bean and Cheese Quesadilla Triangles
What Makes This Special
Crispy on the outside, melty and delicious on the inside. These quesadilla triangles are perfect finger food that kids and adults both love.
Key Ingredients
- 8 large flour tortillas
- 2 cans black beans, drained and rinsed
- 3 cups shredded Mexican cheese blend
- 1 cup corn kernels
- 1/2 cup diced bell peppers (any color)
- 1/4 cup diced red onion
- 1 tsp cumin
- 1/2 tsp chili powder
- 1/4 cup fresh cilantro, chopped
- Vegetable oil for cooking
- Salt and pepper to taste
Step-by-Step Instructions
Prepare the Bean Mixture
In a medium bowl, roughly mash half the black beans with a fork. Leave the other half whole for texture.
Add corn, diced bell peppers, red onion, cumin, chili powder, and cilantro. Mix well and season with salt and pepper.
Assemble the Quesadillas
Lay a tortilla flat on your work surface. Spread about 1/2 cup of the bean mixture on one half of the tortilla.
Sprinkle generously with shredded cheese—about 1/2 cup per quesadilla. Fold the tortilla in half to create a half-moon shape.
Press down gently to help everything stick together.
Cook Until Golden
Heat a large skillet or griddle over medium heat. Brush lightly with vegetable oil.
Place folded quesadilla in the pan. Cook for 3-4 minutes until the bottom is golden brown and crispy.
Carefully flip using a large spatula. Cook another 3-4 minutes on the other side until golden and cheese is melted.
Remove to a cutting board and let rest for 1 minute before cutting.
Cut into Triangles
Using a sharp knife or pizza cutter, cut each quesadilla into 4 triangles. This gives you perfect hand-held portions.
Arrange on a platter with the points facing outward for an attractive presentation.
Tips for Perfect Quesadilla Triangles
Don’t overfill or the ingredients will spill out during cooking and flipping.
Medium heat is crucial—too high and the outside burns before the cheese melts.
Keep cooked quesadillas warm in a 200°F oven while you finish the batch.
What to Serve With
Serve with salsa, guacamole, and sour cream for dipping. Pickled jalapeños on the side add nice heat!
7. Spicy Guacamole with Homemade Chips
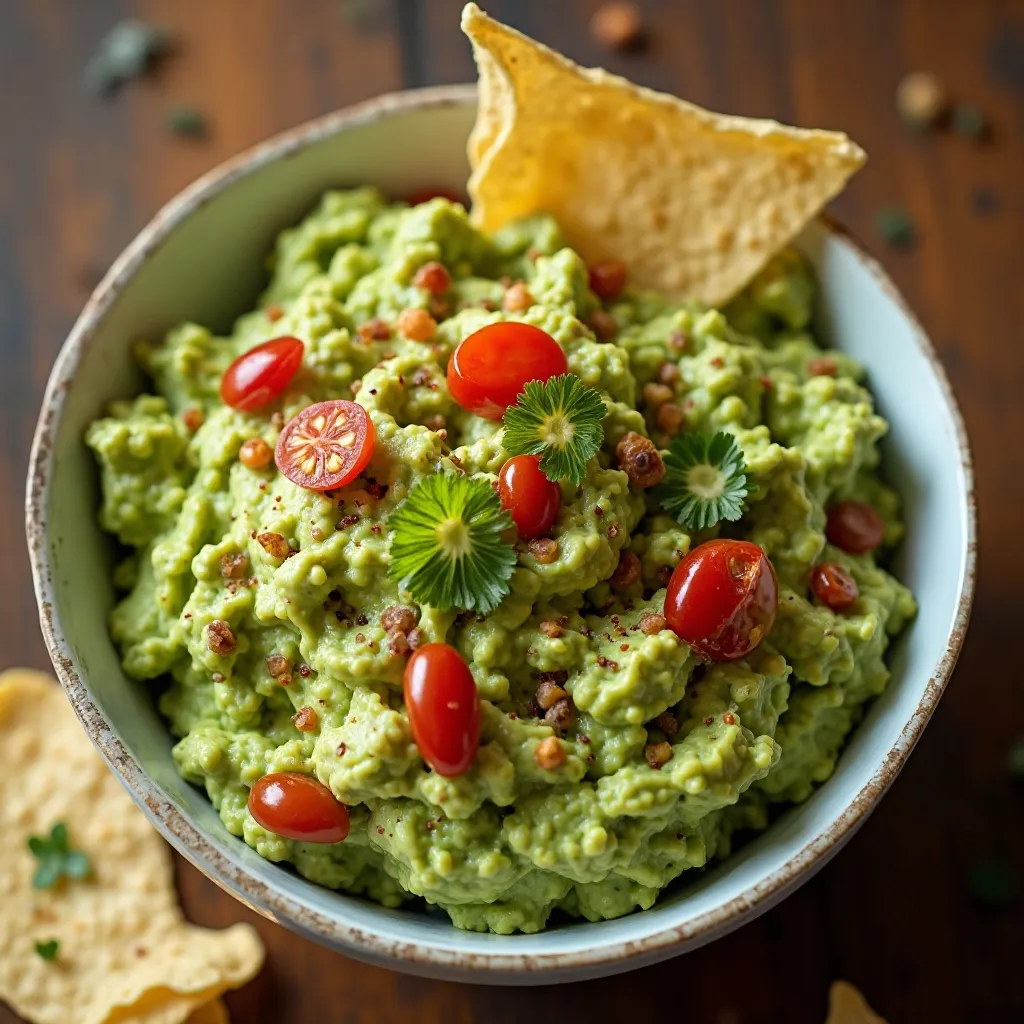
What Makes This Special
Fresh, creamy guacamole is a party essential! This version has a spicy kick that elevates it beyond basic. Making your own chips takes it to another level.
Key Ingredients
For the Guacamole:
- 5 ripe avocados
- 1/4 cup finely diced red onion
- 2 Roma tomatoes, diced
- 1-2 jalapeños, seeded and minced
- 3 cloves garlic, minced
- 1/4 cup fresh cilantro, chopped
- 3 limes, juiced
- 1/2 tsp cumin
- 1/4 tsp cayenne pepper
- Salt and pepper to taste
For the Chips:
- 12 corn tortillas
- 2 tbsp vegetable oil
- 1 tsp salt
- 1/2 tsp chili powder (optional)
Step-by-Step Instructions
Make the Homemade Chips
Preheat oven to 375°F. Stack corn tortillas and cut into 6 wedges each using a sharp knife or pizza cutter.
Arrange wedges in a single layer on two baking sheets. Brush lightly with oil on both sides.
Sprinkle with salt and chili powder if using. Bake for 10-12 minutes, rotating pans halfway through.
Remove when golden and crispy. Let cool—they’ll continue to crisp up as they cool.
Choose Perfect Avocados
Select avocados that yield to gentle pressure but aren’t mushy. Cut each avocado in half lengthwise.
Remove the pit by carefully tapping your knife into it and twisting. Scoop the flesh into a large bowl.
Mash to Your Preference
Using a fork or potato masher, mash the avocados to your desired consistency. I like mine chunky with some texture.
For creamier guacamole, mash more thoroughly. For chunkier, leave bigger pieces.
Add the Mix-Ins
Add diced onion, tomatoes, jalapeños, garlic, and cilantro to the mashed avocado. Squeeze fresh lime juice over everything.
Sprinkle with cumin, cayenne, salt, and pepper. Fold everything together gently but thoroughly.
Taste and adjust seasonings. It should be bright, flavorful, and slightly spicy.
Prevent Browning
Press plastic wrap directly onto the surface of the guacamole to prevent air exposure. This stops oxidation and browning.
Refrigerate until serving time. You can make this up to 4 hours ahead.
Tips for Perfect Guacamole
Don’t over-mash! Some texture is good and shows it’s fresh and homemade.
Add ingredients gradually and taste as you go—you can always add more but can’t take away!
If avocados aren’t ripe, place them in a paper bag with an apple or banana overnight.
What to Serve With
Besides the homemade chips, serve with veggie sticks, pita chips, or use as a topping for other appetizers.
8. Cheesy Jalapeño Poppers
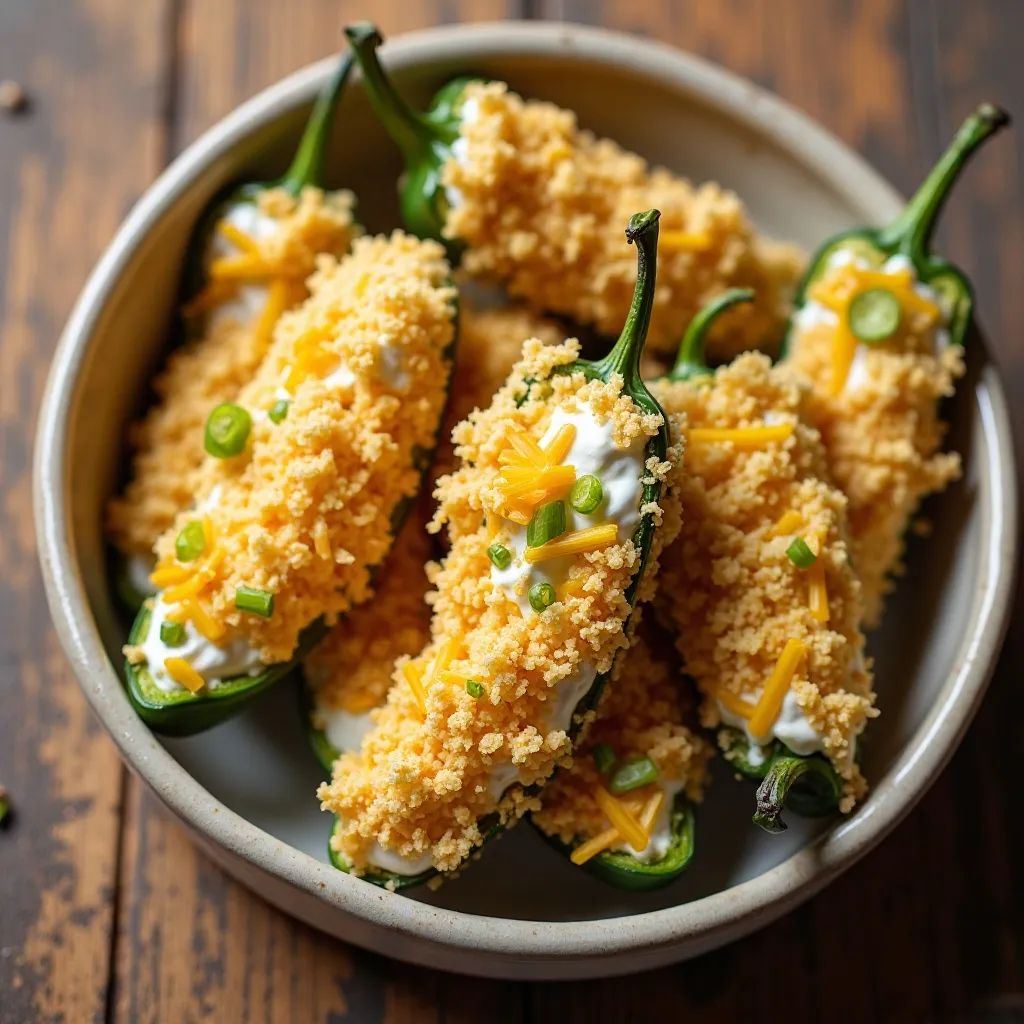
What Makes This Special
Creamy, cheesy filling wrapped in a crispy coating with just the right amount of heat. These disappeared so fast at my last party that I barely got to taste one!
Key Ingredients
- 12 large jalapeños
- 8 oz cream cheese, softened
- 1 cup shredded cheddar cheese
- 1/4 cup shredded Monterey Jack cheese
- 2 green onions, finely chopped
- 1/2 tsp garlic powder
- 1/2 tsp cumin
- 1 cup all-purpose flour
- 2 eggs, beaten
- 2 cups panko breadcrumbs
- Vegetable oil for frying
- Salt and pepper to taste
Step-by-Step Instructions
Prepare the Jalapeños
Put on gloves to protect your hands from jalapeño oils! Cut each jalapeño in half lengthwise.
Using a small spoon, scrape out all the seeds and white membrane. This is where most of the heat lives.
For milder poppers, remove everything. For spicier, leave some seeds.
Make the Cheese Filling
In a bowl, combine softened cream cheese, shredded cheddar, Monterey Jack, green onions, garlic powder, and cumin.
Mix with a spoon or electric mixer until smooth and creamy. Season with salt and pepper.
Taste the filling—it should be flavorful since it’s the star of the show!
Stuff the Peppers
Using a small spoon or piping bag, fill each jalapeño half generously with the cheese mixture. Mound it slightly on top.
Press the filling in firmly so it stays put during breading and cooking.
Set Up Breading Station
Arrange three shallow dishes: one with flour, one with beaten eggs, and one with panko breadcrumbs.
Season the flour with a pinch of salt and pepper. This adds flavor to every layer.
Bread the Poppers
Coat each stuffed jalapeño in flour, shaking off excess. Dip in beaten egg, letting excess drip off.
Finally, press into panko breadcrumbs, coating completely. Place on a baking sheet.
For extra crispy coating, double-bread by repeating the egg and breadcrumb steps.
Fry to Perfection
Heat 2 inches of oil in a deep pan to 350°F. Use a thermometer for accuracy.
Carefully add 3-4 poppers at a time—don’t overcrowd. Fry for 3-4 minutes, turning once, until golden brown.
Remove with a slotted spoon and drain on paper towels. Let cool for 5 minutes before serving—the filling is molten hot!
Tips for Perfect Jalapeño Poppers
Baking Option: Prefer not to fry? Bake at 400°F for 20-25 minutes until golden and crispy.
Mix different cheeses for more complex flavor. Try adding some pepper jack for extra kick!
Make ahead by breading and freezing before cooking. Fry straight from frozen, adding 2 minutes to cooking time.
What to Serve With
Serve with ranch dressing, sour cream, or a cooling cilantro-lime sauce for dipping.
9. Chicken Tinga Tostadas
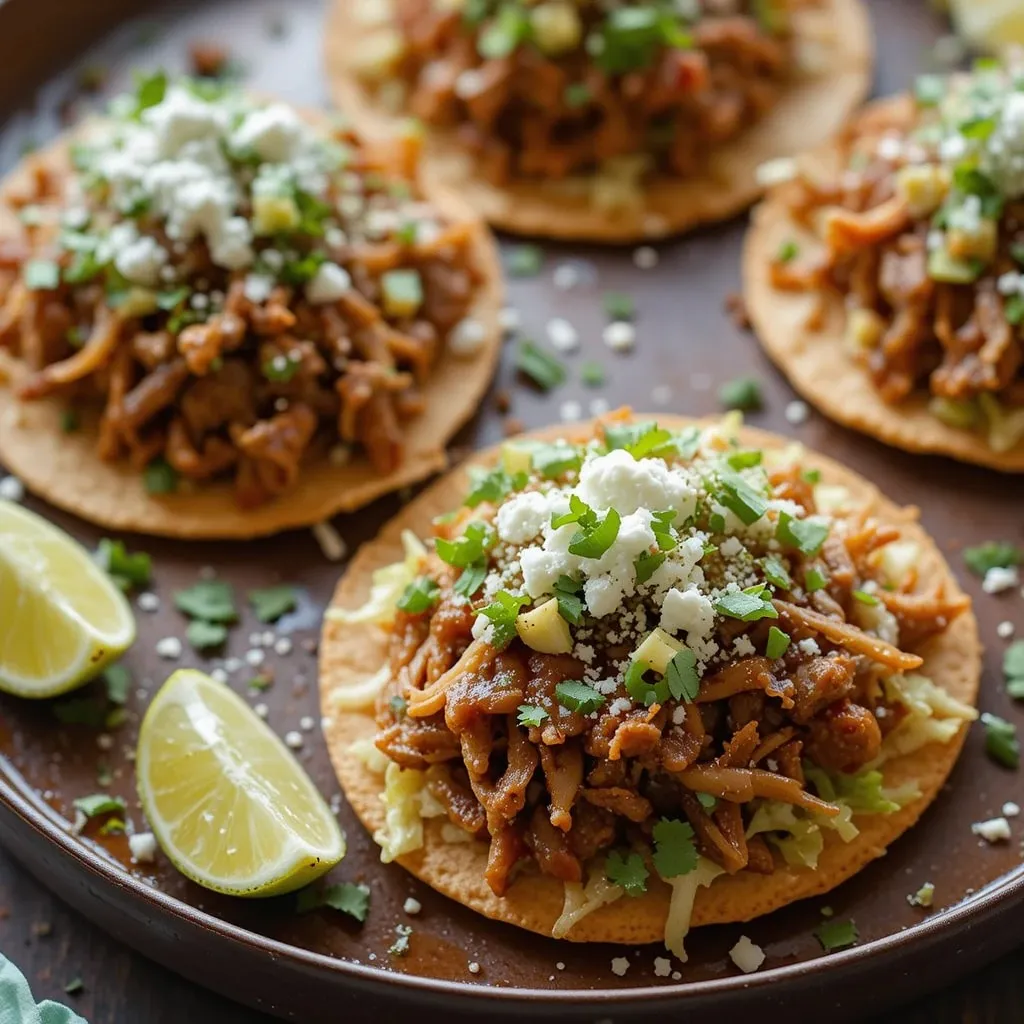
What Makes This Special
Tender, smoky shredded chicken piled high on crispy tostadas. The chipotle gives it that signature smokiness that makes Mexican food so crave-worthy.
Key Ingredients
- 2 lbs chicken breast
- 1 can chipotle peppers in adobo sauce
- 1 large onion, sliced
- 3 cloves garlic, minced
- 1 can crushed tomatoes (14 oz)
- 1 tsp dried oregano
- 1 tsp cumin
- 1/2 tsp smoked paprika
- 2 tbsp vegetable oil
- 16 tostada shells
- Salt and pepper to taste
For Toppings:
- Shredded lettuce
- Crema or sour cream
- Crumbled cotija cheese
- Diced avocado
- Fresh cilantro
- Lime wedges
Step-by-Step Instructions
Cook the Chicken
Place chicken breasts in a large pot and cover with water. Add a pinch of salt and bring to a boil.
Reduce heat and simmer for 20 minutes until chicken is cooked through and reaches 165°F internally.
Remove chicken and let cool slightly. Once cool enough to handle, shred using two forks.
Make the Tinga Sauce
Heat oil in a large skillet over medium heat. Add sliced onions and cook for 5-6 minutes until softened and translucent.
Add minced garlic and cook another minute until fragrant.
Carefully add 2-3 chipotle peppers with 2 tablespoons of the adobo sauce. Be cautious—this is powerful stuff! Start with less and add more for heat.
Simmer the Chicken
Add crushed tomatoes, oregano, cumin, and smoked paprika to the skillet. Stir well to combine.
Add the shredded chicken to the sauce. Stir everything together, making sure the chicken is well coated.
Simmer for 15-20 minutes, stirring occasionally. The sauce should thicken and the chicken should absorb all those amazing flavors.
Taste and adjust seasoning with salt, pepper, or more chipotle if you dare!
Assemble the Tostadas
Warm the tostada shells in a 300°F oven for 5 minutes to make them extra crispy.
Spread a generous amount of chicken tinga on each tostada shell.
Add the Toppings
Top with shredded lettuce, a drizzle of crema, crumbled cotija cheese, and diced avocado.
Garnish with fresh cilantro and serve with lime wedges on the side.
Arrange on a platter and watch them disappear!
Tips for Perfect Tinga Tostadas
Use rotisserie chicken to save time—just skip the boiling step!
The sauce can be made 2 days ahead and reheated before assembling.
For less heat, remove seeds from chipotle peppers before adding.
What to Serve With
These are filling enough to be a main course, but work great alongside other appetizers at a party spread.
10. Elote (Mexican Street Corn) Skewers
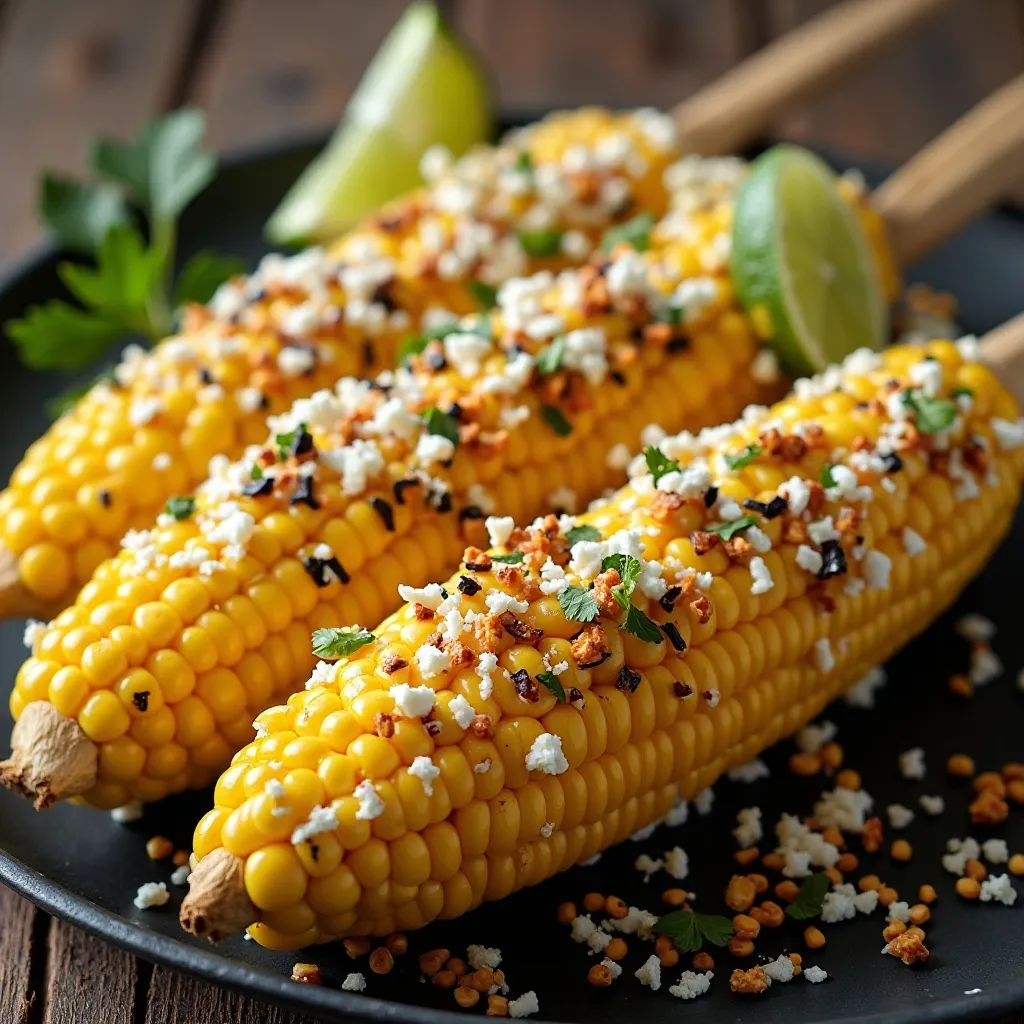
What Makes This Special
Grilled corn on skewers makes eating so much easier than full cobs! The charred kernels with creamy, tangy toppings are irresistible.
Key Ingredients
- 6 ears fresh corn
- 1/2 cup mayonnaise
- 1/2 cup Mexican crema or sour cream
- 1 cup crumbled cotija cheese
- 2 limes, juiced and zested
- 2 tsp chili powder
- 1/2 tsp cayenne pepper (optional)
- 1/4 cup fresh cilantro, chopped
- 2 tbsp butter, melted
- Wooden skewers
- Salt to taste
Step-by-Step Instructions
Prepare the Corn
Shuck the corn and remove all silk. Cut each ear into thirds to make skewer-sized pieces.
Insert a wooden skewer into the cut end of each piece. This creates a handle for easy eating!
If using wooden skewers, soak them in water for 30 minutes first to prevent burning.
Make the Sauce
In a bowl, whisk together mayonnaise, crema, lime juice, and lime zest. This is your creamy coating.
Season with a pinch of salt. Set aside until the corn is cooked.
Grill the Corn
Preheat your grill to medium-high heat. Brush each corn piece with melted butter.
Place corn skewers on the grill. Cook for 10-12 minutes, turning every 2-3 minutes.
You want nice char marks all around—this adds incredible smoky flavor!
The kernels should be tender and slightly caramelized.
Coat and Season
While the corn is still hot, brush generously with the creamy sauce. Use a basting brush or spoon.
Immediately roll in crumbled cotija cheese while the sauce is still wet. The cheese sticks better this way!
Sprinkle with chili powder and cayenne if using. Finish with chopped cilantro.
Serve Immediately
Arrange on a platter with extra lime wedges. Serve while still warm for the best flavor.
These are messy and delicious—have plenty of napkins ready!
Tips for Perfect Elote Skewers
No Grill? Roast in a 425°F oven for 20-25 minutes, turning once.
Make an assembly station and let guests add their own toppings for interactive fun!
Leftovers (if any!) can be cut off the skewer and used in salads or tacos.
What to Serve With
These pair perfectly with cold beverages and are great alongside grilled proteins.
11. Beef Empanada Bites

What Makes This Special
Flaky pastry filled with savory seasoned beef—these are like little pockets of joy! They’re substantial enough to satisfy hungry guests.
Key Ingredients
- 1 lb ground beef
- 1 small onion, finely diced
- 2 cloves garlic, minced
- 1/2 cup diced bell pepper
- 1 tsp cumin
- 1 tsp chili powder
- 1/2 tsp paprika
- 1/4 cup tomato sauce
- 1/4 cup beef broth
- 2 packages refrigerated pie crust
- 1 egg, beaten (for egg wash)
- Salt and pepper to taste
Step-by-Step Instructions
Make the Filling
Heat a large skillet over medium-high heat. Add ground beef and cook, breaking it up with a wooden spoon.
Once browned, drain excess fat. Add diced onion, garlic, and bell pepper. Cook for 5 minutes until vegetables soften.
Add cumin, chili powder, paprika, salt, and pepper. Stir to coat the meat in spices. Cook for 1 minute to toast the spices.
Pour in tomato sauce and beef broth. Simmer for 10-15 minutes until most liquid evaporates. The filling should be moist but not wet.
Let the filling cool completely before assembling—hot filling will make the pastry soggy.
Prepare the Dough
Unroll pie crusts and let them come to room temperature for easier handling.
Using a 3-inch round cookie cutter or drinking glass, cut circles from the dough. You should get about 8-10 circles per crust.
Gather scraps, re-roll gently, and cut more circles. Don’t overwork the dough or it becomes tough.
Fill and Seal
Place a tablespoon of cooled beef filling in the center of each circle. Don’t overfill!
Brush the edges of the circle with water. Fold the dough over to create a half-moon shape.
Press edges firmly together, then crimp with a fork to seal completely. Make sure there are no gaps or the filling will leak out.
Bake to Golden Perfection
Preheat oven to 400°F. Line a baking sheet with parchment paper.
Arrange empanadas on the baking sheet, leaving space between each. Brush tops with beaten egg for a beautiful golden finish.
Cut a small slit in the top of each empanada to allow steam to escape.
Bake for 18-22 minutes until golden brown and crispy. The bottoms should be golden too.
Let cool for 5 minutes before serving—the filling is very hot!
Tips for Perfect Empanada Bites
Make the filling a day ahead and refrigerate. Cold filling is easier to work with.
Freeze unbaked empanadas on a tray, then transfer to a freezer bag. Bake from frozen, adding 5 minutes to cooking time.
For flakier crust, keep everything cold and work quickly.
What to Serve With
Serve with chimichurri sauce, salsa verde, or spicy mayo for dipping.
12. Pico de Gallo with Crispy Tortilla Bowls
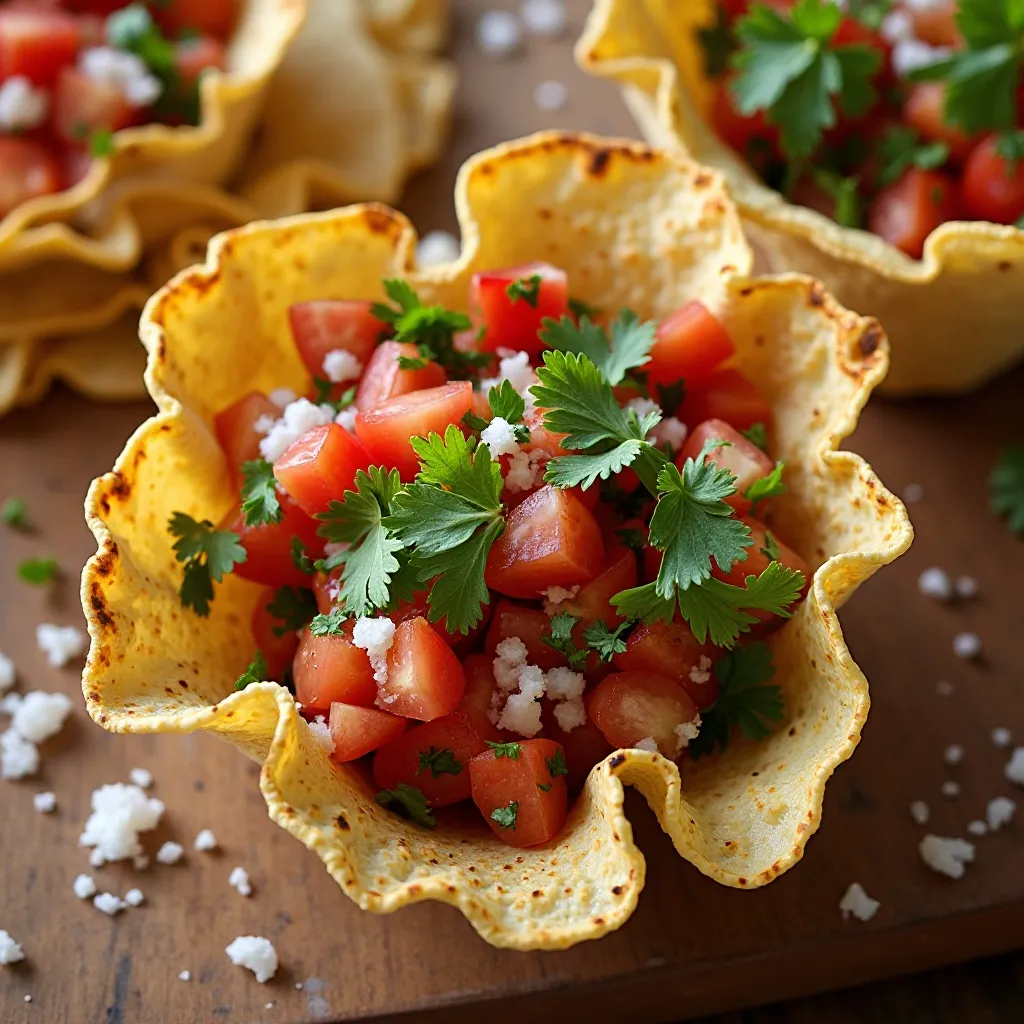
What Makes This Special
Fresh, chunky pico de gallo is a classic for good reason! Serving it in homemade crispy bowls makes it extra special and eliminates the need for separate serving dishes.
Key Ingredients
For Pico de Gallo:
- 6 large ripe tomatoes, diced
- 1 large white onion, finely diced
- 2 jalapeños, seeded and minced
- 1 cup fresh cilantro, chopped
- 4 limes, juiced
- 1 tsp salt
- 1/2 tsp black pepper
For Tortilla Bowls:
- 6 large flour tortillas
- Cooking spray or vegetable oil
- Salt to taste
Step-by-Step Instructions
Make the Tortilla Bowls
Preheat oven to 375°F. Turn a muffin tin upside down.
Spray both sides of tortillas with cooking spray or brush with oil. Sprinkle lightly with salt.
Drape each tortilla over the bottom of an upturned muffin cup, pressing gently to create a bowl shape.
Bake for 10-12 minutes until golden and crispy. They’ll firm up as they cool.
Carefully remove and let cool completely on a wire rack.
Prepare the Pico de Gallo
Dice tomatoes into small, uniform pieces. Place in a colander to drain excess liquid for 10 minutes.
Finely dice the onion. For milder flavor, rinse diced onion under cold water and pat dry.
Seed and mince jalapeños. Adjust the amount based on your heat preference.
Combine and Season
In a large bowl, combine drained tomatoes, onion, jalapeños, and chopped cilantro.
Squeeze fresh lime juice over everything. The lime is crucial—it brightens all the flavors!
Season with salt and pepper. Toss gently to combine.
Let sit for 15-30 minutes before serving. This allows flavors to meld beautifully.
Assemble and Serve
Right before serving, drain any excess liquid from the pico de gallo.
Fill each crispy tortilla bowl with fresh pico de gallo. Don’t fill too early or bowls will get soggy.
Place on a serving platter and surround with extra tortilla chips.
Tips for Perfect Pico de Gallo
Use ripe, firm tomatoes. Overripe ones will make the salsa too watery.
Cut everything roughly the same size for the best texture and appearance.
Make pico de gallo up to 4 hours ahead, but don’t add salt until just before serving—it draws out moisture.
What to Serve With
Beyond the tortilla bowls, serve with chips, use as a topping for other appetizers, or enjoy with grilled proteins.
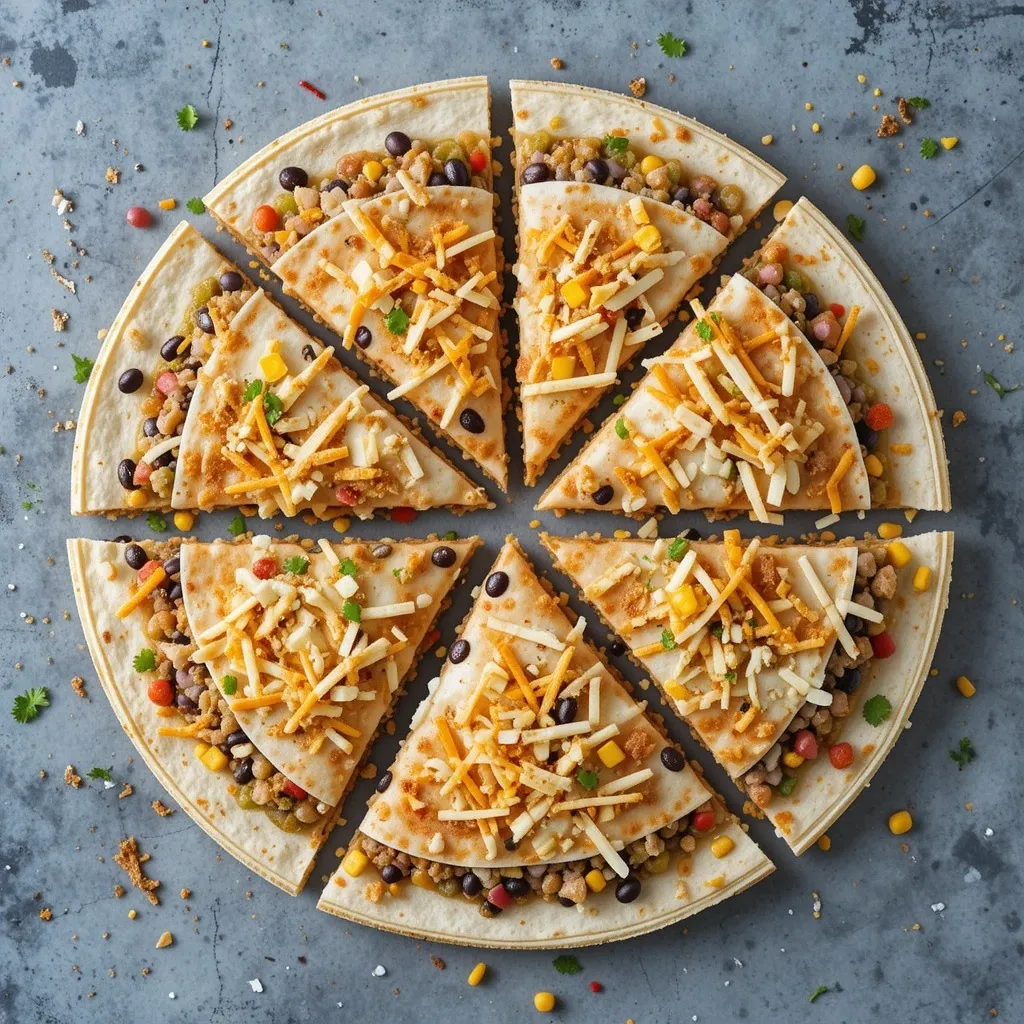
13. Mexican Pizza Bites
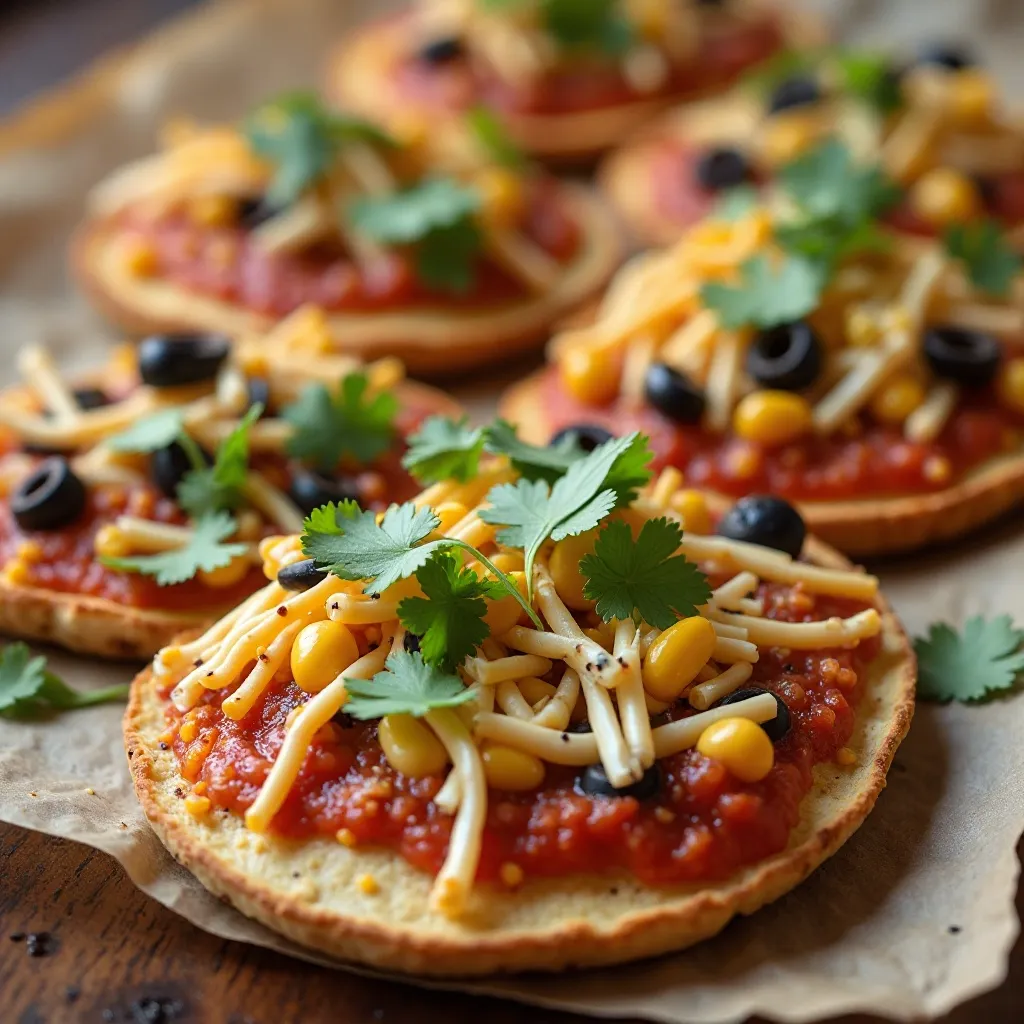
What Makes This Special
These fun mini pizzas combine Italian and Mexican cuisines in the best way! They’re quick to make and totally customizable for picky eaters.
Key Ingredients
- 24 small flour tortillas or mini naan breads
- 1 cup refried beans
- 2 cups cooked ground beef or shredded chicken
- 2 cups shredded Mexican cheese blend
- 1 cup salsa
- 1/2 cup sliced black olives
- 1/2 cup corn kernels
- 1/4 cup diced jalapeños
- 1/4 cup chopped cilantro
- Sour cream for topping
- Olive oil for brushing
Step-by-Step Instructions
Prepare the Bases
Preheat oven to 400°F. Line two large baking sheets with parchment paper.
Arrange tortillas or naan in a single layer on baking sheets. Brush lightly with olive oil.
Pre-bake for 3-4 minutes until just starting to crisp. This prevents soggy bottoms!
Layer the Toppings
Spread a thin layer of refried beans on each base. This acts as your “sauce” and adds protein.
Top with seasoned meat, distributing evenly across all pizzas.
Spoon a little salsa on each—not too much or they’ll get soggy.
Add Cheese and Veggies
Sprinkle generously with shredded cheese. Don’t be shy—cheese is what holds everything together!
Add black olives, corn kernels, and jalapeño slices according to preference.
Bake Until Bubbly
Return to oven and bake for 8-10 minutes until cheese is melted and bubbly.
The edges of the tortillas should be golden and crispy.
Watch closely in the last few minutes to prevent burning.
Garnish and Serve
Remove from oven and let cool for 2 minutes. Top each with a small dollop of sour cream.
Sprinkle with fresh cilantro for color and freshness.
Cut larger ones in half for easier eating, or serve whole if using small tortillas.
Tips for Perfect Pizza Bites
Set up a topping bar and let guests customize their own—kids especially love this!
Use different proteins on different pizzas to offer variety.
These can be assembled ahead and baked right before serving.
What to Serve With
Serve with extra salsa, guacamole, and hot sauce on the side.
14. Chorizo and Potato Flautas
What Makes This Special
Crispy rolled tacos filled with spiced potatoes make an impressive appetizer! The chorizo adds incredible depth of flavor that makes these memorable.
Key Ingredients
- 3 large russet potatoes, peeled and diced
- 1/2 lb ground beef (as halal substitute for chorizo)
- 1 tbsp chili powder
- 1 tsp paprika
- 1 tsp cumin
- 1/2 tsp garlic powder
- 1/2 tsp onion powder
- 1 small onion, diced
- 2 cloves garlic, minced
- 12-15 corn tortillas
- Vegetable oil for frying
- Salt and pepper to taste
Step-by-Step Instructions
Cook the Potatoes
Place diced potatoes in a large pot and cover with cold salted water.
Bring to a boil, then reduce heat and simmer for 12-15 minutes until fork-tender but not mushy.
Drain well and let steam dry for a few minutes. This prevents soggy flautas.
Prepare the Seasoned Beef
In a large skillet, cook ground beef over medium-high heat, breaking it apart as it cooks.
Add chili powder, paprika, cumin, garlic powder, onion powder, salt, and pepper. Mix well to create a chorizo-style seasoning.
Add diced onion and garlic. Cook until onion is soft and meat is fully cooked, about 8-10 minutes.
Combine Filling
Add cooked potatoes to the seasoned beef. Mash some of the potatoes slightly with a fork to help bind everything.
Mix thoroughly so the spices coat everything evenly. Taste and adjust seasoning.
Let cool slightly before assembling—it’s easier to work with when not piping hot.
Warm the Tortillas
Wrap corn tortillas in damp paper towels and microwave for 30-45 seconds.
Keep them wrapped until you’re ready to use each one—they crack if they dry out.
Roll the Flautas
Place 2-3 tablespoons of filling along one edge of a tortilla. Roll tightly, keeping the filling tucked in.
Secure with a toothpick through the seam. Repeat with remaining tortillas and filling.
Fry Until Crispy
Heat 1 inch of oil in a deep skillet to 350°F. Test with a small piece of tortilla—it should sizzle immediately.
Fry flautas in batches of 3-4, seam side down first. Cook for 2-3 minutes per side until golden and crispy.
Remove with tongs and drain on paper towels. Remove toothpicks carefully.
Tips for Perfect Flautas
Don’t overfill or they’ll burst open during frying.
For a healthier option, brush with oil and bake at 425°F for 15-20 minutes, turning halfway.
Make ahead and freeze unbaked. Fry straight from frozen when ready to serve.
What to Serve With
Serve with lettuce, tomatoes, crema, cotija cheese, and salsa for a complete experience.
15. Watermelon and Cucumber Salsa with Cinnamon Chips
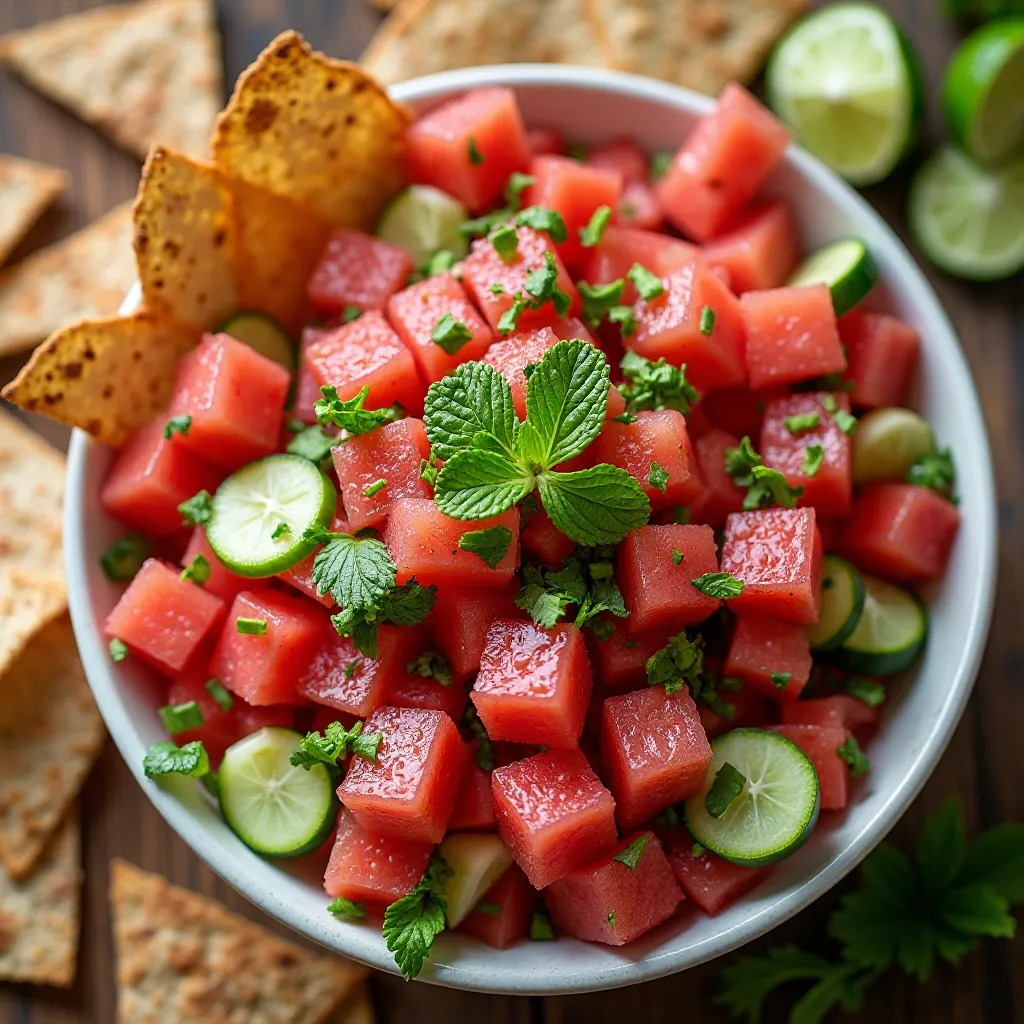
What Makes This Special
This refreshing, unexpected combination is perfect for balancing rich appetizers. The sweet, juicy fruit with spicy kick is incredibly refreshing!
Key Ingredients
For the Salsa:
- 3 cups diced seedless watermelon
- 1 large cucumber, peeled and diced
- 1/4 cup finely diced red onion
- 1 jalapeño, seeded and minced
- 1/4 cup fresh mint, chopped
- 3 limes, juiced
- 1 tbsp honey
- Pinch of salt
For Cinnamon Chips:
- 8 flour tortillas
- 3 tbsp melted butter
- 1/4 cup sugar
- 1 tbsp cinnamon
Step-by-Step Instructions
Make the Cinnamon Chips
Preheat oven to 350°F. Line baking sheets with parchment paper.
Mix sugar and cinnamon in a small bowl.
Brush both sides of tortillas with melted butter. Cut each into 8 triangles.
Arrange in a single layer on baking sheets. Sprinkle generously with cinnamon-sugar mixture.
Bake for 10-12 minutes until crispy and golden. Watch carefully—they can burn quickly!
Let cool completely. They’ll crisp up even more as they cool.
Prepare the Fruit
Dice watermelon into small, bite-sized pieces. Let drain in a colander for 10 minutes to remove excess juice.
Peel cucumber and dice into similar-sized pieces as the watermelon.
Finely dice red onion. Rinse under cold water and pat dry to reduce sharpness.
Make the Salsa
In a large bowl, combine drained watermelon, cucumber, red onion, minced jalapeño, and chopped mint.
In a small bowl, whisk together lime juice, honey, and a pinch of salt until honey dissolves.
Pour dressing over fruit mixture and toss gently to combine.
Chill and Serve
Cover and refrigerate for at least 30 minutes. This allows flavors to blend while keeping everything crisp and cold.
Give a final gentle stir before serving to redistribute juices.
Serve the chilled salsa in a beautiful bowl surrounded by cinnamon chips.
Tips for Perfect Fruit Salsa
Don’t skip the draining step—watery salsa dilutes the flavors!
Make this no more than 4 hours ahead. The fruit releases too much liquid if it sits longer.
Add the mint just before serving to keep it fresh and vibrant.
What to Serve With
This is perfect as a palate cleanser between heavier appetizers. It also pairs wonderfully with vanilla ice cream for dessert!
What to Serve These NYE Appetizers Mexican With
These appetizers are versatile and pair beautifully with various beverages and sides. Here are my top recommendations:
Beverages: Fresh fruit aguas frescas, sparkling water with lime, Mexican sodas, virgin margaritas, or cold horchata all complement these flavors perfectly.
Additional Sides: Mexican rice, cilantro-lime rice, refried beans, or a simple green salad with lime vinaigrette.
Dipping Sauces: Keep bowls of extra salsa, guacamole, sour cream, hot sauce, and lime crema available for guests who like extra condiments.
Fresh Elements: A platter of lime wedges, fresh cilantro sprigs, sliced radishes, and pickled jalapeños lets guests customize their plates.
Top Tips for Perfecting NYE Appetizers Mexican
Plan Your Menu Wisely
Choose 5-7 appetizers that offer variety in temperature, texture, and flavor. Include cold options, hot options, vegetarian choices, and different levels of spiciness.
Prep Ahead Strategy
Many fillings can be made 1-2 days ahead. Chop vegetables the morning of your party. Assemble items that need baking or frying within 2 hours of serving.
Temperature Management
Keep hot items warm in a 200°F oven. Serve cold items on chilled platters. Room temperature appetizers should be set out 15 minutes before serving.
Ingredient Quality Matters
Use fresh limes—bottled juice doesn’t compare. Buy whole spices and grind when possible. Fresh cilantro makes a huge difference in flavor.
Portion Control
Make appetizers bite-sized so guests can easily try multiple options. Plan for 8-10 pieces per person if serving only appetizers.
Common Mistakes to Avoid
Don’t overcrowd your frying pan—it lowers oil temperature and results in soggy food. Don’t skip the resting time for fried items—they need it to crisp up properly.
Avoid making guacamole or pico de gallo too far ahead—they lose freshness. Don’t overfill wrapped appetizers or they’ll burst during cooking.
Seasoning Tips
Always taste and adjust seasoning before serving. Remember that cold foods need more seasoning than hot ones. Layer salt throughout cooking rather than adding it all at once.
Presentation Ideas
Serve on colorful platters with garnishes of lime wedges and fresh cilantro. Use small bowls for dips arranged on larger platters. Label spicy items so guests know what to expect.
Storing and Reheating Tips
Refrigerator Storage
Most cooked appetizers keep well in airtight containers for 3-4 days. Store salsas and dips separately from chips to prevent sogginess.
Fresh items like guacamole last 1-2 days maximum. Press plastic wrap directly on the surface to prevent browning.
Fried items can be refrigerated but lose crispness. Store in paper towel-lined containers to absorb moisture.
Freezer Storage
Empanadas, flautas, and taquitos freeze beautifully for up to 3 months. Freeze in a single layer first, then transfer to freezer bags.
Most cheese-based dips don’t freeze well—they separate when thawed.
Cooked meats like chicken tinga freeze perfectly for up to 3 months in airtight containers.
Reheating Instructions
Oven Method: Best for crispy items. Reheat at 375°F for 10-15 minutes until heated through and crispy.
Skillet Method: Great for quesadillas and flautas. Heat over medium with a little oil, turning once.
Microwave Method: Quick but makes things soft. Use for dips and filling-based items. Heat in 30-second intervals.
Air Fryer Method: Perfect for restoring crispness. Reheat at 350°F for 5-8 minutes.
Food Safety
Always reheat to 165°F internal temperature. Only reheat once—don’t reheat repeatedly. Discard any items left at room temperature for more than 2 hours.
Frequently Asked Questions
Can I make these appetizers ahead of time?
Absolutely! Most fillings and salsas can be prepared 1-2 days ahead. Assemble fried items, bake items, and fresh toppings within a few hours of serving for best results. Items like empanadas and flautas can be assembled and frozen for up to 3 months.
How do I adjust spice levels for guests with different preferences?
Serve hot sauce and jalapeños on the side rather than incorporating them. Remove seeds from peppers to reduce heat. Make half of each recipe mild and half spicy. Label spicy items clearly so guests can choose.
What can I substitute if I can’t find certain ingredients?
Substitute cotija cheese with feta or parmesan. Use regular sour cream instead of Mexican crema. If you can’t find specific peppers, adjust with hot sauce or chili powder. Most Mexican cheeses can be replaced with Monterey Jack or cheddar in a pinch.
How many appetizers should I serve per person?
Plan for 8-10 pieces per person if serving only appetizers. If serving before a meal, 4-6 pieces per person is sufficient. Offer at least 3-4 different varieties so everyone finds something they love.
Can these recipes be made vegetarian?
Yes! Many already are vegetarian. Replace meat with black beans, refried beans, or sautéed vegetables. Most recipes work beautifully without meat—just boost the seasoning slightly.
What’s the best way to keep fried appetizers crispy?
Drain on paper towels immediately after frying. Keep warm in a 200°F oven on a wire rack, not directly on a pan. Don’t cover them—trapped steam makes them soggy. Serve within 30 minutes of frying for best texture.
How do I prevent guacamole from turning brown?
Press plastic wrap directly on the surface, eliminating air pockets. Add extra lime juice—the acid slows oxidation. Store in an airtight container. If it does brown slightly, scrape off the top layer—the rest is still good!
What if my tortillas keep cracking when I roll them?
Tortillas must be warm and pliable. Microwave wrapped in damp paper towels for 15-30 seconds. Work with one at a time, keeping others covered. If they’re old and dry, they’ll crack no matter what—buy fresh ones.
Can I bake instead of fry these appetizers?
Most fried items can be baked! Brush with oil and bake at 400-425°F, turning halfway through. They won’t be quite as crispy but will still be delicious and much lighter.
How do I know when oil is hot enough for frying?
Use a thermometer—oil should be 350°F for most items. Without a thermometer, drop a small piece of bread or tortilla in the oil. It should sizzle immediately and brown in about 60 seconds.
Nutrition Information
| Nutrient | Per Serving (Average) |
|---|---|
| Calories | 180-250 |
| Total Fat | 10-15g |
| Saturated Fat | 4-6g |
| Cholesterol | 25-40mg |
| Sodium | 300-450mg |
| Total Carbohydrates | 15-20g |
| Dietary Fiber | 2-4g |
| Sugars | 2-4g |
| Protein | 8-12g |
Note: Nutrition varies significantly by recipe. Fried items are higher in calories and fat. Fresh salsas and vegetable-based options are lower.
Final Thoughts
There you have it—15 incredible NYE appetizers Mexican-inspired that’ll make your celebration unforgettable! I’ve tested these recipes countless times, tweaked them based on feedback, and watched them disappear at party after party.
The beauty of these appetizers is their flexibility. Mix and match based on your time, budget, and crowd preferences. Make some ahead to reduce stress on party day. Most importantly, don’t try to do everything perfectly—your guests will love whatever you serve because you made it with care.
My advice? Choose 5-6 recipes that excite you most. Prep what you can ahead. Then relax and enjoy your own party! After all, the best memories come from time spent with loved ones, not from stressing in the kitchen.
These recipes have transformed me from a nervous host into someone who actually enjoys entertaining. The secret isn’t complicated—it’s simply good food made with love, served with enthusiasm.
Here’s to a delicious New Year’s Eve filled with flavor, laughter, and the company of people you love. ¡Feliz Año Nuevo! May your party be the one everyone remembers and talks about until next year!