10 NYE Appetizers Seafood Ideas to Wow Your Guests
There’s something magical about gathering around a table filled with elegant seafood appetizers as the clock ticks toward midnight. I still remember my first New Year’s Eve hosting duties—feeling overwhelmed until I discovered that seafood appetizers are actually the secret weapon for impressive yet manageable party food.
These bite-sized treasures bring sophistication and celebration to your spread without chaining you to the kitchen all night. Whether you’re planning an intimate gathering or a grand soirée, these 10 NYE appetizers seafood ideas will transform your celebration into an unforgettable culinary experience that guests will rave about for months to come.
What Are NYE Appetizers Seafood?
Ever wonder why seafood automatically elevates any celebration? NYE appetizers seafood are those show-stopping, ocean-inspired bites that make your party feel like a five-star event. They’re the appetizers that say “something special is happening tonight” without you needing to say a word.
From succulent shrimp to delicate smoked salmon, these dishes capture the essence of celebration in every bite. As the classic saying goes, “the way to someone’s heart is through their stomach,” and trust me, these seafood delights will win hearts all night long. Ready to become the host everyone remembers? Let’s dive in!
Why You’ll Love These NYE Appetizers Seafood Ideas
Impress Without the Stress The beauty of seafood appetizers lies in their sophisticated appearance paired with surprisingly simple preparation. Most of these recipes can be prepared ahead, leaving you free to enjoy your own party. The fresh, briny flavors of the ocean bring an instant elegance that makes guests feel pampered.
Budget-Friendly Luxury Making seafood appetizers at home costs significantly less than restaurant prices while delivering the same wow factor. You control the quality of ingredients and can stretch premium seafood further by combining it with affordable companions like crispy bread, fresh vegetables, or creamy spreads.
Flavor Explosion in Every Bite Each recipe showcases the natural sweetness of seafood enhanced by complementary flavors—zesty citrus, aromatic herbs, rich butter, and tangy sauces. These aren’t just appetizers; they’re conversation starters. If you love exploring different appetizer styles, you’ll want to check out other party favorites on the blog too. Now let’s get cooking and make this New Year’s Eve absolutely unforgettable!
1. Garlic Butter Shrimp Skewers
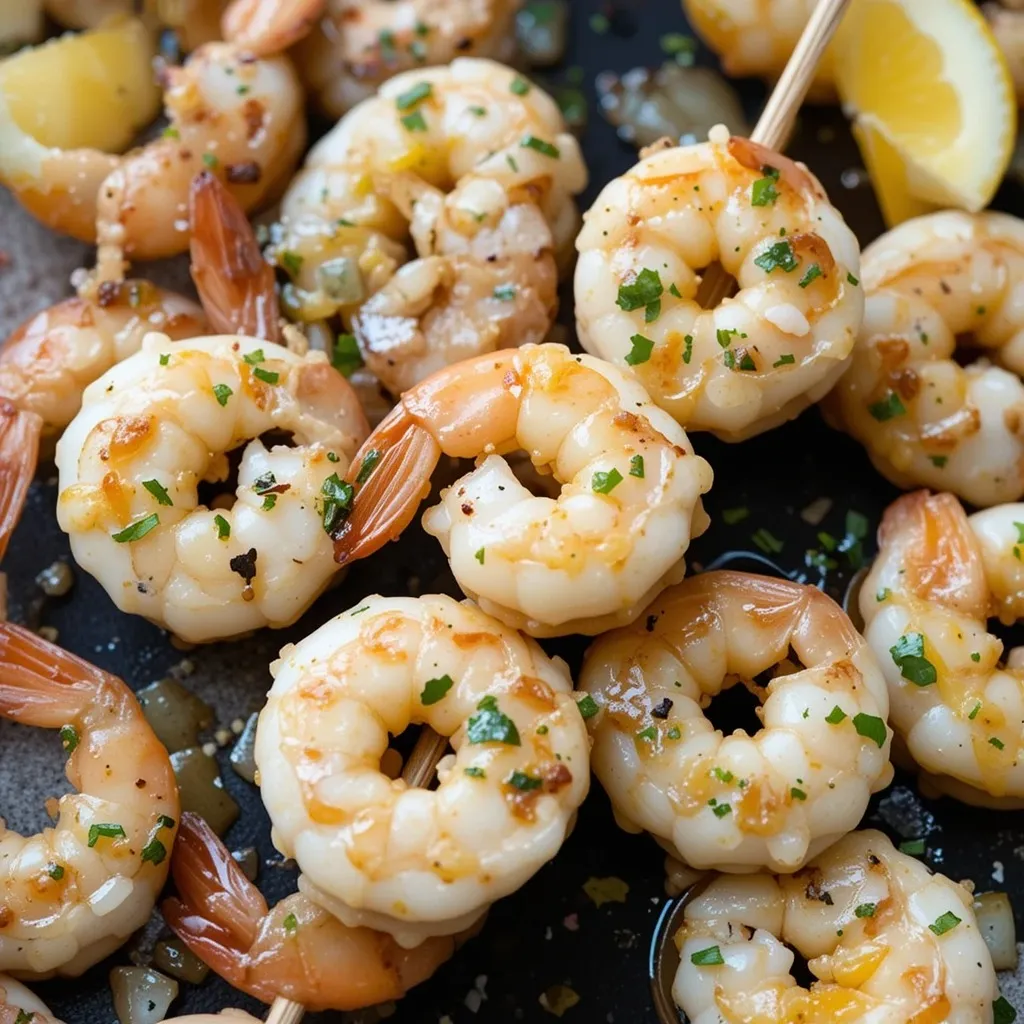
What Makes This Special
Nothing says celebration quite like succulent shrimp glazed with golden garlic butter. These skewers are restaurant-quality gorgeous but incredibly simple to prepare. The aromatic combination of butter, garlic, and fresh herbs creates an irresistible flavor that has guests returning for seconds and thirds.
Key Ingredients for Garlic Butter Shrimp Skewers
- 2 pounds large shrimp, peeled and deveined
- 6 tablespoons unsalted butter
- 6 cloves garlic, minced
- 2 tablespoons fresh lemon juice
- 2 tablespoons fresh parsley, chopped
- 1 teaspoon paprika
- Salt and black pepper to taste
- Wooden or metal skewers
- Lemon wedges for serving
Preparation Time: 10 minutes
Cooking Time: 6-8 minutes
Total Time: 20 minutes
Step-by-Step Instructions
Prepare the Shrimp Start by patting the shrimp completely dry with paper towels. This crucial step ensures they’ll get a beautiful sear rather than steaming. Thread 3-4 shrimp onto each skewer, keeping them close together.
Make the Garlic Butter Melt the butter in a small saucepan over medium heat. Add the minced garlic and cook for 1-2 minutes until fragrant but not browned. Remove from heat and stir in lemon juice, parsley, paprika, salt, and pepper.
Cook the Shrimp Heat a grill pan or outdoor grill to medium-high. Brush the shrimp generously with garlic butter. Grill for 2-3 minutes per side until pink and slightly charred. Brush with more garlic butter while cooking.
Serve Immediately Arrange the skewers on a platter, drizzle with remaining garlic butter, and garnish with lemon wedges and extra parsley.
Top Tips for Perfect Garlic Butter Shrimp
Don’t overcook the shrimp—they’re done when they turn pink and form a C-shape. Overcooking makes them rubbery. If using wooden skewers, soak them in water for 30 minutes beforehand to prevent burning. For extra flavor, add a pinch of red pepper flakes to the garlic butter. You can prep the garlic butter sauce up to 2 days ahead and store it refrigerated.
Storage Tips
These are best enjoyed fresh, but you can store cooked shrimp skewers in an airtight container in the refrigerator for up to 2 days. Reheat gently in a skillet over low heat or enjoy cold as part of a seafood platter.
2. Smoked Salmon Cucumber Bites
What Makes This Special
These elegant no-cook appetizers look like they came from a fancy catering company but take just minutes to assemble. The refreshing crunch of cucumber pairs perfectly with rich, silky smoked salmon and tangy cream cheese. They’re light, sophisticated, and disappear from the platter faster than you can refill it.
Key Ingredients for Smoked Salmon Cucumber Bites
- 2 large English cucumbers
- 8 ounces cream cheese, softened
- 2 tablespoons fresh dill, chopped
- 1 tablespoon lemon zest
- 8 ounces smoked salmon, sliced
- 2 tablespoons capers
- Fresh dill sprigs for garnish
- Black pepper to taste
Preparation Time: 15 minutes
Cooking Time: 0 minutes
Total Time: 15 minutes
Step-by-Step Instructions
Slice the Cucumbers Wash and dry the cucumbers. Cut them into ½-inch thick rounds. Use a small spoon to scoop out a shallow well in the center of each slice, creating a little cup. Pat dry with paper towels.
Prepare the Cream Cheese Mixture In a bowl, combine softened cream cheese with chopped dill, lemon zest, and black pepper. Mix until smooth and well combined. Transfer to a piping bag or plastic bag with the corner cut off for easy assembly.
Assemble the Bites Pipe or spoon a small amount of the herbed cream cheese into each cucumber cup. Top with a folded piece of smoked salmon. Add a few capers on top and garnish with a small sprig of fresh dill.
Chill and Serve Arrange on a serving platter and refrigerate until ready to serve. These are best served chilled.
Top Tips for Perfect Cucumber Bites
English cucumbers work best because they have fewer seeds and thinner skin. Make sure to thoroughly dry the cucumber slices after cutting to prevent the cream cheese from sliding off. You can prepare these up to 4 hours ahead—just cover tightly with plastic wrap and refrigerate. For a flavor twist, add a tiny dollop of horseradish to the cream cheese mixture.
Storage Tips
Best consumed within 4-6 hours of preparation. The cucumbers will release water over time, making them soggy if stored too long. If you must prep further ahead, prepare components separately and assemble just before serving.
3. Crab-Stuffed Mushrooms

What Makes This Special
These warm, savory bites combine earthy mushrooms with sweet, delicate crab meat in a creamy, cheesy filling. They’re the kind of appetizer that makes people stop mid-conversation to savor every bite. The golden-brown tops signal pure comfort while the luxurious crab filling delivers party-worthy sophistication.
Key Ingredients for Crab-Stuffed Mushrooms
- 24 large white button mushrooms
- 8 ounces lump crab meat, picked over for shells
- 4 ounces cream cheese, softened
- ¼ cup mayonnaise
- ½ cup shredded mozzarella cheese
- ¼ cup grated Parmesan cheese
- 2 cloves garlic, minced
- 2 tablespoons fresh parsley, chopped
- 1 tablespoon lemon juice
- ½ teaspoon Old Bay seasoning
- ¼ cup breadcrumbs
- 2 tablespoons melted butter
- Salt and pepper to taste
Preparation Time: 20 minutes
Cooking Time: 20 minutes
Total Time: 40 minutes
Step-by-Step Instructions
Prepare the Mushrooms Preheat your oven to 375°F. Clean the mushrooms with a damp paper towel. Remove the stems carefully and use a small spoon to scrape out the gills, creating more space for filling. Arrange mushroom caps on a baking sheet lined with parchment paper.
Make the Crab Filling In a mixing bowl, combine cream cheese, mayonnaise, mozzarella, half the Parmesan, garlic, parsley, lemon juice, Old Bay seasoning, salt, and pepper. Gently fold in the crab meat, being careful not to break up the lumps too much.
Stuff the Mushrooms Spoon the crab mixture generously into each mushroom cap, mounding it slightly. In a small bowl, mix breadcrumbs with melted butter and remaining Parmesan. Sprinkle this mixture over the top of each stuffed mushroom.
Bake to Perfection Bake for 18-20 minutes until the mushrooms are tender, the filling is hot and bubbly, and the tops are golden brown. Let cool for 2-3 minutes before serving.
Top Tips for Perfect Crab-Stuffed Mushrooms
Use lump crab meat rather than claw meat for the best texture and sweetness. If you can only find canned crab, drain it very well and pat dry. Don’t skip removing the gills—this creates more room for filling and prevents excess moisture. These can be assembled up to 24 hours ahead and refrigerated unbaked. Add 5 minutes to baking time if cooking from cold. For a richer flavor.
Storage and Reheating Tips
Store baked mushrooms in an airtight container in the refrigerator for up to 3 days. Reheat in a 350°F oven for 8-10 minutes until warmed through. These don’t freeze well due to the mushrooms’ high water content, but the filling can be frozen separately for up to 1 month.
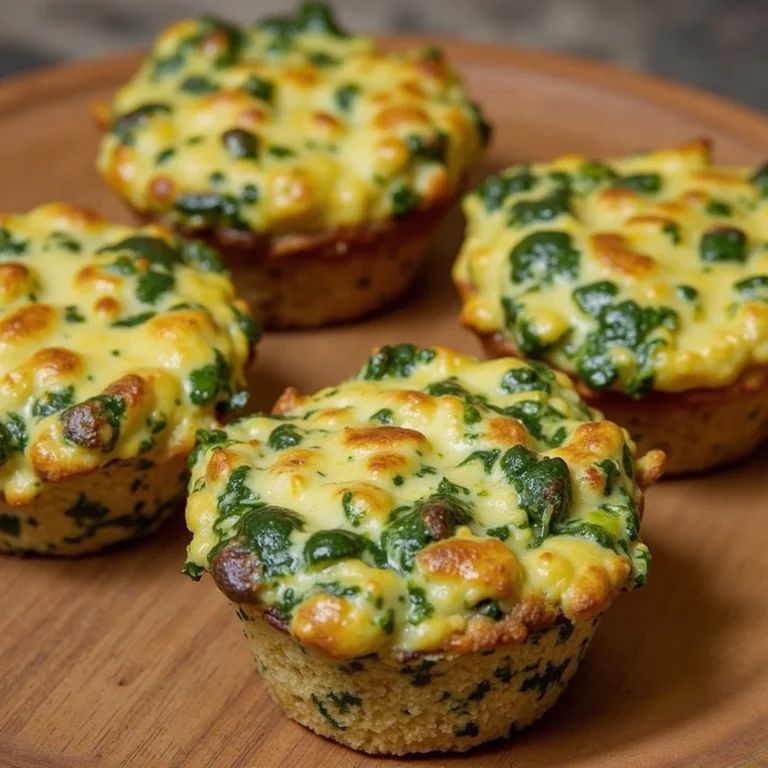
4. Oysters Rockefeller
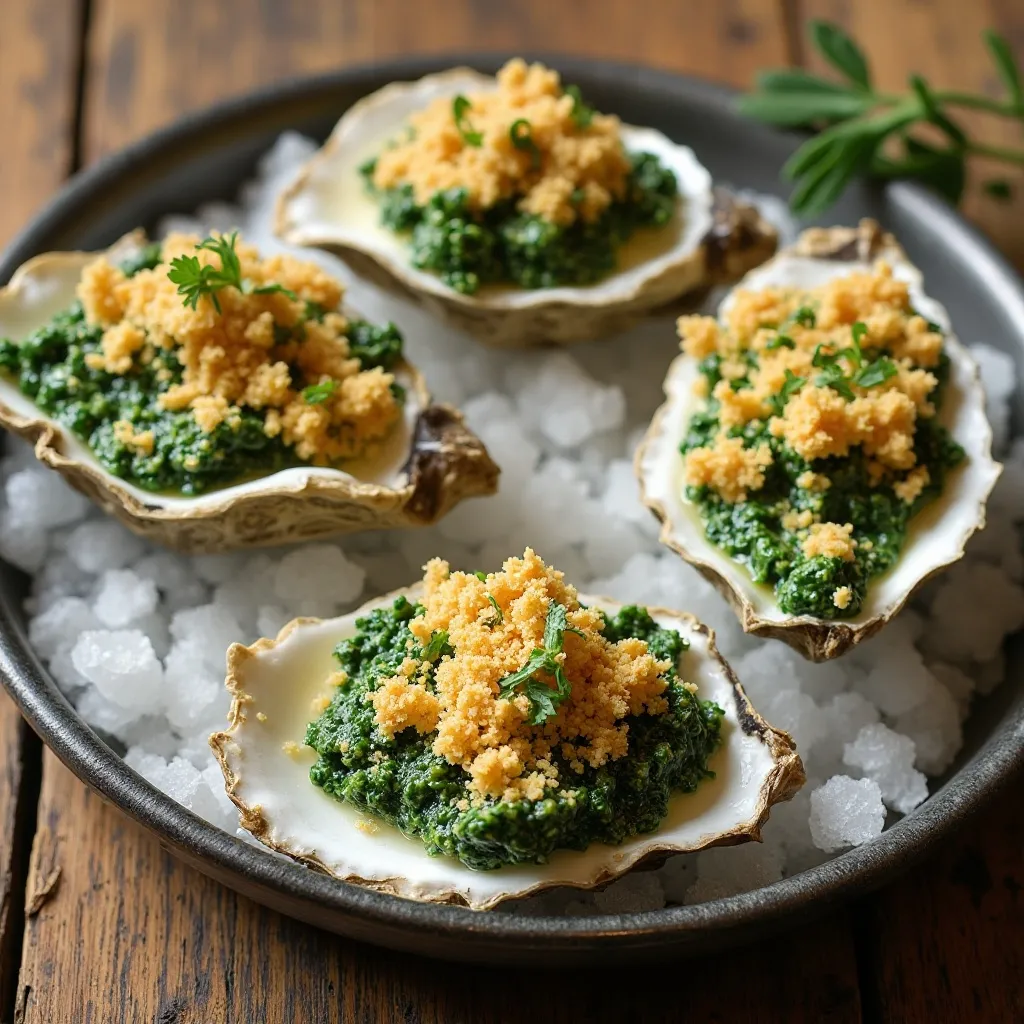
What Makes This Special
This classic New Orleans creation turns fresh oysters into an indulgent delicacy that screams celebration. The combination of spinach, herbs, butter, and cheese creates a rich topping that perfectly complements the briny oysters. They look intimidating but are surprisingly simple to prepare at home.
Key Ingredients for Oysters Rockefeller
- 24 fresh oysters on the half shell
- 4 tablespoons butter
- 2 cloves garlic, minced
- 1 shallot, minced
- 2 cups fresh spinach, finely chopped
- ¼ cup fresh parsley, chopped
- 2 tablespoons fresh tarragon (or 1 tsp dried)
- ¼ cup heavy cream
- ¼ cup breadcrumbs
- ¼ cup Parmesan cheese, grated
- 2 tablespoons anise liqueur (optional)
- Salt, pepper, and hot sauce to taste
- Rock salt for presentation
Preparation Time: 25 minutes
Cooking Time: 10 minutes
Total Time: 35 minutes
Step-by-Step Instructions
Prepare the Oysters Preheat your oven to 450°F. Spread rock salt on a baking sheet to create a stable bed for the oysters (this keeps them level while cooking). Arrange oysters in their shells on the salt bed.
Make the Rockefeller Topping Melt butter in a skillet over medium heat. Sauté garlic and shallot until fragrant, about 2 minutes. Add spinach and cook until wilted. Stir in parsley, tarragon, heavy cream, and anise liqueur if using. Cook for 2-3 minutes until thickened. Season with salt, pepper, and a dash of hot sauce. Remove from heat.
Top and Bake Spoon the spinach mixture generously over each oyster. In a small bowl, combine breadcrumbs and Parmesan cheese. Sprinkle this mixture over each oyster. Bake for 8-10 minutes until the topping is golden and bubbly.
Serve Immediately These are best served hot from the oven. Provide small forks and extra lemon wedges on the side.
Top Tips for Perfect Oysters Rockefeller
Ask your fishmonger to shuck the oysters for you—it saves time and effort. If shucking yourself, use a proper oyster knife and protect your hand with a towel. Keep oysters refrigerated until ready to top and bake. The spinach mixture can be made a day ahead and refrigerated. Don’t overbake or the oysters will become tough and rubbery.
Storage Tips
Oysters Rockefeller are best enjoyed immediately after cooking. Raw oysters should be cooked within 24 hours of purchase. The spinach topping can be made ahead and stored refrigerated for up to 2 days.
5. Tuna Tartare on Crispy Wonton Chips
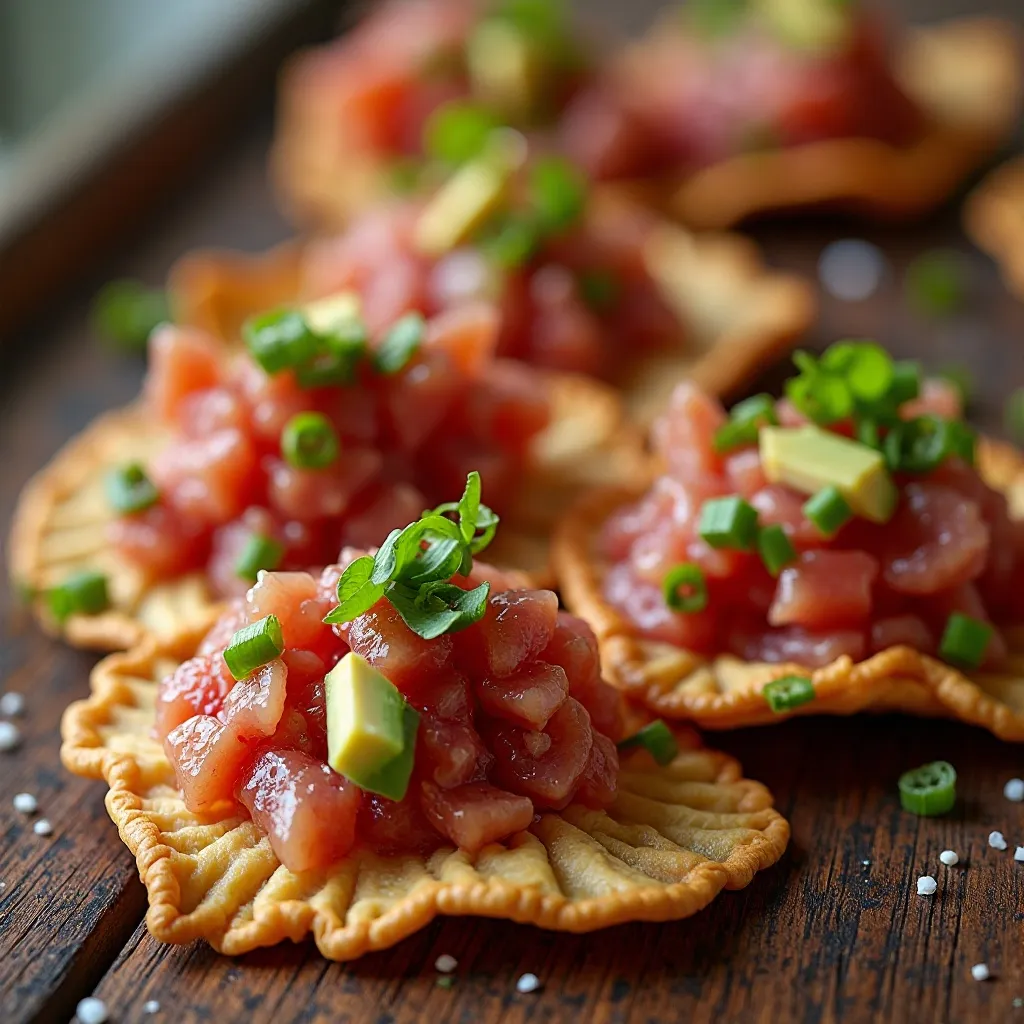
What Makes This Special
This modern, Instagram-worthy appetizer combines buttery raw tuna with Asian-inspired flavors and crispy wonton chips. It’s fresh, vibrant, and delivers a restaurant-quality experience that impresses even the most discerning guests. The contrast of textures—silky tuna against crunchy chips—is absolutely addictive.
Key Ingredients for Tuna Tartare on Wonton Chips
For the Wonton Chips:
- 20 wonton wrappers
- 2 tablespoons vegetable oil
- Sea salt
For the Tuna Tartare:
- 1 pound sushi-grade tuna, finely diced
- 2 tablespoons soy sauce
- 1 tablespoon sesame oil
- 1 tablespoon rice vinegar
- 1 teaspoon fresh ginger, grated
- 2 green onions, thinly sliced
- 1 avocado, diced
- 1 teaspoon sesame seeds
- Fresh cilantro for garnish
- Sriracha or chili oil (optional)
Preparation Time: 20 minutes
Cooking Time: 10 minutes
Total Time: 30 minutes
Step-by-Step Instructions
Make the Wonton Chips Preheat oven to 350°F. Brush wonton wrappers lightly with oil on both sides. Cut each wrapper in half diagonally to form triangles. Arrange on baking sheets in a single layer. Sprinkle with sea salt. Bake for 8-10 minutes until golden and crispy, rotating the pan halfway through.
Prepare the Tuna Tartare In a bowl, combine diced tuna with soy sauce, sesame oil, rice vinegar, ginger, and half the green onions. Gently mix until just combined. Keep refrigerated until ready to serve.
Assemble Just Before Serving Place wonton chips on a serving platter. Top each chip with a spoonful of tuna tartare. Add a small piece of avocado on top. Garnish with remaining green onions, sesame seeds, and cilantro. Add a tiny drizzle of sriracha if desired.
Serve Immediately These must be assembled right before serving to keep the chips crispy.
Top Tips for Perfect Tuna Tartare
Only use sushi-grade tuna from a reputable source—this is crucial for raw fish safety. Keep the tuna very cold until ready to serve. The tartare mixture can be prepared up to 2 hours ahead and kept refrigerated. Dice the tuna into uniform small cubes for the best texture. Wonton chips can be made 2 days ahead and stored in an airtight container. Never assemble more than 5 minutes before serving or chips will become soggy.
Storage Tips
Raw tuna tartare should be consumed the same day it’s prepared. Never store assembled appetizers—the chips will become soggy. Store leftover tuna tartare covered in the refrigerator and consume within 24 hours. Baked wonton chips stay crispy for up to 3 days in an airtight container at room temperature.
6. Lobster Mac and Cheese Bites
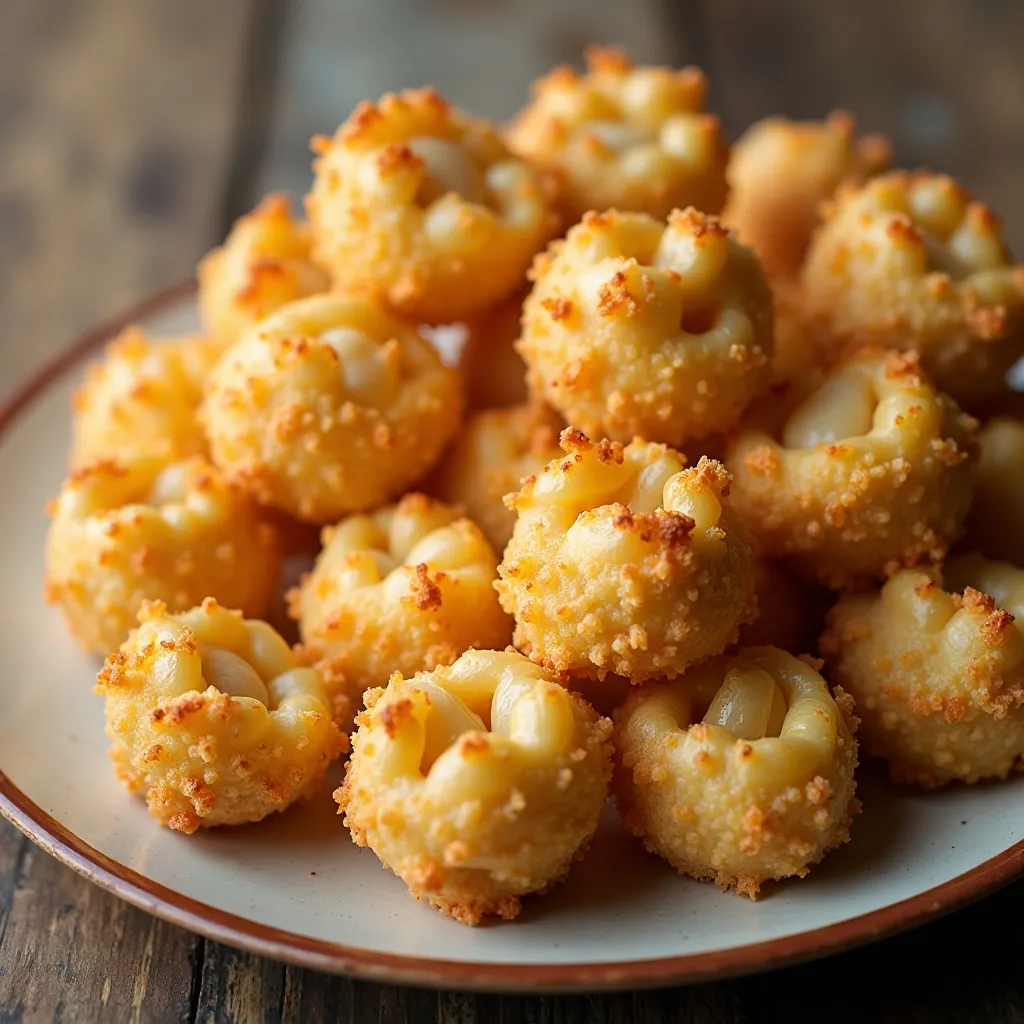
What Makes This Special
Imagine creamy, indulgent mac and cheese studded with sweet lobster meat, formed into bite-sized portions with a crispy golden exterior. These luxurious little bites combine comfort food with celebration elegance. They’re the kind of appetizer that makes people close their eyes in appreciation.
Key Ingredients for Lobster Mac and Cheese Bites
- 8 ounces elbow macaroni
- 3 tablespoons butter
- 3 tablespoons all-purpose flour
- 2 cups whole milk
- 2 cups sharp cheddar cheese, shredded
- ½ cup Gruyere cheese, shredded
- 8 ounces cooked lobster meat, chopped
- ½ teaspoon garlic powder
- ¼ teaspoon paprika
- Salt and white pepper to taste
- 1 cup panko breadcrumbs
- 2 eggs, beaten
- 1 cup all-purpose flour for coating
- Oil for frying or cooking spray for baking
Preparation Time: 30 minutes (plus 2 hours chilling)
Cooking Time: 20 minutes
Total Time: 2 hours 50 minutes
Step-by-Step Instructions
Make the Mac and Cheese Cook macaroni according to package directions until al dente. Drain and set aside. In a large saucepan, melt butter over medium heat. Whisk in flour and cook for 1 minute. Gradually add milk, whisking constantly until smooth and thickened. Remove from heat and stir in both cheeses until melted. Add garlic powder, paprika, salt, and pepper.
Add Lobster and Chill Combine the cheese sauce with cooked macaroni and chopped lobster meat. Mix well. Spread the mixture in a greased 9×13 baking dish and press down firmly. Cover and refrigerate for at least 2 hours or overnight until very firm.
Form and Coat the Bites Once chilled, use a small cookie scoop or spoon to form the mac and cheese into balls or use a knife to cut into squares. Set up three shallow bowls: one with flour, one with beaten eggs, and one with panko breadcrumbs. Roll each bite in flour, then egg, then breadcrumbs, coating completely.
Cook the Bites For frying: Heat 2 inches of oil to 350°F. Fry bites in batches for 2-3 minutes until golden brown. Drain on paper towels. For baking: Place on a greased baking sheet, spray with cooking spray, and bake at 400°F for 15-18 minutes, flipping halfway, until golden and crispy.
Top Tips for Perfect Lobster Mac and Cheese Bites
The key to success is making sure the mac and cheese is very cold and firm before forming bites—this prevents them from falling apart. Use cooked lobster meat from the seafood counter or frozen lobster tails to save money. If lobster is too expensive, substitute cooked shrimp. The mixture can be made and refrigerated up to 2 days before forming and cooking. For easier handling, freeze formed and coated bites for 30 minutes before frying or baking.
Storage and Reheating Tips
Store uncooked, breaded bites in the freezer for up to 1 month. Cook from frozen, adding 2-3 minutes to cooking time. Cooked bites can be refrigerated for up to 3 days. Reheat in a 350°F oven for 10 minutes until crispy and hot throughout. Avoid microwaving as this makes them soggy.
7. Scallop Ceviche Spoons
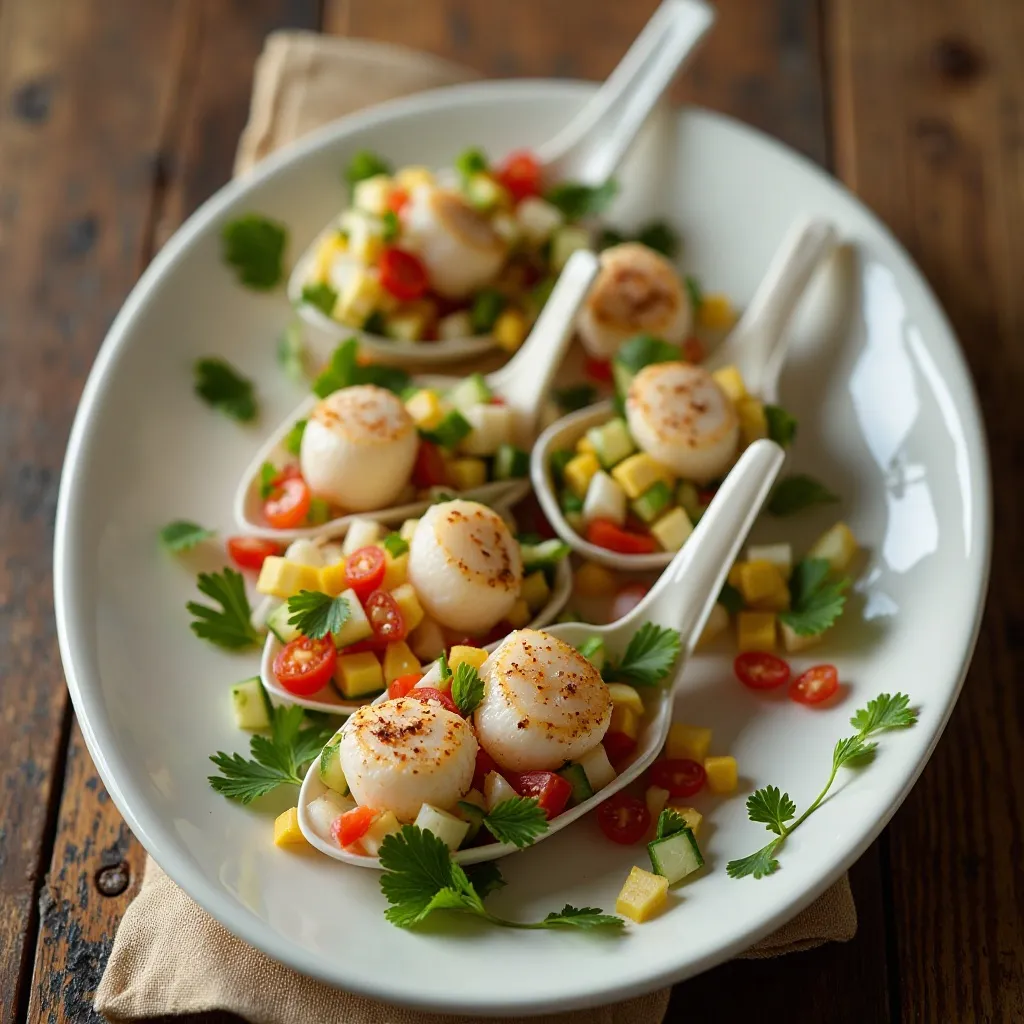
What Makes This Special
These gorgeous appetizer spoons showcase delicate scallops “cooked” in citrus juice, creating a refreshing, elegant bite that looks like it belongs in a fine dining restaurant. The bright, zesty flavors wake up your palate and provide a light, sophisticated option among richer appetizers.
Key Ingredients for Scallop Ceviche Spoons
- 1 pound fresh bay scallops (or sea scallops, diced)
- ½ cup fresh lime juice
- ¼ cup fresh lemon juice
- 1 small red onion, finely diced
- 1 jalapeño, seeded and minced
- 1 cup cherry tomatoes, diced
- ½ cup cucumber, diced
- ¼ cup fresh cilantro, chopped
- 1 avocado, diced (add just before serving)
- Salt and pepper to taste
- 24 Asian soup spoons or small serving spoons
- Tortilla chips for extra serving option
Preparation Time: 15 minutes (plus 2 hours marinating)
Cooking Time: 0 minutes
Total Time: 2 hours 15 minutes
Step-by-Step Instructions
Prepare the Scallops Rinse scallops under cold water and pat completely dry. If using large sea scallops, dice them into ½-inch pieces. Place scallops in a glass bowl and pour lime and lemon juice over them. Make sure all scallops are submerged. Cover and refrigerate.
Marinate and “Cook” Let the scallops marinate in the citrus juice for 2 hours, stirring occasionally. The acid will “cook” the scallops, turning them opaque and firm. Don’t marinate longer than 3 hours or they’ll become rubbery.
Add Remaining Ingredients Drain about half the citrus juice from the scallops. Add red onion, jalapeño, tomatoes, cucumber, and cilantro. Season with salt and pepper. Gently toss to combine. Right before serving, fold in diced avocado.
Serve in Spoons Using a slotted spoon, place a portion of ceviche in each serving spoon. Arrange spoons on a platter. Serve immediately.
Top Tips for Perfect Scallop Ceviche
Only use the freshest scallops from a trusted source—ask specifically if they’re safe for raw consumption. If you’re uncomfortable with raw scallops, briefly blanch them in boiling water for 30 seconds before marinating. Taste the ceviche before serving and adjust lime juice, salt, or jalapeño to your preference. The base ceviche (without avocado) can be made up to 4 hours ahead. Keep everything very cold until serving time.
Storage Tips
Ceviche is best consumed within 4-6 hours of preparation. The scallops will continue to “cook” and can become tough if left too long. Don’t assemble in spoons more than 30 minutes before serving. Store any leftover ceviche in an airtight container in the refrigerator for no more than 24 hours.
8. Crispy Calamari with Spicy Aioli
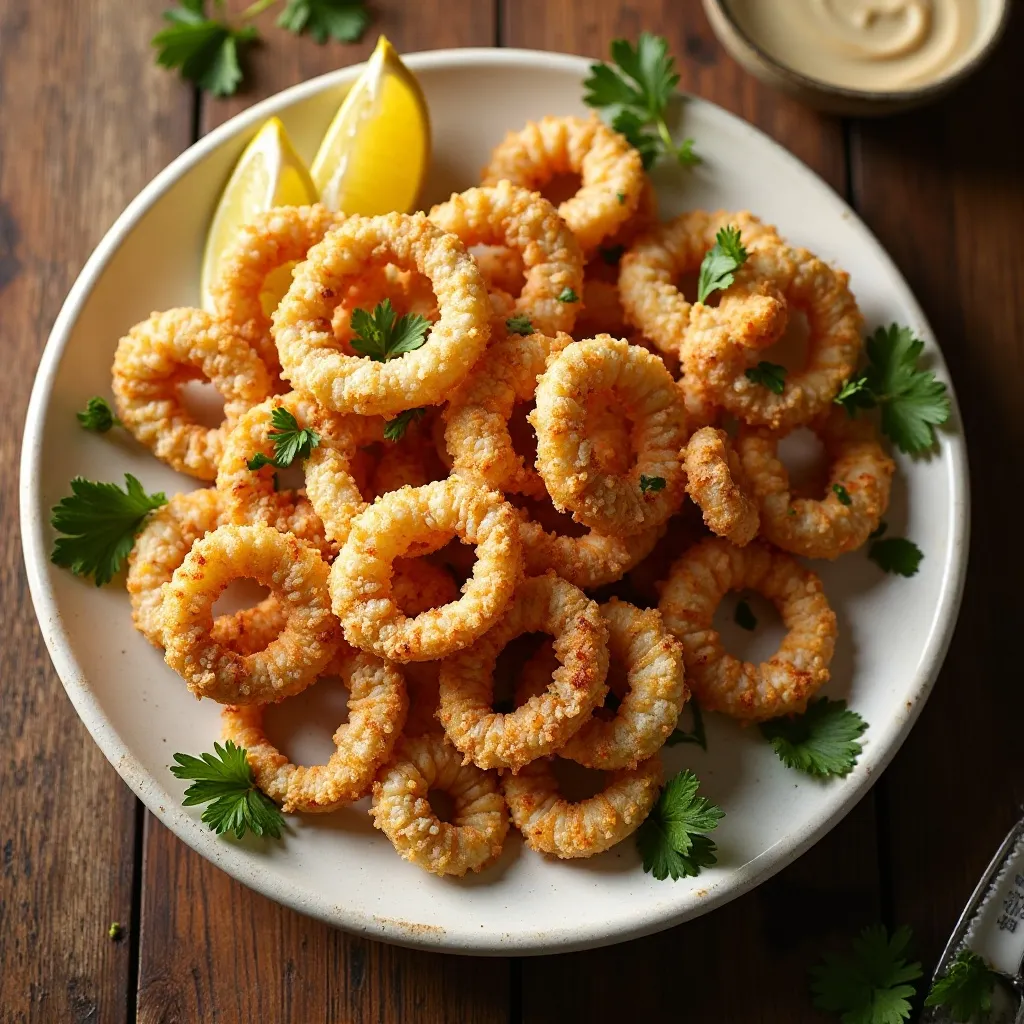
What Makes This Special
Golden, crispy rings of tender calamari paired with a zesty, garlicky aioli—this classic appetizer never goes out of style. When done right, calamari is tender on the inside with a perfectly crispy coating that shatters with each bite. It’s the kind of crowd-pleaser that disappears within minutes of hitting the table.
Key Ingredients for Crispy Calamari
For the Calamari:
- 1½ pounds cleaned calamari (squid), sliced into rings
- 1 cup all-purpose flour
- ½ cup cornstarch
- 1 teaspoon garlic powder
- 1 teaspoon paprika
- ½ teaspoon cayenne pepper
- Salt and black pepper to taste
- Vegetable oil for frying
- Lemon wedges for serving
- Fresh parsley for garnish
For the Spicy Aioli:
- ½ cup mayonnaise
- 2 cloves garlic, minced
- 1 tablespoon lemon juice
- 1 teaspoon sriracha (adjust to taste)
- ½ teaspoon smoked paprika
- Salt to taste
Preparation Time: 20 minutes
Cooking Time: 15 minutes
Total Time: 35 minutes
Step-by-Step Instructions
Prepare the Aioli In a small bowl, whisk together mayonnaise, minced garlic, lemon juice, sriracha, smoked paprika, and salt. Taste and adjust spice level. Cover and refrigerate until ready to serve. This can be made up to 3 days ahead.
Prepare the Calamari Rinse calamari rings and tentacles under cold water. Pat them completely dry with paper towels—this is crucial for crispy calamari. In a shallow dish, combine flour, cornstarch, garlic powder, paprika, cayenne, salt, and pepper. Mix well.
Heat the Oil Pour oil into a heavy pot or deep fryer to a depth of 3 inches. Heat to 375°F. Use a thermometer to maintain proper temperature. If oil isn’t hot enough, calamari will be greasy; too hot and it will burn before cooking through.
Fry the Calamari Working in small batches, toss calamari in the flour mixture, shaking off excess. Carefully drop into hot oil and fry for 2-3 minutes until golden brown and crispy. Don’t overcook or they’ll become rubbery. Remove with a slotted spoon and drain on paper towels. Season immediately with salt.
Serve Hot Arrange crispy calamari on a serving platter. Garnish with fresh parsley and lemon wedges. Serve the spicy aioli in a bowl alongside for dipping.
Top Tips for Perfect Crispy Calamari
The secret to tender calamari is cooking it either very quickly (like frying) or very slowly (like braising)—anything in between makes it tough. Keep calamari very dry before coating. Don’t overcrowd the pot—fry in batches to maintain oil temperature. Let oil return to 375°F between batches. For extra crunch, add some of the tentacles to each batch. If you don’t have a thermometer, test oil by dropping in a piece of bread—it should brown in about 60 seconds.
Storage and Reheating Tips
Calamari is definitely best enjoyed fresh, but leftover fried calamari can be stored in the refrigerator for up to 2 days. Reheat in a 400°F oven for 5-7 minutes to restore some crispiness. Never microwave fried calamari—it becomes rubbery and soggy. The aioli keeps for up to 1 week refrigerated.
9. Mini Crab Cakes with Remoulade
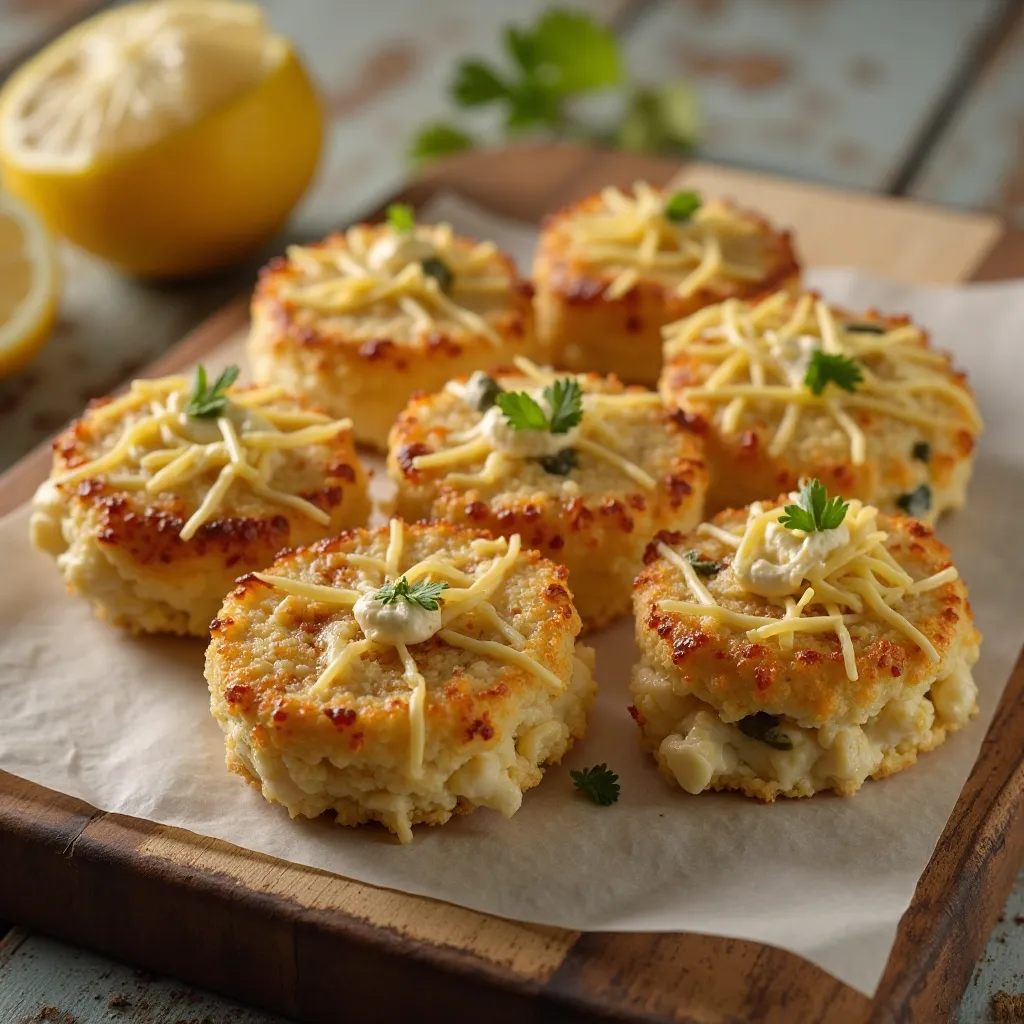
What Makes This Special
These petite crab cakes are all about the sweet, delicate crab meat with just enough binding to hold them together. Crispy golden crusts give way to tender, flavorful interiors bursting with chunks of crab. Paired with tangy remoulade sauce, they’re the sophisticated appetizer that never fails to impress.
Key Ingredients for Mini Crab Cakes
For the Crab Cakes:
- 1 pound lump crab meat, picked over for shells
- ½ cup panko breadcrumbs
- ¼ cup mayonnaise
- 1 egg, lightly beaten
- 2 tablespoons fresh parsley, chopped
- 1 tablespoon Dijon mustard
- 1 tablespoon lemon juice
- 1 teaspoon Old Bay seasoning
- ½ teaspoon Worcestershire sauce
- ¼ teaspoon hot sauce
- Salt and pepper to taste
- 2 tablespoons butter for frying
- 2 tablespoons oil for frying
For the Remoulade:
- ½ cup mayonnaise
- 2 tablespoons Dijon mustard
- 1 tablespoon capers, minced
- 1 tablespoon fresh parsley, chopped
- 1 teaspoon lemon juice
- ½ teaspoon paprika
- ¼ teaspoon cayenne pepper
- 1 small garlic clove, minced
Preparation Time: 25 minutes (plus 30 minutes chilling)
Cooking Time: 15 minutes
Total Time: 70 minutes
Step-by-Step Instructions
Make the Remoulade In a bowl, whisk together all remoulade ingredients. Taste and adjust seasoning. Cover and refrigerate for at least 30 minutes to allow flavors to meld. This can be made up to 3 days ahead.
Prepare the Crab Cake Mixture In a large bowl, gently combine crab meat, panko breadcrumbs, mayonnaise, egg, parsley, Dijon mustard, lemon juice, Old Bay, Worcestershire sauce, hot sauce, salt, and pepper. Mix gently to avoid breaking up the crab lumps too much. The mixture should hold together when pressed.
Form the Crab Cakes Scoop about 2 tablespoons of mixture and gently form into a patty about 2 inches wide and ½ inch thick. Place on a parchment-lined baking sheet. Repeat with remaining mixture—you should get about 20 mini crab cakes. Refrigerate for 30 minutes to help them hold together during cooking.
Cook the Crab Cakes Heat butter and oil in a large skillet over medium-high heat. Working in batches, cook crab cakes for 3-4 minutes per side until golden brown and heated through. Don’t move them around too much—let them develop a nice crust. Transfer to a paper towel-lined plate.
Serve Warm Arrange crab cakes on a platter with remoulade sauce for dipping or top each cake with a small dollop of sauce. Garnish with lemon wedges and fresh parsley.
Top Tips for Perfect Mini Crab Cakes
The less binding you use, the more crab flavor shines through—use just enough breadcrumbs and mayonnaise to hold cakes together. Handle the mixture gently to preserve crab lumps. Chilling before cooking is essential—it prevents them from falling apart. If the mixture seems too wet to form, add a bit more breadcrumbs. If too dry, add a touch more mayonnaise. These can be formed and refrigerated up to 24 hours before cooking. You can also bake them at 400°F for 12-15 minutes, flipping once.
Storage and Reheating Tips
Uncooked formed crab cakes can be frozen for up to 2 months. Freeze on a baking sheet until solid, then transfer to a freezer bag. Cook from frozen, adding 2-3 minutes per side. Cooked crab cakes store in the refrigerator for up to 2 days. Reheat in a 350°F oven for 8-10 minutes. The remoulade keeps refrigerated for up to 1 week.
10. Shrimp Cocktail Shooters
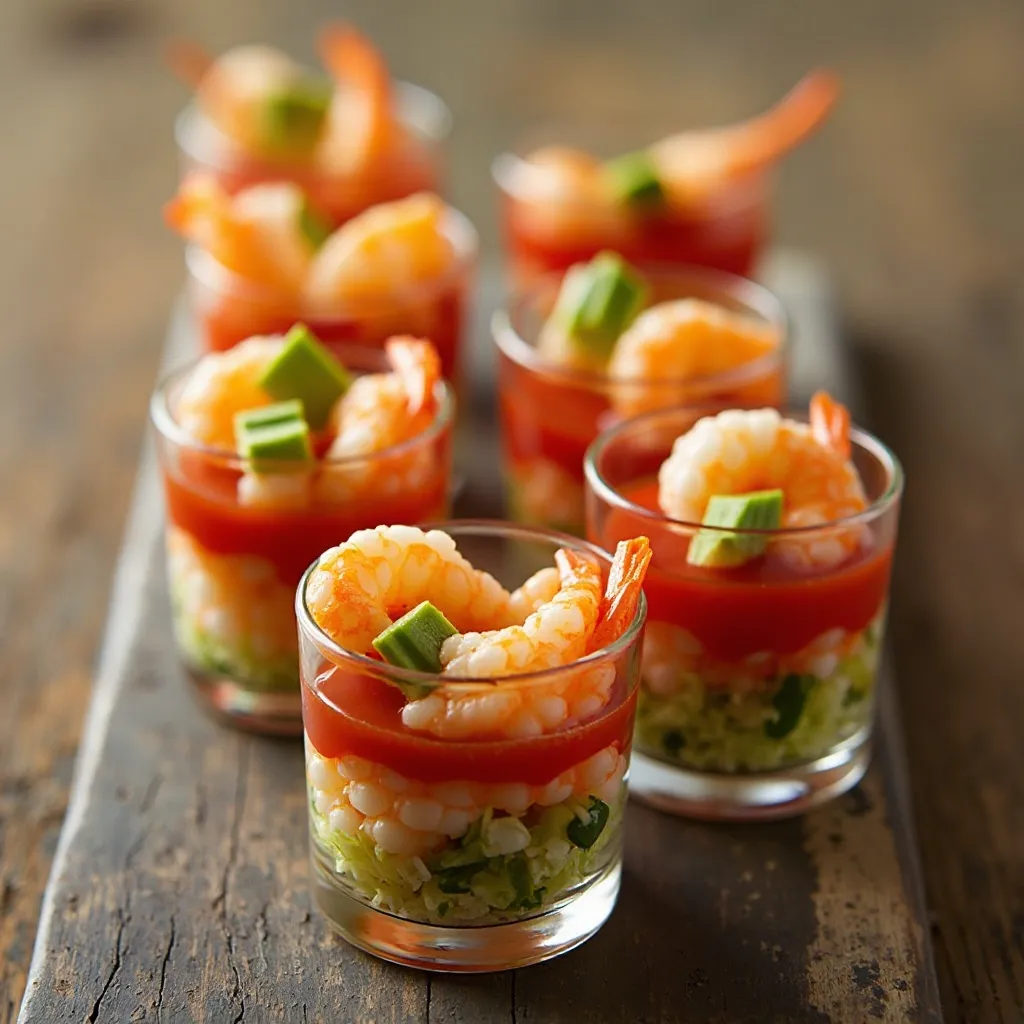
What Makes This Special
These individual shrimp cocktail shooters are a fun, modern twist on the classic appetizer. Served in small glasses, they’re easy to grab, elegant to look at, and provide the perfect combination of sweet shrimp, tangy cocktail sauce, and fresh crunch. They’re practical too—no plates or forks needed!
Key Ingredients for Shrimp Cocktail Shooters
- 2 pounds large shrimp (26-30 count), peeled and deveined, tails on
- 1 lemon, halved
- 2 bay leaves
- 1 teaspoon peppercorns
- Salt
For the Cocktail Sauce:
- 1 cup ketchup
- 3 tablespoons prepared horseradish
- 2 tablespoons lemon juice
- 1 teaspoon Worcestershire sauce
- ½ teaspoon hot sauce
- ¼ teaspoon garlic powder
For Assembly:
- 24 shot glasses or small clear cups
- 1 cup shredded lettuce or micro greens
- 1 avocado, diced
- Lemon wedges for garnish
Preparation Time: 20 minutes
Cooking Time: 5 minutes
Total Time: 25 minutes (plus chilling time)
Step-by-Step Instructions
Poach the Shrimp Fill a large pot with water and bring to a boil. Add lemon halves, bay leaves, peppercorns, and a generous amount of salt. Add shrimp and cook for 2-3 minutes until just pink and cooked through. Immediately drain and plunge shrimp into ice water to stop cooking. Once cool, drain and refrigerate until ready to assemble.
Make the Cocktail Sauce In a bowl, whisk together ketchup, horseradish, lemon juice, Worcestershire sauce, hot sauce, and garlic powder. Taste and adjust horseradish and hot sauce to your preferred spice level. Cover and refrigerate for at least 30 minutes to allow flavors to develop. This can be made up to 1 week ahead.
Assemble the Shooters Place a small amount of shredded lettuce or micro greens in the bottom of each shot glass. Add a spoonful of cocktail sauce. Add a few pieces of diced avocado. Hang 2-3 shrimp on the rim of each glass with tails pointing up for easy grabbing.
Chill and Serve Keep shooters refrigerated until serving time. Arrange on a serving tray with extra lemon wedges and small spoons for scooping up any remaining sauce.
Top Tips for Perfect Shrimp Cocktail Shooters
Don’t overcook the shrimp—they should be just opaque and still tender. The ice bath stops the cooking process immediately. For the best presentation, use uniformly sized shrimp. Butterfly large shrimp by cutting down the back to help them hook over the glass rims. These can be assembled up to 2 hours before serving. Keep everything cold—warm shrimp cocktail isn’t appetizing. For a fancier presentation, use martini glasses or champagne flutes instead of shot glasses.
Storage Tips
Cooked shrimp can be refrigerated for up to 2 days before assembly. Store cocktail sauce separately in the refrigerator for up to 1 week. Once assembled, shooters should be consumed within 2-3 hours for best quality and food safety.
Top Tips for Perfecting NYE Appetizers Seafood
Quality is Everything When it comes to Appetizers seafood, freshness makes the difference between good and spectacular. Shop at reputable fish markets or grocery stores with high turnover. Fresh seafood should smell like the ocean—clean and briny, never fishy or ammonia-like. Don’t be afraid to ask when it arrived and if it’s safe for raw consumption if needed.
Timing Your Preparation Create a timeline working backward from party time. Many components can be prepped ahead—sauces, coatings, and fillings often benefit from resting in the refrigerator. However, final cooking and assembly usually happen close to serving time for optimal texture and temperature. Make a detailed prep schedule so you’re not scrambling.
Temperature Control Matters Keep raw seafood very cold until ready to cook—bacteria multiply rapidly at room temperature. Use ice baths during prep and serving to maintain freshness. Conversely, serve hot appetizers truly hot. Room temperature seafood lacks the wow factor.
Don’t Overcook This is the most common mistake with seafood. Shrimp, scallops, and fish cook quickly and become rubbery when overdone. Watch for visual cues: shrimp turns pink and forms a C-shape, scallops become opaque with light browning, fish flakes easily. When in doubt, slightly undercook—residual heat continues cooking after removal from heat.
Presentation Counts We eat with our eyes first. Use white platters to make colorful seafood pop. Garnish with fresh herbs, lemon wedges, and edible flowers. Arrange appetizers in odd numbers (groups of 3 or 5) for visual appeal. Leave some negative space on the platter—don’t overcrowd.
Accommodate Dietary Needs Always label dishes containing shellfish due to serious allergy concerns. Consider offering at least one or two non-seafood options for guests who don’t eat fish or shellfish. This ensures everyone feels included in your celebration.
Keep It Simple Don’t try to make all 10 appetizers! Choose 3-4 that offer variety in flavor, texture, and temperature. Master a few rather than stress over many. Your guests will appreciate quality over quantity.
Storing and Reheating Tips
Refrigeration Guidelines Most cooked seafood appetizers stay fresh for 2-3 days when properly stored in airtight containers in the refrigerator. Raw seafood should be cooked within 24 hours of purchase. Keep your refrigerator at 40°F or below. Store raw and cooked seafood on separate shelves to prevent cross-contamination.
Freezing Options Some appetizers freeze well, others don’t. Crab cakes, stuffed mushrooms (unbaked), and lobster mac and cheese bites can be frozen for up to 2 months. Wrap individual portions in plastic wrap, then place in freezer bags with the air squeezed out. Label with contents and date. However, avoid freezing anything with raw fish, cucumbers, or lettuce—these become mushy when thawed.
Reheating for Best Results The oven is your best friend for reheating. Preheat to 350°F and reheat until just warmed through, usually 8-12 minutes. This preserves texture better than microwaving. For fried items like calamari or crab cakes, increase temperature to 400°F to restore crispiness. If you must microwave, use 50% power in short bursts to avoid overcooking.
Food Safety Priorities Seafood is particularly susceptible to bacterial growth. Follow the two-hour rule: don’t leave seafood appetizers at room temperature for more than 2 hours (1 hour if temperature is above 90°F). When in doubt, throw it out. It’s not worth the risk of foodborne illness. Keep cold appetizers on ice during your party to maintain safe temperatures.
Make-Ahead Success Many components can be prepped 1-2 days ahead. Sauces, dressings, breadcrumb coatings, and vegetable prep all store well. Form items like crab cakes or stuffed mushrooms and refrigerate unbaked. Cook fresh seafood the day of or the night before at most. Keep detailed notes on what you prepped when to track freshness.
Frequently Asked Questions
Can I use frozen seafood for these recipes? Absolutely! Many times, frozen seafood is fresher than “fresh” seafood at the grocery store because it’s frozen immediately after being caught. Thaw frozen seafood in the refrigerator overnight, never at room temperature. Pat it very dry before cooking. Avoid refreezing previously frozen seafood.
How far in advance can I prepare these appetizers? It depends on the recipe. Sauces and dips can be made 3-5 days ahead. Assembled items like stuffed mushrooms or formed crab cakes can be prepped 24 hours ahead and cooked just before serving. Items requiring assembly like cucumber bites should be assembled no more than 4 hours before your party. Fried items and anything with crispy elements must be cooked just before serving for best results.
What if I can’t find a specific type of seafood? Seafood is very versatile! Substitute shrimp for scallops, crab for lobster, or different white fish varieties interchangeably. The cooking methods remain the same. Just adjust cooking times based on the size and thickness of your substitution.
How do I know if seafood is fresh? Fresh fish should have clear, bright eyes (if whole), firm flesh that springs back when pressed, and a clean ocean smell. Shrimp should be firm with translucent shells. Avoid anything with a strong fishy odor, slimy texture, or discoloration. When shopping, ask to smell before buying—reputable sellers won’t mind.
Are these recipes safe for pregnant women? Pregnant women should avoid raw or undercooked seafood like the tuna tartare, scallop ceviche, and oysters. All other recipes in this collection that use fully cooked seafood are generally safe. However, pregnant women should always consult their healthcare provider about dietary restrictions and avoid high-mercury fish.
Can I make these appetizers gluten-free? Most of these recipes can easily be adapted! Use gluten-free breadcrumbs or almond flour for coatings. Substitute gluten-free flour and pasta for mac and cheese bites. Use gluten-free soy sauce or tamari for Asian-inspired dishes. Check all condiments and seasonings for hidden gluten.
What’s the best way to transport these appetizers to a party? Use sturdy, shallow containers with tight lids. Pack cold items in a cooler with ice packs. Bring crispy coatings or toppings separately and assemble on-site. For hot items, transport them almost fully cooked and finish in the host’s oven. Bring serving platters and garnishes separately for best presentation.
How many appetizers should I plan per person? For an appetizer-only party, plan 8-10 pieces per person. If serving appetizers before a meal, 4-6 pieces per person is sufficient. Consider your guest list—hungry crowds need more, and variety matters. It’s better to have leftovers than run out!
What if my guests have seafood allergies? Seafood allergies can be severe, so take them seriously. Always clearly label which appetizers contain shellfish, fish, or other allergens. Prepare at least 2-3 non-seafood options. Use separate cutting boards and utensils when preparing seafood and non-seafood items to avoid cross-contamination.
Can I prep these appetizers the morning of my party? Yes, but strategically! Morning prep should focus on non-perishable tasks: making sauces, chopping vegetables, setting up your workspace, and preparing any items that need to chill. Cook seafood in the afternoon or evening—no more than 6 hours before serving for best quality and safety.
Tips for Avoiding Common Mistakes
Don’t Let Seafood Sit at Room Temperature This is the cardinal sin of seafood cooking. Bacteria multiply rapidly on seafood left out too long. Keep raw seafood refrigerated until the moment you cook it. During your party, set hot items on warming trays and cold items on ice to maintain safe temperatures.
Avoid Overcrowding the Pan When cooking shrimp, scallops, or frying calamari, overcrowding lowers the temperature and causes steaming instead of searing or frying. This results in rubbery, gray seafood instead of beautifully caramelized, tender bites. Cook in batches and be patient—it makes all the difference.
Don’t Skip the Pat-Dry Step Moisture is the enemy of crispy coatings and proper searing. Always pat seafood completely dry with paper towels before cooking. This single step prevents soggy breadings, promotes browning, and improves texture dramatically.
Never Assemble Too Early Crispy elements become soggy quickly when in contact with wet ingredients. Wait until the last possible moment to assemble items like tuna tartare on wonton chips or top oysters with sauce. Prep all components ahead, then assemble right before serving.
Don’t Forget to Taste as You Go Seafood’s natural saltiness varies, so recipes are guidelines. Taste your sauces and seasonings before serving. Is the cocktail sauce spicy enough? Does the crab filling need more lemon? Adjust and balance flavors to your preference.
Avoid Using Old Bay to Excess Old Bay seasoning is fantastic, but it’s potent. Start with less than you think you need—you can always add more. Too much overwhelms the delicate sweetness of crab and shrimp.
Don’t Buy Seafood Too Far in Advance Unlike meat, seafood deteriorates quickly. Shop for seafood no more than 24 hours before you plan to cook it, ideally the same day. The freshest seafood makes the best appetizers.
Never Rush the Thawing Process If using frozen seafood, don’t thaw it in the microwave or under hot water—this partially cooks the exterior while leaving the interior frozen. Always thaw overnight in the refrigerator or, if pressed for time, submerge sealed packages in cold water, changing the water every 30 minutes.
Nutrition Information (Sample – Garlic Butter Shrimp Skewers)
| Nutrient | Per Serving (3 skewers) |
|---|---|
| Calories | 245 |
| Protein | 28g |
| Total Fat | 14g |
| Saturated Fat | 8g |
| Carbohydrates | 2g |
| Fiber | 0g |
| Sugar | 0g |
| Cholesterol | 215mg |
| Sodium | 340mg |
| Vitamin A | 12% DV |
| Vitamin C | 8% DV |
| Calcium | 6% DV |
| Iron | 15% DV |
Note: Nutritional values are approximate and will vary based on specific ingredients used and portion sizes. These values are provided as general guidance only.
Final Thoughts: Ring in the New Year with Seafood Excellence
Creating a memorable New Year’s Eve celebration doesn’t require professional catering or expensive restaurant reservations. With these 10 spectacular seafood appetizers, you have everything you need to host an unforgettable evening that combines elegance, flavor, and that special touch of coastal luxury.
The beauty of these recipes lies in their versatility. Mix and match to create your perfect menu—perhaps start with light, refreshing options like scallop ceviche spoons and cucumber salmon bites, then progress to heartier choices like crab-stuffed mushrooms and crispy calamari. Balance temperatures and textures: serve some items chilled, others warm and comforting. This variety keeps your spread interesting and ensures every guest finds something they love.
Remember, the key to stress-free entertaining is preparation. Read through recipes completely, make your shopping list, and create a timeline. Prep what you can in advance—sauces, coatings, and component pieces. Save the final cooking and assembly for closer to party time when these dishes truly shine.
Most importantly, don’t lose sight of why you’re cooking: to celebrate with people you care about. These appetizers are meant to bring joy, spark conversations, and create delicious memories as you count down to midnight. If something doesn’t turn out perfectly, laugh it off and enjoy the moment anyway. The best parties are filled with warmth, laughter, and good food shared with great company.
Here’s to a New Year filled with delicious food, wonderful gatherings, and countless reasons to celebrate. May your New Year’s Eve be as spectacular as these seafood appetizers, and may every bite bring happiness to your table.
Happy New Year, and happy cooking!
What’s your favorite seafood appetizer for celebrations? Share your experiences and questions in the comments below! Don’t forget to pin these recipes for your next party and tag us in your creations—we love seeing how these turn out in your kitchen!